Bags of Spices

Favorite Recipes

Category: Sides

  • Paneer

    Paneer

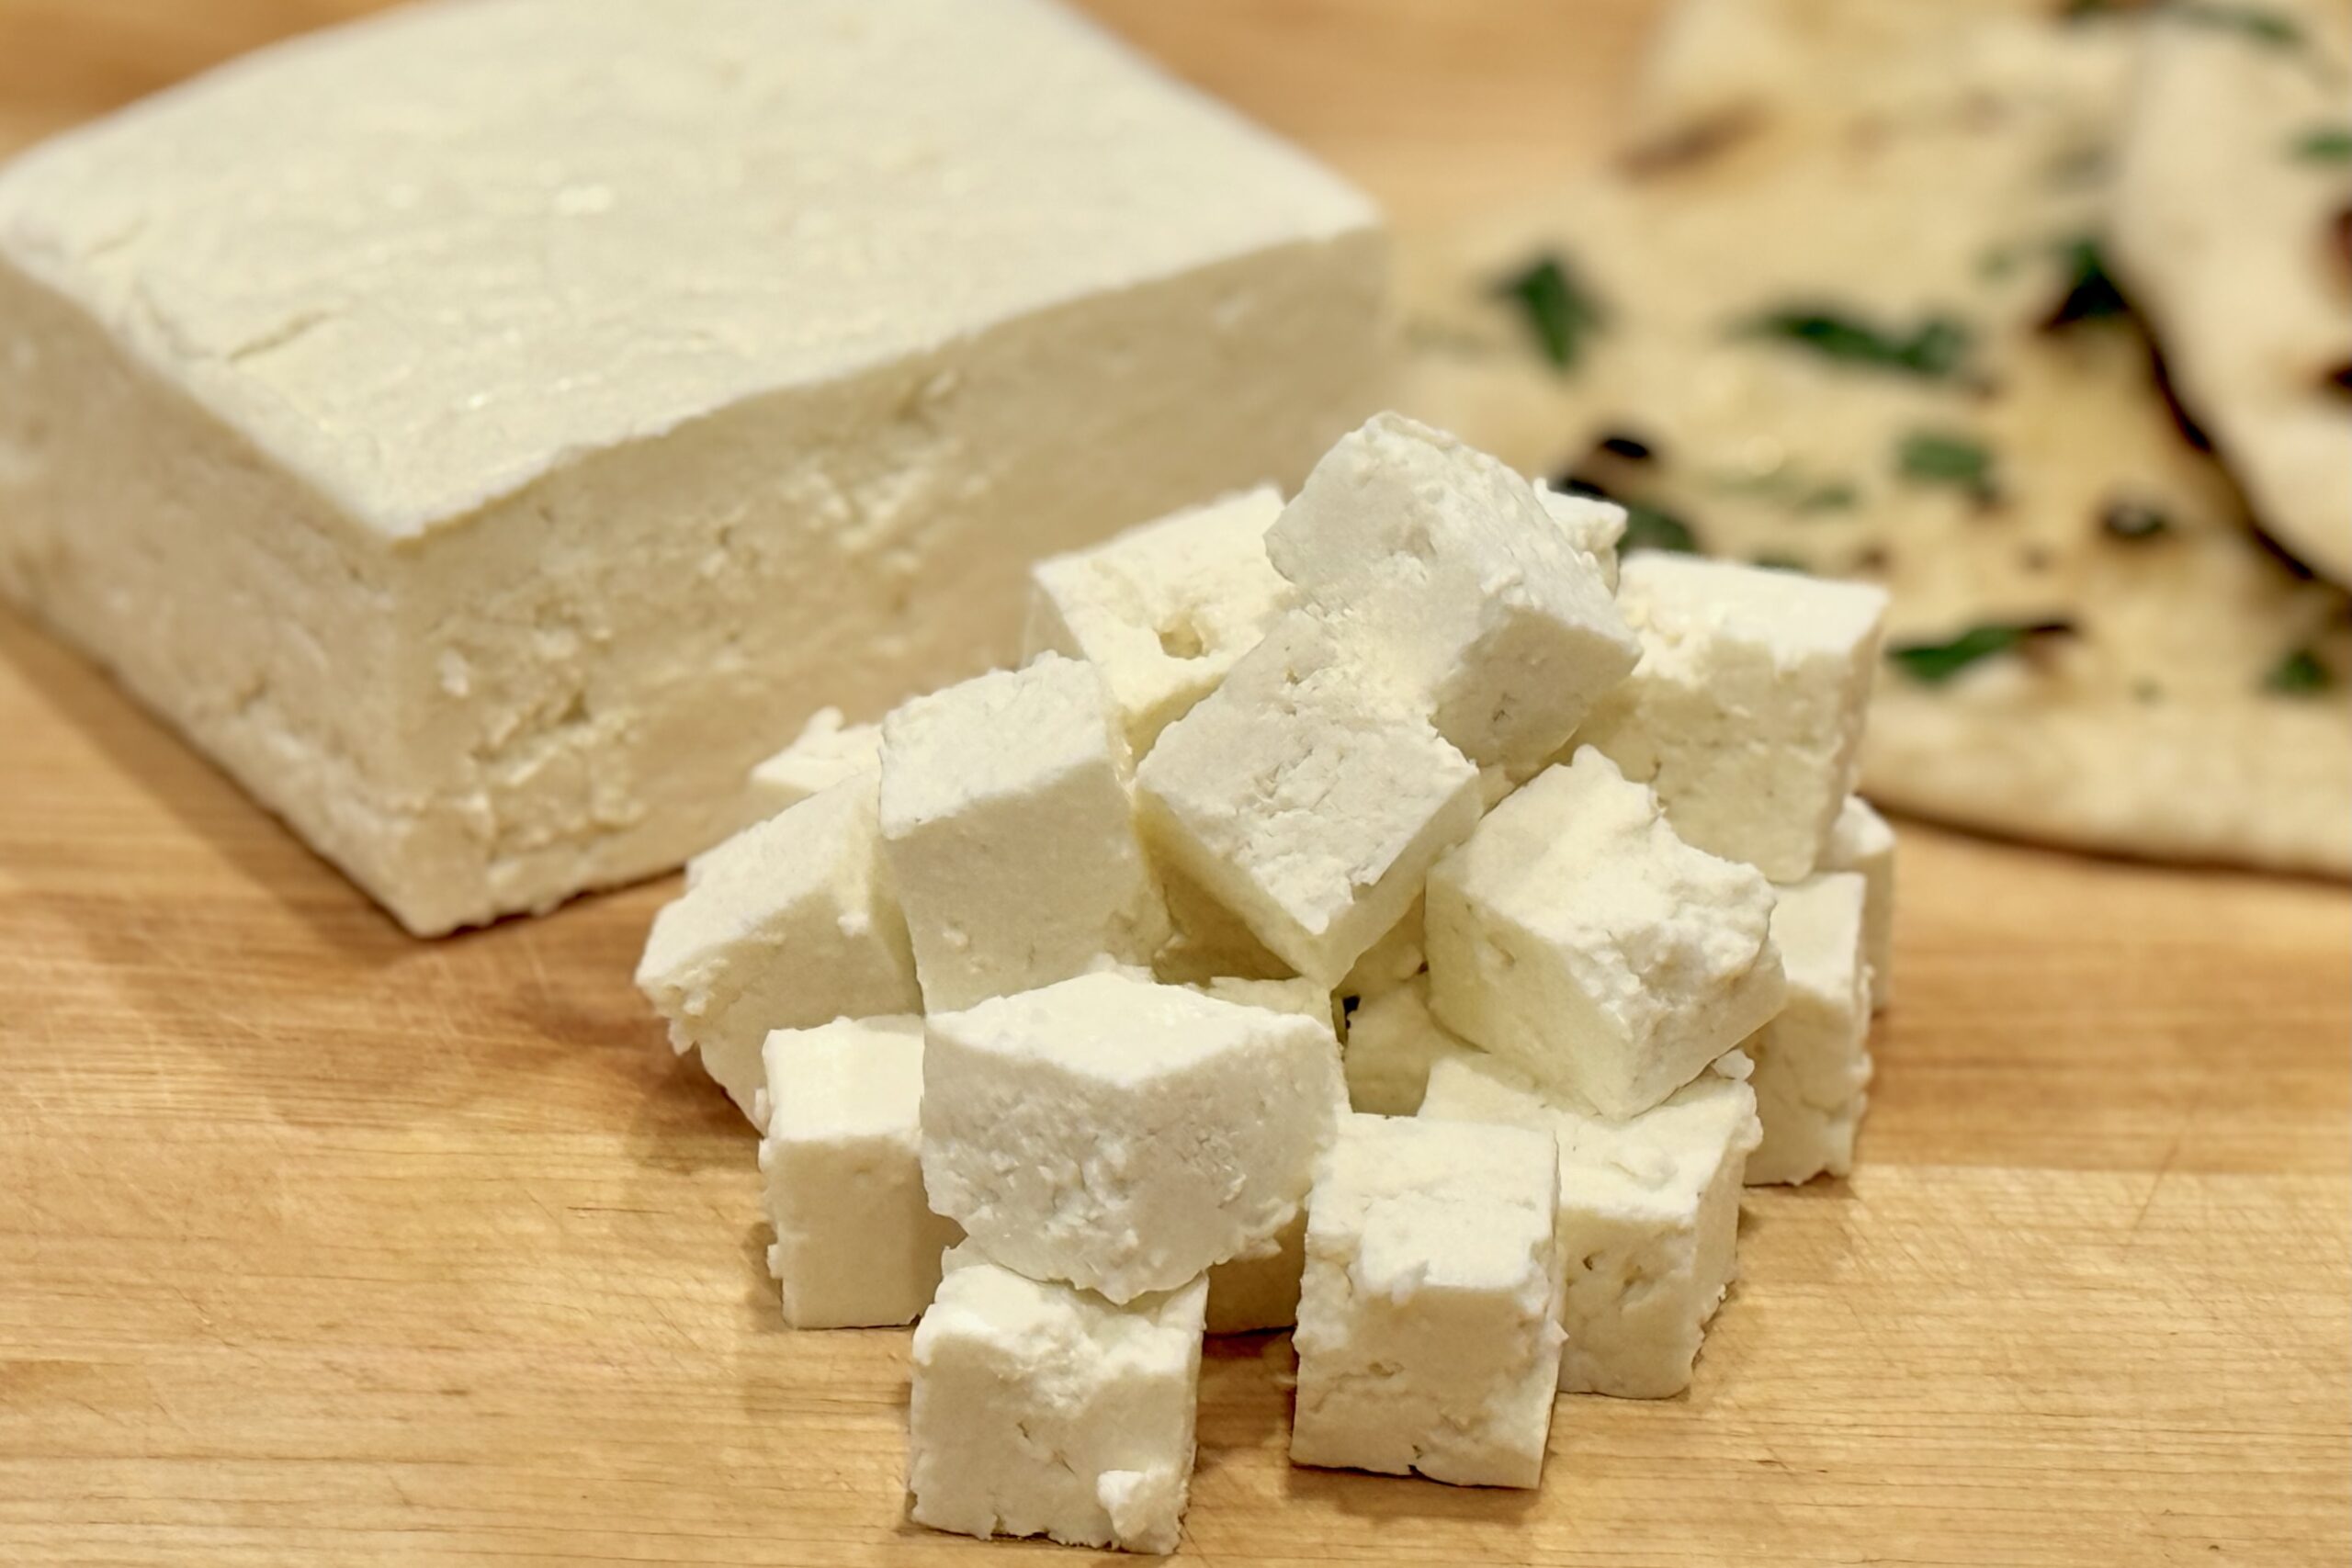
    This traditional homemade paneer is soft, creamy, and fresh with a delicate balance of sweetness and acidity. Made simply from milk, lemon juice, and salt, it forms the foundation of countless Indian dishes—from rich curries like saag paneer to grilled kebabs or golden pan-fried cubes. The process is simple, yielding pure, fresh cheese with a texture you can’t find in store-bought versions.


    Ingredients

    • 1 gallon whole milk (not ultra-pasteurized)
    • ¼ cup lemon juice (plus 1–2 tbsp extra, if needed)
    • 1 tbsp salt

    Directions

    Prepare the Strainer

    Line a fine-mesh strainer or colander with four layers of cheesecloth or a clean cotton kitchen towel. Set the strainer over a large bowl or in the sink to catch the whey.

    Heat and Curdle the Milk

    Pour milk into a large, heavy-bottomed pot over medium-high heat, stirring occasionally to prevent scorching. When warm, add salt and continue heating until the milk comes to a gentle boil. Reduce heat to low.

    Slowly drizzle in lemon juice, 1 tbsp at a time, while gently stirring in a slow figure-eight motion. Within 10–30 seconds, curds should begin separating from the whey. If separation doesn’t occur after 2–3 tbsp, add 1–2 tbsp more until the whey runs mostly clear.

    Drain and Rinse the Curds

    Once curdled, carefully pour the mixture into the prepared strainer. Let drain 5–10 minutes to remove excess whey. Rinse the curds gently under cool running water for a few seconds to remove residual lemon flavor and acidity, taking care not to break up the curds.

    Shape and Press

    Gather the corners of the cheesecloth into a bundle and twist to squeeze out additional liquid. Flatten the cloth-wrapped bundle into a disc about 1 inch thick and place it on a plate or cutting board. Set a heavy weight—such as a pot filled with water or canned goods—on top and press for 30–45 minutes, or until firm and sliceable.

    Chill and Store

    Unwrap the paneer and refrigerate for at least 1 hour before cutting. Store in an airtight container for 3–4 days.


    Notes

    Preparation

    • Paneer can also be formed using a paneer or tofu press; compress 30–45 minutes, or until firm and sliceable.
    • Rinsing the curds lightly improves flavor and keeps the texture tender.
    • Whole milk is essential for rich, creamy paneer; low-fat milk yields drier results.

    Serving Suggestions

    • Cube and fry until golden for dishes like saag paneer or matar paneer.
    • Grill or skewer with vegetables for paneer tikka.
    • Crumble into curries or use as a filling for samosas or wraps.

    Make-Ahead & Storage

    • Refrigerate up to 4 days in an airtight container.
    • Freeze up to 2 months; thaw overnight in the refrigerator before using.
    • Once thawed, pat dry before pan-frying or grilling.
  • Jalapeño-Bacon Smoked Mac & Cheese

    Jalapeño-Bacon Smoked Mac & Cheese

    Smoky, creamy, and loaded with layers of bold flavor, our family’s Jalapeño Bacon Smoked Mac & Cheese takes this comfort classic to the next level. A silky, stabilized cheese sauce coats tender pasta, balanced by the heat of jalapeños, the savoriness of crisp bacon, and often covered in a golden layer of broiled cheese. It’s indulgent yet refined—the kind of mac and cheese that steals the show at any family gathering.


    Ingredients

      Pasta Base

    • 1 lb elbow macaroni
    • salt, for boiling
    • Bacon & Jalapeños

    • 1 lb thick-cut bacon, chopped
    • 1½ cups jalapeños, finely diced with seeds & veins removed
    • 1 tbsp reserved bacon fat
    • Cheese Sauce

    • ¼ cup butter
    • ⅓ cup all-purpose flour
    • ½ tsp smoked paprika
    • ½ tsp dry mustard
    • ½ tsp onion powder
    • ¼ tsp garlic powder
    • 4 cups whole milk
    • 1½ cups heavy cream
    • 1½ tsp sodium citrate
    • 8 oz cream cheese, cubed
    • 8 oz sharp cheddar, grated
    • 8 oz colby jack, grated
    • 4 oz gouda, grated
    • 4 oz emmentaler, grated
    • salt and pepper, to taste
    • Garnish

    • reserved crispy bacon
    • thin jalapeño slices or fresh chives (optional)

    Directions

    Cook the Pasta

    Bring a large pot of salted water to a boil. Add macaroni and cook 2–3 minutes less than al dente, leaving it slightly firm. Drain and rinse under cold water to halt cooking; set aside.

    Prepare the Bacon & Jalapeños

    In a large skillet, cook bacon over medium heat until crisp. Remove with a slotted spoon and drain on paper towels, reserving about 1 tbsp rendered fat.

    Add diced jalapeños to the reserved bacon fat and sauté 2–3 minutes until fragrant and slightly softened. Set aside, reserving some bacon for garnish.

    Make the Roux & Base

    In a large saucepan or cast-iron skillet, melt butter over medium heat. Whisk in flour, smoked paprika, dry mustard, onion powder, and garlic powder; cook 1–2 minutes, whisking constantly until fragrant and lightly golden.

    Gradually whisk in milk and cream until smooth and combined.

    Incorporate Sodium Citrate

    Whisk in sodium citrate until fully dissolved. Bring the mixture just below a simmer—do not boil—to create the base for a smooth, stable sauce.

    Add the Cheeses

    Remove the pan from heat. Add cream cheese, stirring until melted and smooth. Gradually whisk in the grated cheeses in small handfuls, allowing each addition to melt before adding the next. Season to taste with salt and pepper; the sauce should be glossy and pourable.

    Combine

    Fold in cooked bacon (reserve a handful for garnish) and sautéed jalapeños. Add pasta and stir to coat evenly.

    If the sauce thickens too much, stir in a splash of reserved pasta water or milk to loosen.

    Smoke the Mac & Cheese

    Preheat pellet grill to 165°F / 74°C. Transfer mac and cheese to a greased 12-inch cast-iron pan or baking dish. Smoke uncovered for 1–2 hours, stirring after 15 and 30 minutes for even flavor absorption.

    Increase temperature to 225°F / 107°C for the final 15 minutes to slightly tighten and toast the surface.

    Cheese Finish

    Removing from the smoker and sprinkle a thin, even layer of shredded cheddar or gouda over the top. Place under a broiler for 2–4 minutes, watching closely, until golden and bubbling with crisp edges.

    Let rest 5–10 minutes before serving.

    Garnish & Serve

    Top with reserved crispy bacon and garnish with thin jalapeño slices or fresh chives. Serve warm, directly from the skillet for best presentation.


    Notes

    Preparation

    • sodium citrate ensures a stable, silky sauce that resists separation, even during smoking or reheating.
    • cold-smoking the cheese before grating adds a deeper, more developed smoke flavor.
    • a pinch of chipotle powder or smoked salt can be used to enhance depth without adding much heat.
    • let the mac and cheese rest briefly before serving to help the sauce set slightly.

    Serving Suggestions

    • serve alongside barbecue favorites like smoked ribs, pulled pork, or brisket.
    • use leftovers as a rich filling for grilled cheese sandwiches or baked stuffed peppers.
    • top with additional crisp bacon or caramelized onions for added texture and flavor.

    Make-Ahead & Storage

    • refrigerate up to 4 days in an airtight container.
    • reheat gently in the oven or smoker at low temperature; avoid direct stovetop reheating after cheese is added.
    • freeze up to 2 months; thaw overnight in the refrigerator before reheating.
  • Char Siu

    Char Siu

    With 60 first cousins on just the Huggins side, family parties are rarely small. It isn’t unusual to have 40 to 75 guests for dinner at our get-togethers. Cooking for that many people forces a bit of food-preparation creativity, and this char siu takes advantage of sous-vide precision to simplify the process. For a more traditional method, the pork can also be cooked and basted over a hot charcoal grill for deep, smoky flavor.


    Ingredients

    • 3–4 lbs pork shoulder, cut into 3–4 long strips, about 2 inches thick (see Notes for pork belly option)
    • Marinade:

    • ¾ cup soy sauce
    • ½ cup hoisin sauce
    • ½ cup Shaoxing wine (or dry sherry)
    • ½ cup rock sugar, crushed (or ¼ cup rock sugar + ¼ cup white sugar)
    • 2 tbsp oyster sauce (optional, adds depth)
    • 2 tbsp grated fresh ginger
    • 4 garlic cloves, minced
    • 1 tsp toasted sesame oil
    • 1 tsp Chinese five-spice powder
    • ½ tsp ground white pepper
    • ⅛ tsp pink curing salt #1 (optional, for rosy interior)
    • 3–5 drops red food coloring (optional, classic look)
    • Glaze:

    • 1 cup reserved marinade, strained
    • ¼–⅓ cup honey

    Directions

    Marinate the Pork

    Whisk together all marinade ingredients except the curing salt and honey. Reserve 1 cup of marinade, strain, and refrigerate for the glaze.

    Add curing salt to the remaining marinade. Place pork strips in vacuum-seal bags or heavy zipper bags and add the marinade. Seal and refrigerate at least 8–12 hours, up to 24 hours.

    For best flavor and color penetration, turn the bags occasionally during marinating.

    Sous-Vide Cook

    Preheat the sous-vide water bath to 65°C (149°F). Submerge the sealed pork and cook for 12–16 hours.

    When done, remove the pork and transfer to a rack set over a sheet pan. Pat dry gently.

    Prepare the Glaze

    In a small saucepan, combine the reserved marinade with honey. Simmer over medium heat until reduced by about half and syrupy. Keep warm.

    Dry and Broil

    Let the pork rest uncovered on the rack for 15–20 minutes so the surface becomes slightly tacky. This helps the glaze adhere during broiling.

    Preheat your broiler (or charcoal grill) to very hot. Brush the pork with glaze and broil 6–8 minutes total, turning and re-glazing every 1–2 minutes until lacquered with caramelized edges and light char.

    Keep pork about 6 inches from the broiler to prevent burning. Final internal temperature should be approximately 68–70°C (155–158°F), though the meat is already fully cooked from the sous-vide process.

    Rest and Serve

    Let pork rest 5 minutes, then slice into thick pieces. Drizzle with warm glaze before serving.


    Notes

    Preparation

    • Crushing rock sugar before measuring ensures accurate sweetness and easier dissolving.
    • Optional curing salt deepens the rosy color but does not affect flavor.
    • Turning the pork during marinating promotes even seasoning and color.

    Serving Suggestions

    • Serve over steamed jasmine rice or noodles.
    • Pair with pickled cucumbers or a crisp slaw to balance richness.
    • Excellent in bao buns or sliced thinly for fried rice.

    Variations

    • Pork Belly Version: Remove skin, cut into 1½–2-inch strips, reduce sugar to ⅓ cup total, sous-vide at 70°C (158°F) for 10–12 hours, broil from 8 inches away, glazing every minute.
    • Grill Instead of Broil: Cook over hot charcoal, glazing and turning every 1–2 minutes until lacquered.
    • Extra Caramelization: Increase honey in the glaze up to ½ cup for a deeper lacquer.

    Make-Ahead & Storage

    • Pork can be marinated up to 24 hours in advance.
    • Sous-vide cooked pork can be chilled in the sealed bags up to 48 hours before finishing.
    • Leftovers keep 3–4 days refrigerated; broil briefly to refresh the glaze.
  • Cilantro Lime Rice

    Cilantro Lime Rice

    Fluffy jasmine rice infused with fresh lime and cilantro—simple, bright, and perfectly balanced to complement tacos, grilled meats, or saucy dishes. A touch of butter enhances richness while the zest and juice keep every bite fresh and aromatic. Click here for the Instant Pot version of this recipe.


    Ingredients

    • 1 cup jasmine rice, rinsed and drained
    • 1 tbsp butter
    • 1½ cups chicken broth (or vegetable broth)
    • 1 clove garlic, minced (optional)
    • Zest of 1 lime
    • 1–1½ tbsp fresh lime juice (to taste)
    • ½ cup cilantro leaves, finely chopped
    • ⅛ tsp sugar (to round acidity)
    • Salt to taste

    Directions

    Toast the Rice

    In a saucepan or rice cooker insert, melt butter over medium heat. Add rice (and garlic, if using) and sauté 2–3 minutes until grains appear glossy and lightly golden.

    Cook the Rice

    Add broth and a generous pinch of salt. Stir once, bring to a simmer, then cover and reduce heat to low. Cook for 15 minutes, then remove from heat and let stand, covered, for 10 minutes to finish steaming.

    Finish with Lime and Cilantro

    In a small pan, warm lime zest with a few drops of butter until aromatic (optional but enhances flavor).

    Fluff rice gently with a fork and fold in lime zest, lime juice, cilantro, and sugar. Taste and adjust salt or lime as desired.

    Serve

    Serve warm as a side or base for tacos, grilled meats, or saucy dishes where a bright, citrusy accent balances richness.


    Notes

    Preparation

    • Rinse jasmine rice until water runs mostly clear to remove excess starch and keep grains fluffy.
    • Let cooked rice rest 10 minutes before fluffing to allow steam to redistribute for perfect texture.
    • Warming lime zest in butter releases aromatic oils and coats grains more evenly.
    • Adjust lime and salt balance at the end—rice should taste bright but not sharp.

    Serving Suggestions

    • Pairs beautifully with tacos, fajitas, or grilled seafood.
    • Excellent base for burrito bowls or enchilada platters.
    • Top with extra cilantro and a sprinkle of lime zest for presentation.

    Variations

    • Subtle Coconut Version: Replace ¼ cup of broth with ¼ cup unsweetened coconut milk (1¼ cups broth + ¼ cup coconut milk). Adds gentle creaminess and a faint coconut aroma while maintaining lime-cilantro brightness.
    • Coconut-Forward Version: Replace ½ cup of broth with ½ cup coconut milk (1 cup broth + ½ cup coconut milk). Creates a richer, tropical flavor—use 2 tbsp lime juice and season more assertively with salt.
    • Use coconut versions for fusion dishes like Korean Pulled-Pork Tacos, jerk chicken, or grilled shrimp where a creamy contrast enhances spice and smoke.

    Make-Ahead & Storage

    • Cooked rice can be held warm for up to 30 minutes before adding lime and cilantro.
    • Refrigerate leftovers in an airtight container up to 3 days; reheat gently with a drizzle of broth or water to restore moisture.
    • Fresh cilantro and lime juice should always be added just before serving for best color and flavor.
  • Cilantro Lime Rice (Instant Pot)

    Cilantro Lime Rice (Instant Pot)

    This Instant Pot version of Cilantro-Lime Rice delivers the same bright, aromatic flavor as the stovetop method in a fraction of the time. Jasmine rice cooks up fluffy and tender with perfect lime-cilantro balance—ideal for tacos, fajitas, enchiladas, or grilled meats. Click here for the stovetop version of this recipe.


    Ingredients

    • 1 cup jasmine rice, rinsed and drained
    • 1 tbsp butter or olive oil
    • 1 cup chicken broth (or water + ¼ tsp salt)
    • Zest of 1 lime
    • 1–1½ tbsp fresh lime juice (added after cooking)
    • ½ cup cilantro leaves, finely chopped
    • ⅛ tsp sugar (optional, to balance acidity)
    • Salt to taste

    Optional Add-Ins

    • 1 small clove garlic, minced (sauté before adding rice)
    • 1 bay leaf (for subtle herbal aroma)

    Directions

    Rinse the Rice

    Rinse jasmine rice in a fine-mesh strainer under cold water until the water runs mostly clear to remove excess starch. Drain well.

    Sauté

    Set the Instant Pot to Sauté. Melt butter or heat oil, then add garlic if using. Stir in drained rice and toast for 1–2 minutes until lightly fragrant.

    Press Cancel to stop the sauté function.

    Pressure Cook

    Add chicken broth and a pinch of salt. Stir once to distribute evenly, then secure the lid and set the valve to Sealing.

    Cook on High Pressure for 3 minutes. Allow pressure to release naturally for 10 minutes, then manually release any remaining steam.

    Finish the Rice

    Fluff the rice gently with a fork. Stir in lime zest, lime juice, cilantro, and sugar (if using). Taste and adjust seasoning with more salt or lime juice as needed.

    Let rest uncovered for 2–3 minutes to allow excess steam to escape before serving.

    Serve

    Serve warm as a side or base for tacos, fajitas, enchiladas, or grilled meats. Garnish with additional cilantro and lime zest if desired.


    Notes

    Preparation

    • Use a 1:1 ratio of rice to liquid for the Instant Pot—no evaporation means less liquid is required than on the stove.
    • Do not add lime juice before pressure cooking; acid interferes with proper rice hydration.
    • Natural release for 10 minutes ensures fluffy, evenly cooked grains.
    • Let rice rest uncovered for a few minutes after fluffing to release steam and maintain perfect texture.

    Serving Suggestions

    • Pairs beautifully with tacos, fajitas, grilled shrimp, or chicken.
    • Use as a flavorful base for burrito bowls or enchilada platters.
    • For color and brightness, top with extra cilantro and a sprinkle of lime zest before serving.

    Variations

    • Subtle Coconut Version: Replace ¼ cup of broth with ¼ cup unsweetened coconut milk (use ¾ cup broth + ¼ cup coconut milk). Adds gentle richness and a faint coconut aroma while maintaining lime-cilantro brightness.
    • Coconut-Forward Version: Replace ½ cup of broth with ½ cup coconut milk (use ½ cup broth + ½ cup coconut milk). Yields a creamier, tropical variation—use 2 tbsp lime juice and slightly more salt to balance flavor.
    • For added aromatics, sauté a small piece of shallot or a few cilantro stems with the rice.

    Make-Ahead & Storage

    • Cooked rice can be held warm in the Instant Pot for up to 30 minutes before adding lime and cilantro.
    • Refrigerate leftovers in an airtight container for up to 3 days; reheat with a splash of broth or water to restore moisture.
    • Not recommended for freezing—fresh cilantro and lime flavor are best enjoyed fresh.
  • Mexican Rice

    Mexican Rice

    Fluffy, richly flavored Mexican rice made in the Instant Pot without the risk of burning. Toasted rice, sautéed aromatics, and a homemade Mexican Tomato Sauce create deep color and balanced heat, while careful layering and adjusted liquid ratios ensure perfect texture every time.


    Ingredients

    • 3 cups basmati rice, rinsed and drained
    • 3 tbsp avocado oil
    • 1 tbsp lard (optional, for richness)
    • ½ tsp annatto powder (optional, for color)
    • 1½ cups prepared Mexican Tomato Sauce (see recipe)
    • 2¾ cups chicken broth
    • ½ tsp table salt
    • ½ medium onion, diced
    • 1–2 jalapeños, diced
    • 1 tbsp butter (for finishing)
    • fresh cilantro, chopped, for garnish
    • lime wedges, for serving

    Directions

    Rinse the Rice

    Place rice in a fine-mesh strainer and rinse under cold running water for 1–2 minutes, or until the water runs mostly clear. Drain well.

    Sauté the Aromatics

    Heat a deep sauté pan over medium-high heat; add 1 tbsp avocado oil. When shimmering, add onion and jalapeño. Sauté until the edges of the onion begin to brown and the jalapeño softens slightly. Transfer the mixture to a bowl and set aside.

    Toast the Rice

    Add remaining 2 tbsp avocado oil and the lard (if using) to the same pan. Once the oil is hot, add the drained rice and cook, stirring occasionally, until lightly golden and fragrant, 5–7 minutes.

    Stir in annatto powder (if using) for 30 seconds, just until color deepens. Deglaze the pan with a few tablespoons of chicken broth, scraping up any toasted bits. Transfer the rice to the Instant Pot.

    Layer and Pressure Cook

    Pour the remaining chicken broth into the Instant Pot over the rice. Sprinkle in salt but do not stir. Gently pour the Mexican Tomato Sauce over the top—again, do not stir. This layering prevents the thicker sauce from touching the bottom and triggering a burn warning.

    Secure the lid and set to Pressure Cook – High for 3 minutes. Allow pressure to release naturally for 10 minutes with Keep Warm on, then turn off Keep Warm and release any remaining pressure manually.

    Fluff and Finish

    Let the rice rest for 2–3 minutes after opening the lid. Fluff gently with a fork, then fold in the reserved jalapeño mixture and the butter. Allow residual heat to melt the butter and evenly coat the grains.

    Let rest uncovered for 3–5 minutes before serving to release excess steam and preserve texture.

    Serve

    Garnish with chopped cilantro and serve with lime wedges. For a stronger tomato flavor, drizzle with additional Mexican Tomato Sauce before serving.


    Notes

    Preparation

    • Total liquid increased to 4¼ cups (2¾ cups broth + 1½ cups sauce) for even cooking and no burn warnings.
    • Layer liquids—broth first, sauce last—and avoid stirring before cooking.
    • Deglaze the pan after toasting the rice to remove any stuck bits that can trigger burn errors.
    • Natural release for 10 minutes ensures fluffy, separate grains without overcooking.
    • Rest uncovered briefly after fluffing to let excess steam escape for perfect texture.

    Serving Suggestions

    • Serve with enchiladas, tacos, grilled meats, or any saucy main dish.
    • Use as a flavorful base for burrito bowls or stuffed peppers.
    • Top with extra cilantro and a squeeze of lime for brightness.

    Variations

    • Substitute vegetable broth for chicken broth for a vegetarian version.
    • For deeper color and richness, always include annatto and lard.
    • For milder heat, use just one jalapeño or remove the seeds before dicing.

    Make-Ahead & Storage

    • This rice reheats beautifully and maintains texture when stored properly.
    • Refrigerate in an airtight container up to 4 days.
    • Reheat gently on the stove or in the microwave with a splash of broth to restore moisture.
    • Freeze up to 2 months; thaw overnight in the refrigerator before reheating.
  • Braised Fennel

    Braised Fennel

    This elegant side transforms fennel’s natural sweetness into something truly special. Lightly caramelized and gently braised with shallots, garlic, and white wine, the tender fennel is finished with butter, lemon zest, and fresh fennel fronds for a glossy, aromatic dish worthy of any restaurant table.


    Ingredients

    • 2–3 fennel bulbs, trimmed and quartered lengthwise (cores intact)
    • 2 tbsp olive oil or butter
    • 1 shallot, thinly sliced
    • 1 clove garlic, thinly sliced
    • ¼ cup dry white wine or 1 tbsp lemon juice
    • 1 cup chicken stock
    • ½ tsp honey (optional)
    • 1 tbsp butter (for finishing)
    • salt and freshly ground black pepper, to taste
    • zest of ½ lemon, for garnish
    • chopped fennel fronds or parsley, for garnish

    Directions

    Brown the Fennel

    In a large sauté pan, heat olive oil or butter over medium-high heat. Add fennel quarters cut-side down and cook until deeply golden on both cut sides, about 3–4 minutes per side. Remove and set aside.

    Build the Aromatic Base

    Add shallot and garlic to the pan; sauté 30 seconds, just until fragrant. Deglaze with white wine (or lemon juice), scraping up any browned bits.

    Braise

    Add chicken stock and honey, if using. Return fennel to the pan, cut-side up. Bring to a simmer, reduce heat to low, and cover. Braise gently for 15–20 minutes, turning once, until fennel is tender but still holds its shape.

    Glaze & Finish

    Remove the lid and simmer uncovered for 5–7 minutes more, allowing the liquid to reduce into a glossy glaze. Stir in butter off heat to finish the sauce and season with salt and pepper.

    Serve

    Transfer fennel to a serving dish and drizzle with the reduced pan juices. Garnish with lemon zest and chopped fennel fronds or parsley before serving.


    Notes

    Preparation

    • Proper browning is essential—golden edges enhance both flavor and appearance.
    • Use vegetable stock for a vegetarian version.
    • Finishing with butter gives the glaze a rich, silky texture.

    Serving Suggestions

    • Serve as a side with roasted chicken, fish, or creamy polenta.
    • For a richer presentation, finish with freshly grated Parmesan or a drizzle of aged balsamic.
    • Add a sprinkle of toasted breadcrumbs or flaky salt for texture.

    Make-Ahead & Storage

    • Can be braised up to 1 day ahead; cool and refrigerate in its cooking liquid.
    • Reheat gently over low heat, spooning juices over the fennel to re-glaze.
    • Best served warm, but can also be enjoyed at room temperature as part of an antipasto spread.
  • Refried Beans

    Refried Beans

    Rich, creamy, and deeply savory, our family’s recipe for refried beans captures the heart of traditional Mexican cooking with a fraction of the usual time. Each bite balances earthy depth and a hint of sweetness from slow-simmered pinto beans. Whether tucked inside burritos, layered beside Mexican rice, or served simply with warm tortillas, they bring comfort and authenticity to any meal—and once you’ve made them this way, you may never reach for canned beans again.


    Ingredients

      Beans

    • 2 cups dry pinto beans, rinsed and drained
    • 1 onion, diced (or 1 tbsp onion powder)
    • 1 tsp table salt
    • ½ tsp ground cumin
    • 5 cups chicken broth or water
    • Fat (Choose One or a Blend)

    • 2–3 tbsp avocado oil, lard, butter, or a combination
    • Optional Flavor Boosters

    • ¼ cup Mexican Tomato Sauce (recommended for deeper flavor)
    • OR ½ tsp soy sauce or Maggi (for umami depth without tomato flavor)
    • Optional Add-Ins

    • ⅛ tsp Mexican oregano
    • 1 tsp garlic powder (add after cooking)
    • 1 sachet ham bouillon or sazón (optional, for savory richness)

    Directions

    Sauté Aromatics (Optional but Recommended)

    Using the Sauté function, heat 1 tbsp of the fat in the Instant Pot. Add diced onion and cook 2–3 minutes until translucent and fragrant. If using onion powder, add during the Mash step.

    Deglaze with a splash of broth if any browning occurs.

    Cook the Beans

    Add pinto beans, broth, cumin, and salt to the pot. (If using butter, reserve it for after cooking.) If using Mexican Tomato Sauce for integrated flavor, stir it in now—or stir it in later during the refry step as a finisher.

    Set to Pressure Cook – High for 60 minutes. When complete, allow natural release for 10–15 minutes, then release remaining pressure manually.

    Mash or Refry

    Drain beans lightly, reserving at least ½ cup of the cooking liquid. For classic mashed texture, return beans to the pot, add fat, and mash to desired smoothness using a potato masher, hand mixer, or immersion blender. Add liquid as needed for consistency.

    For authentic refried texture, heat remaining fat in a large skillet over medium-high heat. Add beans and mash directly in the pan, stirring occasionally until thickened and slightly toasty (about 5 minutes). Stir in reserved broth as needed for a silky, spreadable consistency. If using Mexican Tomato Sauce as a finisher, add 2–3 tbsp during this stage and cook until slightly reduced and glossy.

    Rest and Serve

    For best flavor, refrigerate overnight and reheat before serving. The beans thicken slightly as they cool, deepening both flavor and texture.


    Notes

    Preparation

    • For richer flavor, add ¼ cup Mexican Tomato Sauce or ½ tsp soy sauce/Maggi during cooking or mashing (omit if serving entrées with green sauce bases).
    • Mashing the beans in hot fat develops a nutty flavor and glossy, restaurant-style finish.
    • Reserve some cooking liquid and add as needed to reach your preferred consistency.
    • Beans improve overnight as flavors meld and starches set.

    Serving Suggestions

    Make-Ahead & Storage

    • Refrigerate up to 5 days in an airtight container.
    • Freeze up to 3 months; thaw overnight in the refrigerator before reheating.
    • Reheat gently on the stovetop or in the microwave, adding a splash of broth or water to loosen if thickened.