Bags of Spices

Favorite Recipes

Breads

Fresh-baked comfort — rolls, quick breads, flatbreads, holiday loaves, and international favorites perfect for breakfast, sides, and gatherings.

  • North Woods Garlic Cheese Bread

    North Woods Garlic Cheese Bread

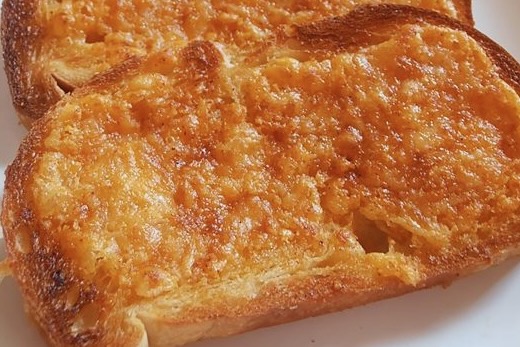
    This garlic cheese bread captures the rich, gooey, paprika-tinted flavor of the beloved North Woods Inn classic—warm, buttery, deeply savory, and loaded with cheddar. This version adds the option for an ultra-smooth melt while keeping the rustic cheese bits that make the original so iconic.


    Ingredients

    • ¾ lb cheddar cheese, grated (reserve ½ cup for pulsing in at the end)
    • 2 oz Romano cheese, grated
    • 8 oz butter, room temperature
    • 1 small clove garlic, grated (or ¾ tsp garlic powder)
    • 1 tsp Hungarian sweet paprika
    • ½ tsp Tabasco sauce
    • 2 tsp Worcestershire sauce
    • Optional: 1–2 tsp sodium citrate (for an extra-smooth, gooey melt)
    • salt, to taste
    • 2 loaves French or sourdough bread, sliced
    • Hungarian sweet paprika, for sprinkling after broiling

    Directions

    Prepare the Cheese Spread

    Combine all ingredients except ½ cup of the cheddar in a food processor. Blend until smooth, cohesive, and richly colored.

    Taste and adjust salt if needed—the mixture should be boldly savory.

    Add the reserved cheddar and pulse 2–3 times to leave small, visible cheese pieces suspended in the spread.

    Assemble & Broil

    Spread the cheese mixture generously onto sliced French or sourdough bread.

    Place under the broiler until the top is melted with darkened, blistered spots—this light caramelization is essential for authentic North Woods flavor.

    Remove from the broiler and lightly dust with Hungarian sweet paprika. Wrap in foil to keep warm until serving.


    Notes

    Preparation

    • French bread gives the most classic soft, gooey texture; sourdough creates a firmer, tangier base.
    • Sodium citrate is optional but helps the cheese melt into an ultra-smooth, cohesive layer without separating.
    • Taste the spread before adding salt—Romano and cheddar vary in saltiness.

    Serving Suggestions

    • Serve alongside steaks, ribs, or salad for a full North Woods–style meal.
    • Excellent as an appetizer when cut into strips or squares.

    Variations

    • Add a pinch of cayenne or smoked paprika for a spicy or smoky accent.
    • Use sharp white cheddar for a milder color and deeper tang.

    Make-Ahead & Storage

    • The cheese spread can be made up to 3 days ahead and refrigerated in an airtight container.
    • Bring to room temperature before spreading for smoothest application.
    • Bread is best enjoyed immediately after broiling.
  • Pão de Queijo — Brazilian Cheese Rolls

    Pão de Queijo — Brazilian Cheese Rolls

    Crisp on the outside and chewy within, these Brazilian cheese rolls—known as Pão de Queijo—are irresistibly airy and full of cheesy flavor. Made from tapioca flour, they’re naturally gluten-free and come together quickly in a blender for an easy, crowd-pleasing treat.


    Ingredients

    • 1 egg
    • 1 cup milk
    • ½ cup vegetable oil
    • 1¾ cups tapioca flour
    • ½ cup parmesan, grated
    • ½ cup mozzarella, cheddar, or jack cheese, grated
    • ½ tsp table salt

    Directions

    Prepare the Batter

    Preheat oven to 350°F (175°C). Spray a 24-cup mini muffin tin with nonstick cooking spray.

    In a blender, combine egg, milk, and oil. Blend for 30 seconds, then add the remaining ingredients and blend for another 30 seconds until smooth.

    Bake

    Pour batter into the prepared muffin cups, filling each about ¾ full. Bake for 20–25 minutes, or until the cheese rolls are puffed and golden.

    Serve warm for the best texture. Makes about 35–40 cheese rolls.

    Store

    Allow cheese rolls to cool completely before storing. Place in an airtight container and refrigerate up to 3 days or freeze up to 1 month. Reheat in a 350°F oven for 5–10 minutes until warmed through.


    Notes

    Preparation

    • Avocado oil is preferred, but olive oil or any neutral vegetable oil works well.
    • Tapioca flour gives Pão de Queijo its signature chewy texture—do not substitute with wheat flour.

    Serving Suggestions

    • Serve as a snack, breakfast bread, or alongside soups and stews.
    • Enjoy warm with butter, cream cheese, or fruit preserves for a sweet-savory contrast.

    Variations

    • Add ½ tsp garlic powder or minced herbs for extra flavor.
    • Swap in pepper jack for a spicy version or gouda for a milder flavor.

    Make-Ahead & Storage

    • Refrigerate baked rolls up to 3 days in an airtight container.
    • Freeze baked or unbaked batter portions up to 1 month.
    • Reheat frozen rolls directly in a 350°F oven for 10–12 minutes until hot and crisp.
  • Buttermilk Biscuits

    Buttermilk Biscuits

    Tall, flaky, and tender, these buttermilk biscuits are our elevated take on a classic Southern staple. Grated butter, gentle folds, and a blast of high heat create dramatic layers, while buttermilk adds subtle tang and softness. Perfect for Sunday breakfast, sausage gravy, or warm from the oven with a generous swipe of butter.


    Ingredients

      Biscuits

    • 4 cups self-rising flour
    • 1–2 tbsp sugar (optional)
    • ¾ cup unsalted butter, grated and frozen 10–15 minutes
    • ¼ cup shortening (optional, adds tenderness)
    • 1 large egg (or omit for fluffier, more delicate biscuits)
    • 1½ cups buttermilk, plus more as needed
    • ½ tsp table salt (recommended for flavor balance)
    • Glaze

    • 1 egg, beaten
    • 1 tbsp buttermilk

    Directions

    Prepare the Dough

    Preheat oven to 475ºF (245ºC). Line a baking sheet with parchment paper.

    Whisk together self-rising flour, sugar (if using), and salt. Add grated frozen butter and shortening; toss lightly to distribute.

    Stir in the egg (if using), then add buttermilk. Mix gently with a wooden spoon until just combined; add an extra tablespoon of buttermilk at a time only if the dough seems dry.

    Fold & Shape

    Turn dough onto a lightly floured surface. Pat into a rough rectangle about ¾″ thick. Fold the right third over the center, then the left third (like an envelope). Pat back to ¾″, then repeat the fold 2–3 more times.

    Pat to a final thickness of about 1″. Cut biscuits with a sharp cutter, pressing straight down without twisting. Gather scraps, pat gently, and re-cut.

    Arrange biscuits on the prepared baking sheet with sides touching for higher rise.

    Glaze & Bake

    Whisk together egg and buttermilk; brush lightly over the tops.

    Bake at 475ºF for 5 minutes, then reduce heat to 450ºF (no need to open the oven) and bake 6–8 minutes more, or until deeply golden.

    Brush hot biscuits with melted butter. Let rest 5 minutes before serving.


    Notes

    Preparation

    • Freezing the grated butter helps create dramatic layers and prevents premature melting.
    • Using both butter and shortening gives restaurant-quality flakiness and tenderness.
    • For the tallest biscuits, keep dough cold and handle it as little as possible.
    • Patting dough to 1″ thickness produces higher, fluffier biscuits.
    • If substituting all-purpose flour for self-rising flour: use 1 cup all-purpose flour + 1½ tsp baking powder + ¼ tsp salt per cup. For this recipe: 4 cups all-purpose flour + 6 tsp (2 tbsp) baking powder + 1 tsp salt.

    Serving Suggestions

    • Serve with sausage gravy and fried eggs for a classic breakfast.
    • Pair with honey butter, jam, or sorghum molasses.
    • Split and toast leftovers for sandwiches.

    Variations

    • Cheddar & chive biscuits: fold in 1 cup shredded cheddar and ¼ cup chopped chives.
    • Sweet cream biscuits: omit egg and substitute sweet cream for buttermilk.
    • Cinnamon–brown sugar biscuits: add 1 tsp cinnamon and increase sugar to 3 tbsp.

    Make-Ahead & Storage

    • Refrigerate cut, unbaked biscuits up to 1 day; bake straight from fridge.
    • Freeze unbaked biscuits up to 1 month; bake from frozen, adding 2–3 minutes.
    • Baked biscuits keep 2–3 days at room temperature; reheat at 350ºF for 5–7 minutes.
  • Naan

    Naan

    Soft, fluffy, and beautifully blistered, this homemade naan rivals restaurant versions—without the need for a tandoor. Enriched with yogurt for tenderness and cooked quickly on a hot skillet or pizza steel, it’s perfect for scooping up curries, daal, or creamy saag paneer.


    Ingredients

    • ¾ cup warm water (about 110°F / 43°C)
    • 2¼ tsp (1 packet) active dry yeast
    • 1 tsp sugar
    • ⅓ cup whole milk plain yogurt
    • 2 tbsp neutral oil (avocado, canola, sunflower, or vegetable)
    • 1 tbsp milk or melted butter (optional)
    • ⅛ tsp baking powder (optional)
    • 1 tsp salt
    • 2–2½ cups all-purpose flour, plus more for dusting
    • Optional Toppings

    • Melted ghee or butter, for brushing
    • Chopped cilantro, garlic, or nigella seeds

    Directions

    Prepare the Dough

    In a large bowl, combine warm water, yeast, and sugar; stir and let sit 5–10 minutes, until foamy.

    Add yogurt, oil, milk or melted butter (if using), baking powder (if using), and salt. Mix in about 2 cups flour (starting with 1¾ cups and adding more as needed) until a soft, slightly sticky dough forms. Knead 6–8 minutes by hand or 5 minutes in a stand mixer, until smooth and elastic.

    Place dough in a lightly oiled bowl, cover, and let rise in a warm spot 1–2 hours, or until doubled in size.

    Shape the Naan

    Punch down dough. Divide into 8 equal pieces and shape into balls. Cover and rest 10 minutes.

    Roll each ball into a teardrop or oval about ¼-inch thick, dusting with flour as needed to prevent sticking.

    Cook the Naan

    Heat a cast-iron skillet or heavy nonstick pan over medium-high heat until very hot. Place one rolled naan in the dry skillet.

    Cook for 45–60 seconds, until bubbles form and golden brown spots appear. Flip and cook the other side 30–45 seconds. Optional: Flip once more and press gently with a spatula to encourage blistering.

    Repeat with remaining dough, adjusting heat as needed. Brush hot naan with melted butter or ghee and sprinkle with toppings if desired.

    Oven or Pizza Steel Option

    For a tandoor-style finish, place rolled dough on a preheated pizza steel in a 500°F (260°C) oven and bake ~90 seconds until bubbles form and brown spots appear. Flip and cook on the other side for 30-60 seconds. Brush immediately with ghee or butter after removing from the oven.


    Notes

    Preparation

    • Adding 1 tbsp milk or melted butter to the dough enhances softness and browning.
    • A pinch (⅛–¼ tsp) of baking powder can help naan puff more evenly on the stovetop.
    • Lightly misting the skillet or dough with water before cooking adds steam for tenderness.
    • Keep cooked naan warm in a towel-lined bowl or low oven (175°F) until serving.

    Serving Suggestions

    • Serve warm with curries, daal, Saag Paneer, or kebabs.
    • Brush with garlic butter and cilantro for restaurant-style garlic naan.
    • Use as a wrap for butter chicken or other saucy entrées.

    Variations

    • Garlic–Cilantro Naan: Brush rolled dough with garlic butter, sprinkle with chopped cilantro, then cook as usual.
    • Cheese-Stuffed Naan: Seal 2–3 tbsp grated cheese (paneer, mozzarella, or cheddar mix) inside each ball before rolling out.
    • Whole Wheat Naan: Substitute up to 50% white whole wheat flour and add 1–2 tsp extra water as needed.
    • Chilli–Herb Naan: Add ½ tsp crushed red pepper and 1 tbsp chopped herbs (cilantro, mint, or parsley) to dough.
    • Sweet Coconut Naan: Add 1 tbsp sugar to dough and fill with coconut, nuts, and a touch of cardamom.
    • Sesame or Nigella Seed Naan: Brush surface lightly with water, sprinkle seeds, and press gently before cooking.

    Make-Ahead & Storage

    • Refrigerate dough up to 24 hours; bring to room temperature before rolling.
    • Cooked naan can be frozen up to 1 month. Reheat in a 350°F oven for 5–7 minutes or on a hot skillet until warm and soft.
    • Brush with fresh ghee or butter just before serving for best flavor.
  • Soft Pretzels

    Soft Pretzels

    These homemade soft pretzels bake up golden brown, chewy, and buttery—just like the ones from a pretzel shop. The dough can be made quickly for a same-day bake or rested in the refrigerator for a richer, malty flavor and more authentic bakery-style texture.


    Ingredients

    • 1½ cups warm water (105–110°F)
    • 1 packet (2¼ tsp) active dry or instant yeast
    • 1 tsp table salt
    • 1 tbsp brown sugar (or 1 tbsp barley malt syrup for classic flavor)
    • 1 tbsp butter, melted and slightly cooled
    • 3½–4 cups all-purpose flour
    • ½ cup baking soda (see note for enhanced version)
    • 9 cups water
    • kosher or coarse sea salt, for topping
    • 2 tbsp butter, melted (for brushing after baking)

    Optional Egg Wash (for Soft, Glossy Pretzels)

    • 1 egg, beaten with 1 tbsp water

    Directions

    Prepare the Dough

    In a large bowl, combine warm water and yeast. Let stand for about 1 minute until slightly foamy. Stir in table salt, brown sugar, and melted butter.

    Add 3½ cups of flour, one cup at a time, mixing with a wooden spoon until a soft dough forms. If dough is sticky, add up to ½ cup more flour gradually until smooth and slightly tacky but not wet.

    Knead and Rest

    Turn dough onto a lightly floured surface and knead for about 3 minutes until elastic and uniform. Shape into a ball.

    • Quick Version: Cover lightly and let rest for 10 minutes before shaping.
    • Bakery-Style Version: Cover the bowl with plastic wrap and refrigerate 1–2 hours (or up to overnight). Bring to room temperature for 10–15 minutes before shaping.

    Shape the Pretzels

    Preheat oven to 425°F (220°C). Line baking sheets with parchment paper or silicone baking mats.

    Divide dough into 8–10 equal pieces (about 90–100 g each). Roll each piece into a 20-inch rope and twist into a pretzel shape. Place on prepared baking sheets.

    Boil in Baking Soda Solution

    In a large pot, bring 9 cups water and ½ cup baking soda to a gentle boil. For deeper color, bake the baking soda first (spread on a tray and bake at 250°F for 1 hour) before adding it to the water.

    Drop pretzels, one or two at a time, into the boiling solution for 20–25 seconds. Remove with a slotted spoon, drain well, and place on prepared baking sheets.

    Top and Bake

    For traditional bakery-style pretzels, sprinkle with kosher or coarse sea salt immediately after boiling, then bake as directed.

    For a softer, fair-style pretzel, brush with the optional egg wash before sprinkling with salt. Bake for 11–13 minutes, or until deep golden brown with a shiny crust and soft interior.

    Finish

    Brush warm pretzels with melted butter immediately after baking for a glossy finish and tender bite. Serve warm with mustard, cheese sauce, or butter.


    Notes

    Preparation

    • Lower hydration (3½ cups flour to 1½ cups liquid) produces the classic tight, chewy crumb.
    • A short cold ferment (1–2 hours) develops malty depth and improves shaping.
    • Bake baking soda before boiling for more intense pretzel color and flavor.
    • Brushing with butter right after baking adds shine and a soft finish without dulling color.

    Egg Wash vs. Baking Soda Finish

    • Without Egg Wash (Traditional): Deep mahogany color, chewy crust, classic pretzel flavor.
    • With Egg Wash (Soft & Glossy): Lighter golden color, slightly softer texture, mild sheen.
    • Both versions can be brushed with melted butter after baking for extra flavor and softness.

    Serving Suggestions

    • Serve warm with mustard, cheese dip, or honey butter.
    • Top with coarse salt, everything bagel seasoning, or cinnamon sugar for sweet pretzels.
    • Use smaller portions to make pretzel bites or sandwich rolls.

    Make-Ahead & Storage

    • Shaped pretzels can be refrigerated for up to 6 hours before boiling.
    • Freeze shaped, unboiled pretzels up to 1 month; boil directly from frozen before baking.
    • Store baked pretzels airtight up to 2 days; reheat at 350°F for 5–7 minutes to refresh.