Bags of Spices

Favorite Recipes

All-Time Favorites

Our most requested, most repeated, and most loved recipes — the dishes family and friends ask for again and again. These are the crowd-pleasers, comfort foods, and signature flavors that anchor our kitchen.

  • Saté Ajam — Indonesian Chicken Satay

    Saté Ajam — Indonesian Chicken Satay

    When I was living in the Netherlands, I had the good fortune of learning a few Indonesian dishes from a kind little Indonesian grandmother in the beautiful city of Delft. Zuster Volder was from Java, and in her small kitchen she showed me how simple ingredients—ketjap manis, shallots, garlic, and warm spices—could transform humble skewers of meat into something unforgettable. This saté ajam, the Indonesian dish most people know as chicken satay or sate ayam, draws inspiration from those lessons: chicken marinated in sweet soy, coconut milk, and fragrant spices, then grilled over hot coals until caramelized and served with rich Dutch-Indonesian peanut sauce (Pindasaus).


    Ingredients

    Chicken

    • 2 lb boneless skinless chicken thighs
    • Bamboo skewers, soaked in water for at least 30 minutes

    Marinade

    • ¼ cup ketjap manis
    • 1 tbsp vegetable oil
    • 1½ tbsp shallot, finely grated
    • ½ tsp fresh ginger, finely grated
    • ½ tsp fresh galangal, finely grated
    • 1 tbsp brown sugar
    • ¼ tsp ground coriander
    • ¼ tsp ground turmeric
    • ¼ tsp ground cumin
    • 1 clove garlic, minced, or ¼ tsp garlic powder
    • 1 tsp lime juice
    • 2 tbsp coconut milk
    • ⅛ tsp white pepper
    • ¼ tsp baking soda

    Pre-Grill Seasoning

    • 1 tsp ketjap manis
    • 1 tsp vegetable oil
    • Pinch of table salt

    Coconut Milk Baste

    • 2 tbsp coconut milk
    • Pinch of table salt

    For Serving

    • Warm Dutch-Indonesian peanut sauce (Pindasaus)
    • Lime wedges
    • Cucumber slices or Acar Ketimun
    • Fried shallots (optional)
    • Steamed rice or lontong

    Directions

    Prepare the Chicken

    Trim any large excess pieces of fat from the chicken thighs. Cut the meat into long strips about ½–¾ inch thick rather than cubes. This traditional shape lets the chicken fold onto the skewers and gives you more caramelized surface area over the coals.

    Thread the chicken onto the soaked skewers, weaving and folding the strips back and forth so the meat lies fairly flat.

    Make the Marinade

    In a medium bowl, combine the ketjap manis, vegetable oil, grated shallot, ginger, galangal, brown sugar, coriander, turmeric, cumin, garlic, lime juice, coconut milk, white pepper, and baking soda. Stir until the sugar is dissolved and the marinade is well blended.

    Marinate the Chicken

    Add the chicken to the marinade and toss well to coat evenly. Cover and refrigerate for 4–5 hours, or up to 8 hours. This timing gives the flavors time to penetrate while the small amount of baking soda helps the chicken stay especially tender over high charcoal heat.

    Prepare the Grill

    Light a charcoal grill and let the coals burn down until they are very hot and covered with a light layer of ash. You want strong direct heat for fast caramelization, but not roaring flames.

    In a small bowl, stir together the coconut milk and a pinch of salt for the baste. In a second small bowl, combine the ketjap manis, oil, and pinch of salt for the pre-grill seasoning.

    Season and Grill the Satay

    Remove the skewers from the refrigerator. Lightly brush or toss the skewered chicken with the pre-grill seasoning. Leave a light coating of marinade on the meat rather than wiping it clean; that helps create the classic lacquered satay crust.

    Place the skewers over direct heat and grill for about 2–3 minutes per side, turning frequently so the sugars caramelize without scorching. During the last minute or two of cooking, brush lightly with the coconut milk baste.

    Cook until the chicken is lightly charred in spots and reaches 165°F.

    Serve

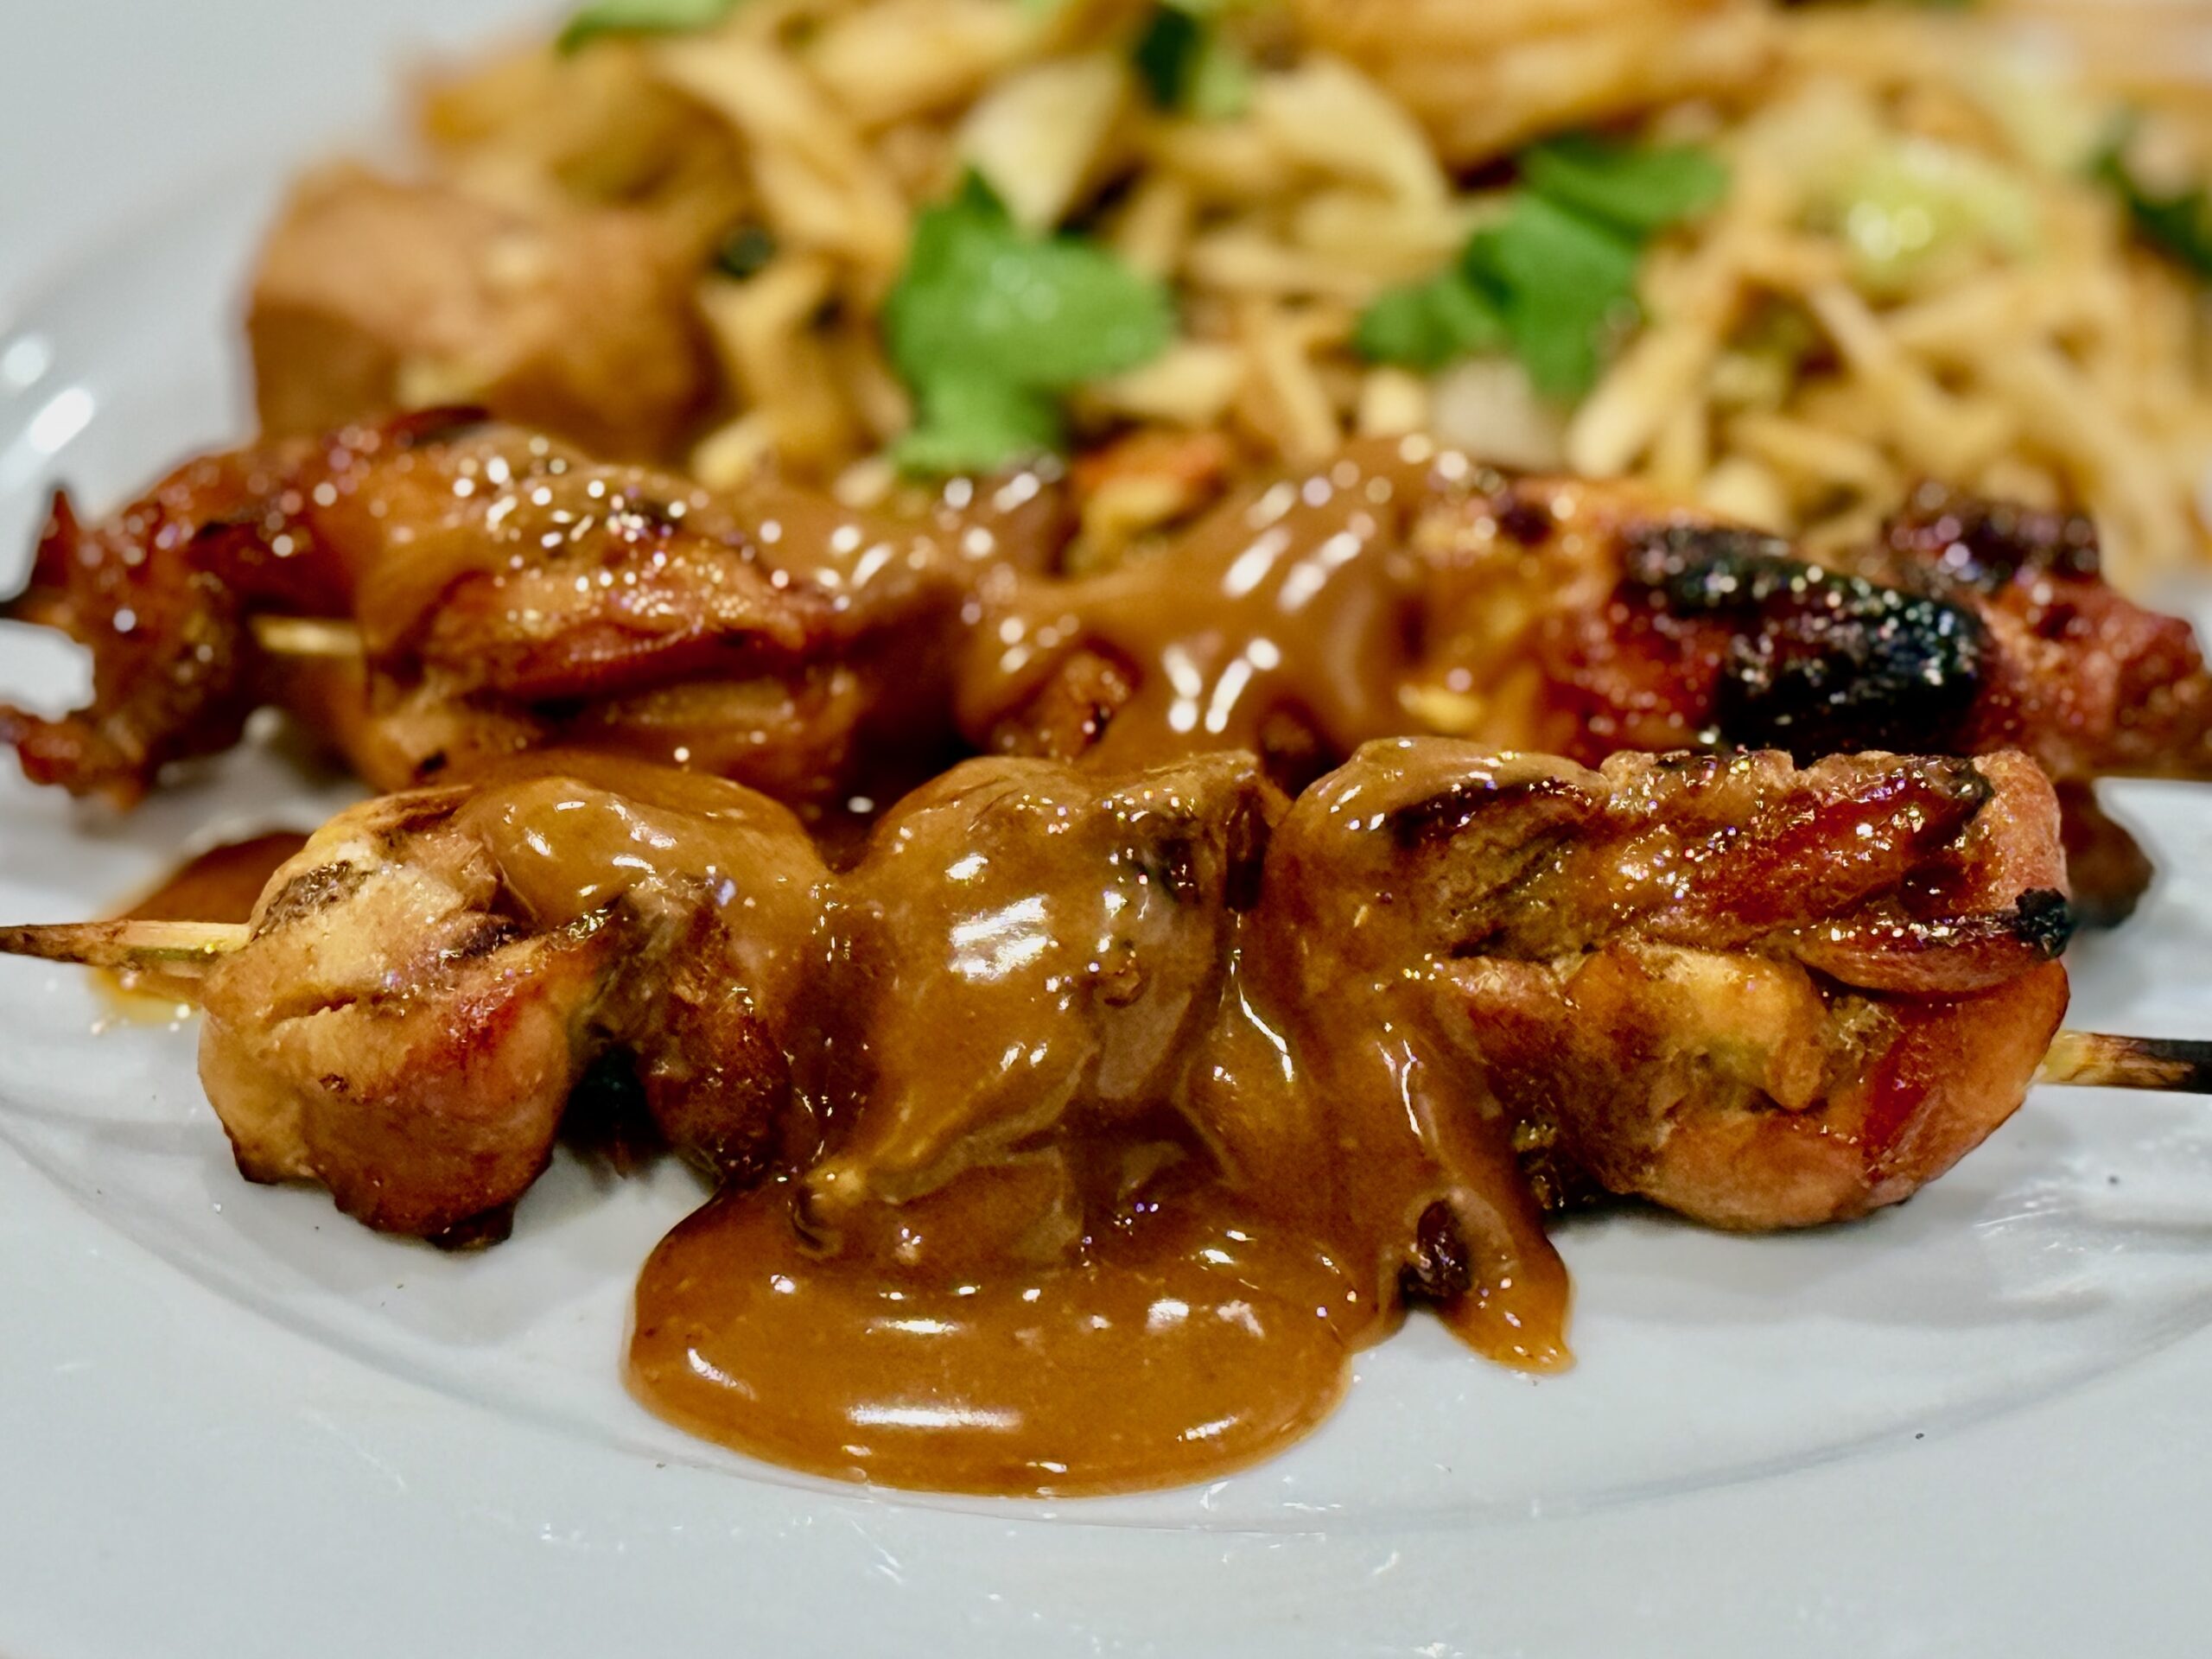
    Arrange the saté ajam on a platter and serve immediately with warm Pindasaus, lime wedges, cucumber or Acar Ketimun, and steamed rice or lontong. A squeeze of lime over the top just before eating brightens the sweet ketjap glaze and balances the peanut sauce beautifully.


    Notes

    Preparation

    • Chicken thighs are preferred here because they stay juicy and tender over high direct heat and hold up better than breast meat in a sweet ketjap marinade.
    • Cutting the chicken into long folded strips instead of cubes gives more surface area for browning and produces a more traditional satay texture.
    • The small amount of baking soda helps the chicken retain moisture and stay tender during quick charcoal grilling. Do not increase the amount, or the flavor can become slightly alkaline.
    • Fresh galangal adds a more traditionally Indonesian, Javanese-leaning aroma to the marinade. If galangal is not available, using 1 tsp finely grated ginger in place of the ginger and galangal combination is still very good.
    • If using larger bamboo skewers, you can double-skewer the chicken to make turning easier over the grill.

    Serving Suggestions

    • Serve with your family’s Pindasaus, lime wedges, and a crisp cucumber pickle such as Acar Ketimun.
    • This pairs especially well with steamed rice, lontong, or as part of a larger rijsttafel-style meal.
    • Fried shallots scattered over the platter add a wonderful savory finish.

    Variations

    • For a more classic yellow Javanese profile, increase the turmeric slightly to ⅜ tsp.
    • If you prefer a cleaner, more straightforward satay flavor, omit the cumin; with it included, the marinade leans a bit more Javanese.
    • Chicken breast can be used, but watch the cook closely and pull as soon as it reaches 150°F, then hold at that temperature for 2.8 minutes for pasteurization, or cook to 165°F for a more conventional approach.

    Make-Ahead & Storage

    • The chicken can be marinated earlier in the day and held refrigerated for up to 8 hours before grilling.
    • Leftover cooked satay can be refrigerated in an airtight container for up to 3 days.
    • Reheat gently in a covered skillet, low oven, or microwave until just warmed through. Serve with freshly warmed Dutch-Indonesian peanut sauce (Pindasaus) for the best texture.
  • Chicken Gyro

    Chicken Gyro

    On a family trip to Corfu, we stopped at a small waterside restaurant and ordered one of the best gyros we had ever tasted. The chicken was deeply seasoned, moist, and tender, with bright lemon, garlic, and oregano and none of the heavy, meatloaf-like texture so common in the United States. This version is our home tribute to that meal—grilled whole for juiciness, sliced and crisped in a hot skillet for authentic gyro-style edges, then wrapped in warm pita with fresh salad and cool tzatziki.


    Ingredients

    Chicken

    • 4 lb boneless, skinless chicken thighs

    Marinade

    • 2 tbsp garlic, minced
    • ⅓ cup lemon juice
    • ⅓ cup plain Greek yogurt
    • 2 tbsp white wine vinegar
    • 2 tbsp extra virgin olive oil
    • 3 tbsp dried oregano, rubbed between your palms before adding
    • 1 tsp paprika
    • ½ tsp ground cumin
    • ½ tsp ground coriander
    • 1 tbsp table salt
    • 1 tsp freshly ground black pepper

    Tzatziki

    • 1 English cucumber, diced or grated
    • 1½ cups plain Greek yogurt
    • 2 tbsp lemon juice
    • 2 tbsp extra virgin olive oil
    • 1 tsp garlic, minced
    • ½ tsp table salt
    • Freshly ground black pepper, to taste

    Salad

    • 2 English cucumbers, diced
    • 4 to 5 tomatoes, seeded and diced
    • ½ large red onion, thinly sliced
    • ¼ cup fresh parsley, chopped
    • 1 to 2 tbsp lemon juice, or to taste
    • 1 to 2 tbsp extra virgin olive oil, or to taste
    • ½ tsp dried oregano, crushed
    • Salt and freshly ground black pepper, to taste

    For Serving

    • Flatbread or pita
    • Olive oil, for warming the pita
    • Lemon wedges, for finishing
    • A small pinch of dried oregano for each gyro, optional but recommended

    Directions

    Marinate the Chicken

    In a large bowl or resealable container, combine the garlic, lemon juice, Greek yogurt, white wine vinegar, olive oil, oregano, paprika, cumin, coriander, salt, and black pepper. Rub the oregano between your palms before adding to help release its aroma.

    Add the chicken thighs and turn well to coat. Cover and refrigerate for 3 to 24 hours. Overnight is ideal.

    Make the Tzatziki

    In a medium bowl, stir together the cucumber, Greek yogurt, lemon juice, olive oil, garlic, salt, and black pepper.

    Refrigerate for at least 30 minutes before serving to let the flavors meld.

    Prepare the Salad

    In a separate bowl, combine the cucumbers, tomatoes, red onion, and parsley.

    Toss with the lemon juice, olive oil, crushed oregano, salt, and black pepper to taste. Refrigerate until ready to serve.

    Grill the Chicken

    Preheat a grill to medium-high heat. Remove the chicken from the marinade and grill the thighs whole until cooked through and nicely marked, about 5 to 7 minutes per side depending on thickness.

    Cook until the thickest part of the chicken reaches an internal temperature of 165°F (74°C).

    Transfer to a cutting board and let rest for 5 to 10 minutes.

    Slice and Crisp

    Slice the rested chicken into thin strips. Heat a large skillet over high heat and add a small amount of oil.

    Add the sliced chicken and cook briefly, tossing for 60 to 90 seconds, until the edges crisp and brown in spots.

    Finish with a small squeeze of lemon juice.

    Warm the Pita and Assemble

    Lightly brush the pita or flatbread with olive oil and warm on a hot skillet, grill, or griddle for 20 to 30 seconds per side, just until soft, hot, and lightly toasted.

    To serve, place chicken on the warm pita, spoon over tzatziki, add the salad, and finish with a small pinch of dried oregano if desired.


    Notes

    Preparation

    • For the best flavor, marinate the chicken overnight.
    • Chicken breast can be substituted for thighs. Grill to an internal temperature of 150°F (65.6°C) and hold at or above that temperature for about 3 minutes to achieve pasteurization. Use an instant-read thermometer to verify the temperature in the thickest part of the meat.
    • If using regular cucumbers for the tzatziki, dice or grate them, salt lightly, let rest 10 to 15 minutes, then squeeze dry in a kitchen towel before mixing into the yogurt.
    • English cucumbers usually contain less moisture, so that draining step is often unnecessary, though a light squeeze is still helpful if they seem especially juicy.
    • You may use diced cucumber, grated cucumber, or a combination in the tzatziki. A 50/50 mix of diced and grated cucumber gives an especially nice texture—creamy, but still fresh and crisp.

    Serving Suggestions

    • Serve with Greek Lemon Rice, fries, roasted potatoes, or a simple Greek-style salad for a full meal.
    • For a traditional Greek gyro-shop feel, wrap the finished gyro loosely in parchment or foil before serving.
    • Extra lemon wedges on the side are excellent for brightening each bite.

    Variations

    • For a traditional herb note in the tzatziki, add 1 to 2 tsp finely chopped fresh dill or mint.
    • Flatbread works well here, but warm pita gives the most classic gyro-style presentation.
    • A few fries tucked into the gyro are a very Greek addition and make it even closer to the style commonly served in Greece.

    Make-Ahead & Storage

    • The chicken can be marinated up to 24 hours ahead.
    • The tzatziki can be made 1 day ahead and kept refrigerated.
    • The salad is best made the day of serving, though the vegetables can be chopped ahead and dressed shortly before assembling.
    • Leftover cooked chicken keeps well in the refrigerator for up to 3 days. Reheat in a hot skillet to restore some of the crisp edges before serving.
  • Jane’s Top Secret Carrot Cake

    Jane’s Top Secret Carrot Cake

    This carrot cake has been a longtime family favorite—simple, reliable, and always a hit. Built on a classic combination of carrots, pineapple, and warm spice, it bakes up incredibly moist with a tender crumb and just the right amount of richness. Finished with a smooth, sweet cream cheese frosting, it’s the kind of cake that shows up at gatherings and quietly becomes everyone’s favorite slice.


    Ingredients

      Cake

    • 4 eggs, beaten
    • 1 cup vegetable oil
    • 1 (8 oz) can crushed pineapple, undrained
    • 2 cups sugar
    • 3 cups carrots, shredded
    • 2 cups flour
    • 1 tsp table salt
    • 2 tsp baking soda
    • 2 tsp cinnamon
    • ¼ tsp nutmeg (optional)
    • ¼ tsp ground ginger (optional)
    • 1 cup pecans, chopped and toasted
    • Icing

    • 1 cube (½ cup) butter, softened
    • 1 pkg cream cheese, softened
    • 4 cups confectioners’ sugar
    • 1 tsp vanilla
    • ¼ tsp table salt

    Directions

    Prepare the Pan

    Grease and flour a bundt pan.

    Mix the Batter

    In a large bowl, whisk together the eggs, sugar, and vegetable oil until smooth and well combined.

    Stir in the crushed pineapple (with juice) and shredded carrots.

    In a separate bowl, combine the flour, salt, baking soda, cinnamon, and optional nutmeg and ground ginger (if using).

    Fold the dry ingredients into the wet mixture until just combined.

    Fold in the toasted pecans.

    Bake

    Pour the batter into the prepared bundt pan and bake at 350°F for about 1 hour, or until a toothpick inserted into the center comes out clean.

    Let the cake cool in the pan for 15–20 minutes, then turn out onto a rack to cool completely.

    Alternative Pan Option

    Pour the batter into a greased stoneware bar pan, then bake at 350°F for 25–30 minutes, or until a toothpick comes out clean.

    Make the Icing

    In a mixing bowl, beat the butter and cream cheese together until smooth and creamy.

    Gradually add the confectioners’ sugar, mixing until fully incorporated and smooth.

    Add the vanilla and salt, and mix until well combined.

    Finish

    Spread the icing over the completely cooled cake.


    Notes

    Preparation

    • To toast nuts, spread on a baking sheet and bake at 350°F for 6–8 minutes, until fragrant.
    • Shred carrots finely for the best texture and even distribution.
    • Walnuts can be used in place of pecans if preferred.
    • High Altitude (~4,750 ft / 1400 m) – Increase the flour to 2 tbsp plus 2 tsp extra, reduce the baking soda to 1¾ tsp, and increase the baking time slightly as needed. Sea Level – Use 2 cups flour and the full 2 tsp baking soda as written.

    Serving Suggestions

    • Serve at room temperature for the best flavor and texture.
    • Great for gatherings, holidays, and family-style desserts.

    Variations

    • Add optional nutmeg and ginger for a slightly deeper, warmer spice profile.

    Make-Ahead & Storage

    • Store covered in the refrigerator for up to 4 days.
    • Bring to room temperature before serving for best texture.
    • Unfrosted cake can be wrapped and frozen for up to 2 months.
  • Bahmi Goreng — Indonesian Fried Noodles

    Bahmi Goreng — Indonesian Fried Noodles

    When Jane and I returned home from our honeymoon, we talked about what to have for dinner that first Sunday back. I said Indonesian sounded great—she had no idea what I meant. That conversation started what has since become one of our favorite family food traditions. The first time I made bahmi goreng for her, the kitchen filled with the aroma of garlic, chilies, and ketjap caramelizing in a hot wok, and she was instantly hooked. Ever since, this dish has represented warmth, comfort, and the sense of adventure we shared from the very beginning. Stir-fried noodles tossed with tender chicken, pork, and shrimp, fragrant with galangal and brightened with lime, bring a taste of Indonesia to our table time and again.


    Ingredients

      Noodles

    • 12 oz (340 g) Chinese egg noodles or lo mein noodles
    • Proteins

    • 4 oz (115 g) small shrimp, peeled and halved lengthwise (optional)
    • 4 oz (115 g) chicken breast, thinly sliced
    • 4 oz (115 g) lean pork or thinly sliced beef
    • Optional Quick Marinades

    • For Shrimp: ½ tsp light soy sauce, ¼ tsp fish sauce, ¼ tsp cornstarch, pinch white pepper
    • For Pork: 1 tsp ketjap manis, ½ tsp light soy sauce, ¼ tsp cornstarch, ¼ tsp minced garlic
    • For Chicken: 1 tsp ketjap manis, ½ tsp light soy sauce, ¼ tsp cornstarch, ¼ tsp minced garlic, pinch white pepper
    • Vegetables

    • 2 cups shredded white cabbage or Chinese cabbage
    • 4 green onions, cut into 1-inch pieces
    • Bumbu (Spice Paste)

    • 3½ oz (100 g) shallots, roughly chopped
    • 4–5 cloves garlic
    • ½ oz (15 g) fresh galangal, sliced (or ½ tsp galangal powder)
    • 1–2 fresh red chilies, seeded if desired
    • 1 tbsp chopped cilantro stems
    • Seasoning Sauce

    • 2 tbsp ketjap manis (Indonesian sweet soy sauce)
    • 1 tbsp light soy sauce
    • ⅓ tsp MSG (optional but recommended)
    • ¼ tsp ground white pepper
    • ⅛ tsp turmeric
    • 1 tsp fish sauce (optional, for added umami)
    • Cooking Oil

    • 3 tbsp peanut oil, divided
    • Optional Flavor Boost

    • 1 tsp tomato paste
    • Finishing & Garnishes

    • Fresh lime juice, to taste
    • Fresh cilantro leaves
    • Fried shallots
    • Reserved chili slivers
    • Omelet shreds (optional)
    • Fried onion flakes (optional)
    • For Serving

    • Lime wedges
    • Sambal oelek or sambal badjak
    • Extra ketjap manis

    Directions

    Prepare the Noodles

    Cook the noodles according to package directions until just tender. Drain well and toss lightly with about 1 tsp of the peanut oil to prevent sticking.

    Spread the noodles out on a tray or colander and let them cool slightly while preparing the remaining ingredients.

    Optional: Marinate the Proteins

    If using the marinades, toss each protein with its respective marinade ingredients and let stand for 10–15 minutes while preparing the vegetables and bumbu.

    Prepare the Bumbu

    In a food processor or mortar and pestle, grind the shallots, garlic, galangal, chilies, and cilantro stems into a coarse aromatic paste.

    Prepare the Vegetables

    Shred the cabbage and cut the green onions into 1-inch lengths.

    Cook the Proteins

    Heat 1 tbsp peanut oil in a wok over high heat until shimmering.

    Add the chicken and pork (or beef) and spread them across the surface of the wok. Let them sear undisturbed for about 30 seconds before stir-frying.

    Continue stir-frying until just cooked through, about 2–3 minutes.

    Add the shrimp and cook briefly until pink. Transfer all proteins to a plate and set aside.

    Cook the Bumbu

    Add the remaining peanut oil to the wok.

    Add the bumbu paste and stir-fry for about 2 minutes until fragrant.

    If using the tomato paste, add it now and cook about 30 seconds until lightly caramelized.

    Build the Stir-Fry

    Add the cabbage and green onions and stir-fry for 1–2 minutes.

    Add the noodles and toss well with the aromatics.

    Return the proteins to the wok.

    Season and Finish

    Add the ketjap manis, soy sauce, MSG, white pepper, turmeric, and fish sauce if using.

    Toss everything over high heat until evenly coated and glossy. If the noodles absorb the sauce too quickly, add 1–2 tbsp hot water to loosen the sauce and help it coat the noodles.

    Finish with a squeeze of fresh lime juice.

    Serve

    Garnish with cilantro leaves, fried shallots, chili slivers, and optional omelet shreds or fried onion flakes. Serve with lime wedges, sambal, and extra ketjap manis.


    Notes

    Preparation

    • Chinese egg noodles or lo mein noodles work best for this dish.
    • If ketjap manis is unavailable, substitute 1 tbsp soy sauce mixed with 2 tsp brown sugar.
    • If using a less sweet ketjap manis, add ½ tsp brown sugar to balance the sauce.
    • A small amount of fish sauce adds savory depth similar to Indonesian shrimp paste.
    • The tomato paste adds deeper color and umami reminiscent of Dutch-Indo restaurant versions.

    Serving Suggestions

    • Serve with krupuk (Indonesian shrimp crackers).
    • A fried egg on top is a popular Indonesian presentation.
    • A side of acar timun adds refreshing contrast.

    Variations

    • Increase the chilies or add sambal badjak for a spicier Javanese-style version.
    • A light drizzle (about ½ tsp) sesame oil over the finished noodles adds subtle aroma.

    Make-Ahead & Storage

    • Best served fresh from the wok.
    • Leftovers keep up to 2 days refrigerated.
    • Reheat in a skillet with a splash of water or oil.
  • Pindasaus — Dutch-Indonesian Peanut Sauce

    Pindasaus — Dutch-Indonesian Peanut Sauce

    I learned to love peanut sauce (pindasaus) while living in the Netherlands. An Indonesian meal just isn’t right without it. This delicious sauce is a favorite of every member of our family. We use it most often to smother skewers of chicken (Saté Ajam) or beef (Saté Sapi), over vegetables for gado gado, or with mayonnaise and diced onions to top Frites for patatje oorlog. There are two kinds of people in the world: those who love peanut sauce, and those who haven’t eaten it often enough to crave it… yet.


    Ingredients

    Sauce

    • 2 tbsp peanut or vegetable oil
    • 2 cloves garlic, minced
    • ½ tsp hot red curry powder
    • ½ tsp ground coriander
    • 1 cup smooth peanut butter
    • ¼ cup ketjap manis
    • 2 tbsp lime juice
    • 2 tbsp brown sugar
    • 1–2 tsp sambal oelek, to taste
    • 2 tsp tamarind paste (store-bought; or use our homemade Tamarind Paste from Whole Pods)
    • 1 can (14.5 oz/400 ml) coconut milk
    • ¼ tsp aji-no-moto, or to taste
    • Warm water, as needed to thin

    Optional

    • 1 tsp dark soy sauce, for a deeper Dutch-Indonesian satay-house flavor

    Directions

    Bloom the Aromatics

    Heat the oil in a saucepan over medium-low heat. Add the garlic and cook just until fragrant, stirring constantly so it does not brown.

    Add the curry powder and ground coriander and cook for about 30 seconds, stirring, until aromatic.

    Build the Sauce

    Stir in the peanut butter, ketjap manis, lime juice, brown sugar, sambal oelek, and tamarind paste. Mix until smooth and evenly combined.

    Add the Coconut Milk

    Gradually whisk in the coconut milk until the sauce is creamy and smooth. If using the optional dark soy sauce, stir it in now.

    Reduce the heat to low and warm gently for 2–3 minutes, stirring often. Do not let the sauce boil hard.

    Finish and Adjust

    Stir in the aji-no-moto. Thin with warm water as needed until the sauce reaches your preferred consistency.

    Taste and adjust with additional tamarind for tang, sambal for heat, brown sugar for sweetness, or a little more MSG for deeper savory flavor. Keep warm for serving, or cool and refrigerate for later use.

    Serve

    Serve warm over satay, spoon over blanched vegetables for gado gado, or drizzle over Frites with mayonnaise and diced onions for patatje oorlog.


    Notes

    Preparation

    • Blooming the curry powder and coriander briefly in the oil deepens their flavor and helps them blend more fully into the sauce.
    • Tamarind gives the sauce a brighter, more balanced finish and keeps it from tasting too sweet or heavy.
    • MSG is optional, but even a small amount gives the sauce a fuller, more savory satay-stall character.
    • Use warm water for thinning so the sauce stays smooth and emulsified.

    Serving Suggestions

    • This sauce is especially good with Saté Ajam.
    • It also pairs beautifully with saté babi, grilled Saté Sapi, gado gado, or spooned over Frites with mayonnaise and diced onions for patatje oorlog.
    • For a satay platter, serve with lime wedges, Acar Ketimun, fried shallots, and steamed rice or lontong.

    Variations

    • Add the optional dark soy sauce for a slightly deeper, more savory Dutch-Indonesian satay-house flavor.
    • For a milder sauce, start with 1 tsp sambal oelek and increase to taste.
    • For a tangier sauce, add an extra 1–2 tsp tamarind paste or a little more lime juice.
    • For a looser sauce for gado gado or fries, thin with a bit more warm water until spoonable and pourable.

    Make-Ahead & Storage

    • The sauce can be made up to 3 days ahead and refrigerated in an airtight container.
    • It will thicken considerably when chilled. Rewarm gently over low heat and thin with warm water as needed before serving.
    • Leftovers are excellent repurposed as a dip for grilled chicken, a sauce for noodles, or a dressing for blanched vegetables.
  • Sweet & Sour Chicken

    Sweet & Sour Chicken

    Sweet & Sour Chicken is a long-standing family favorite at our table—the dinner Oma requests every time she visits. Crisp, double-fried chicken breast meets a glossy sauce built from pineapple, balanced vinegars, a touch of ketchup, and just enough sweetness to round everything out. Bright peppers, fresh tomatoes, and optional mango give it depth without losing its classic comfort.


    Ingredients

    Sauce

    • 2 cups chicken broth (optional: replace up to 1 cup with mango juice)
    • ½ cup seasoned rice vinegar
    • 2 tbsp unseasoned rice vinegar
    • ¾ cup sugar
    • 1 tbsp vegetable oil
    • 1 tbsp ketchup
    • 1 tsp light soy sauce
    • ¼ tsp msg
    • 1 tsp table salt, plus more to taste
    • 1 large yellow onion, sliced (for infusion)
    • 3 cloves garlic, finely chopped
    • 1 can (20 oz/567 g) pineapple chunks, drained (reserve ½ cup juice)
    • 3–4 tbsp modified cornstarch (or 3½–4 tbsp regular cornstarch)
    • ¼ cup cold water (for slurry)

    Vegetables

    • 1 large yellow onion, sliced into ½-inch strips (for stir-frying)
    • 2 bell peppers, cut into 1-inch pieces
    • 2 fresh tomatoes, cut into wedges
    • 1–2 tbsp vegetable oil (for stir-frying)
    • ½ tsp sugar (for stir-frying)

    Chicken

    • 1½ lb chicken breast, cut into 1¼-inch cubes

    Marinade

    • 1 egg, lightly beaten
    • 2 tbsp cornstarch
    • 2 tbsp vegetable oil
    • 1 tsp soy sauce
    • 1 tsp table salt
    • ¼ tsp white pepper

    Batter & Frying

    • ⅔ cup flour
    • ⅓ cup cornstarch
    • 1 tsp table salt
    • 1 tsp baking soda
    • ⅔–¾ cup very cold water
    • 1–2 tbsp cornstarch (for dusting chicken)
    • Vegetable oil, for frying

    Directions

    Marinate the Chicken

    In a medium bowl, combine egg, cornstarch, oil, soy sauce, salt, and white pepper. Add chicken and toss to coat evenly.

    Cover and refrigerate 20 minutes.

    Build and Thicken the Sauce

    In a saucepan over medium heat, warm 1 tbsp oil. Add ketchup and cook 30 seconds to lightly deepen flavor.

    Add chicken broth (replacing up to 1 cup with mango juice if using), seasoned rice vinegar, unseasoned rice vinegar, sugar, soy sauce, msg, salt, the sliced onion (for infusion), garlic, and ½ cup reserved pineapple juice.

    Bring to a boil, then reduce to a steady simmer. Simmer 5–7 minutes until onions soften and flavors infuse.

    Strain into a clean saucepan and discard solids. Return to a full simmer.

    Whisk cornstarch with cold water, stir into the simmering sauce, and boil 60–90 seconds until glossy and spoon-coating. Taste and adjust with vinegar or salt if needed. Hold warm.

    First Fry

    Heat oil to 360°F (it should drop to about 330–340°F when chicken is added).

    Remove chicken from marinade and allow excess to drip off. Lay chicken on a rack 3–5 minutes, then lightly toss with 1–2 tbsp cornstarch.

    Whisk batter ingredients together just until thick but pourable. Dip chicken, allowing excess batter to drip off.

    Fry in batches 3½–4 minutes until pale golden. Drain on a rack in a single layer and rest 4–5 minutes.

    Stir-Fry the Vegetables

    In a wok or large skillet over high heat, add 1–2 tbsp oil.

    Add the onion strips and bell peppers. Sprinkle with ½ tsp sugar and stir-fry 60–90 seconds until slightly tender but still crisp.

    Turn off heat and set aside.

    Second Fry

    Increase oil to 385–390°F.

    Fry chicken 45–60 seconds until deep golden and crisp.

    Drain on a rack in a single layer (do not stack while hot). Lightly sprinkle with a small pinch of salt while hot (optional).

    Finish and Serve

    While chicken finishes, add the thickened sauce to the vegetables. Stir in pineapple chunks and fold in tomato wedges last. Warm gently just until heated through.

    Serve chicken on a tray, sauce in a bowl, and rice separately so everyone can spoon as much sauce as they like.


    Notes

    Preparation

    • Measure ½ cup pineapple juice for consistent balance. If using more, add 1–2 tbsp extra unseasoned rice vinegar to maintain brightness.
    • Rest chicken between fries and avoid stacking while hot to preserve crispness.
    • Use very cold water for the batter and avoid overmixing.

    Serving Suggestions

    • Serve with steamed jasmine rice.
    • Keep chicken and sauce separate until serving for best texture.

    Variations

    • Replace up to 1 cup of broth with mango juice for subtle fruit depth.
    • Substitute club soda for the batter water for a lighter crust.

    Make-Ahead & Storage

    • Sauce can be made up to 2 days ahead and reheated gently.
    • Store chicken and sauce separately; re-crisp chicken in a 400°F oven or air fryer.
  • Pho Broth

    Pho Broth

    This Instant Pot pho broth delivers deep, restaurant-style beef flavor with charred aromatics, toasted spices, and a clean, glossy finish—perfect for building steaming bowls of pho with your favorite garnishes.


    Ingredients

    • 1 onion, peeled and halved
    • 2 oz ginger, crushed
    • 7–8 whole cloves
    • 1 cinnamon stick, broken into pieces
    • 2–3 whole star anise
    • 1 tsp whole fennel seeds
    • 1 tsp coriander seeds
    • 1 black cardamom pod (optional)
    • 2–3 lb mixed beef bones (beef shank, neck, soup bones, oxtail, etc.), roasted until well browned
    • 2 chunks rock sugar (or palm sugar)
    • 2 tbsp fish sauce
    • 2 tsp table salt
    • 10–12 cups water (or enough to reach the Instant Pot max fill line)
    • ½ tsp Aji-No-Moto (MSG) (optional)

    Directions

    Char the Aromatics and Spices:

    Select Sauté on the Instant Pot. Add the onion, ginger, and all spices. Cook, stirring occasionally, until the onion and ginger are lightly charred and the spices are fragrant.

    Pressure Cook:

    Add the roasted beef bones, rock sugar, fish sauce, salt, optional MSG, and enough water to reach the max fill line.

    Seal the Instant Pot and cook on High Pressure for 1½ hours. Allow a natural pressure release.

    Strain and Chill:

    Strain the broth through a fine-mesh strainer, then strain again through a cheesecloth-lined strainer for a clean, clear broth.

    Refrigerate until fully chilled, then remove and discard the hardened fat from the surface.

    Serve:

    Reheat the broth to a rolling simmer. Ladle the steaming broth into bowls over cooked rice noodles, thinly sliced raw steak, and thinly sliced onion.

    Serve with (as desired):

    • Thai basil
    • Bean sprouts
    • Cilantro
    • Sawtooth herb (culantro)
    • Sliced jalapeños
    • Green onions
    • Lime wedges
    • Sambal
    • Fish sauce
    • Hoisin sauce

    Makes: about 3–4 servings (depending on bowl size).


    Notes

    Preparation

    • Using a whole cinnamon stick (broken into pieces) keeps the cinnamon flavor warm and present without the harshness that can come from ground cinnamon.
    • For the cleanest, most restaurant-style broth, don’t skip the second strain through cheesecloth, and chill fully before removing the fat cap.

    Serving Suggestions

    • Keep the broth boldly seasoned, and let each person customize at the table with lime, sambal, fish sauce, and hoisin. A small bowl of sliced jalapeño and extra herbs makes it feel like a pho shop spread.

    Variations

    • If you prefer a deeper smoky note, include the optional black cardamom pod. If you want a lighter spice profile, leave it out and stick to the core spice set.

    Make-Ahead & Storage

    • This broth is ideal for making ahead—its flavor often improves after a night in the fridge.
    • Refrigerate: 4–5 days in a covered container.
    • Freeze: up to 3 months (leave headspace for expansion).
    • Reheat: bring to a rolling simmer before serving.
  • Ginger Caramel Chicken

    Ginger Caramel Chicken

    This Ginger Caramel Chicken leans into a Southeast Asian flavor logic that makes caramel chicken so addictive: sugar cooked down into a glossy glaze, fish sauce for deep savory backbone, rice vinegar for balance, and ginger + garlic for warmth and aroma. Palm sugar brings a rounded, toasty caramel note, while a final hit of fresh ginger, sesame oil, and lime keeps the finish bright and lively instead of heavy. It’s sweet-salty, sticky, and intensely flavorful—perfect over rice with plenty of cilantro and lime wedges on the side.


    Ingredients

      Chicken

    • 1½ lb boneless, skinless chicken thighs, trimmed (left whole)
    • 1½ lb boneless, skinless chicken breasts, cut into large pieces
    • 1–2 tbsp vegetable oil, as needed
    • ½ tsp table salt (lightly season the chicken)
    • Caramel Sauce

    • ½ cup brown sugar (preferably dark brown sugar)
    • ⅓ cup palm sugar, finely chopped or grated
    • ⅓ cup fish sauce
    • ⅓ cup rice vinegar
    • ½ cup chicken stock
    • 2 tbsp fresh ginger, finely grated
    • 5 cloves garlic, crushed
    • To Finish

    • 1–2 jalapeños, thinly sliced (to taste)
    • 1 bunch green onions, sliced
    • ½ cup roasted peanuts, coarsely chopped
    • 1 tbsp fresh ginger, finely grated (added at the end)
    • 1 tsp toasted sesame oil
    • Juice of ½ lime (plus more to taste)
    • Fresh cilantro leaves, for garnish
    • Lime wedges, for serving

    Directions

    Prepare the Sauce

    In a bowl, combine brown sugar, palm sugar, fish sauce, rice vinegar, chicken stock, 2 tbsp grated ginger, and garlic. Stir well (some palm sugar may not fully dissolve yet).

    Brown the Chicken

    Pat the chicken dry and season lightly with ½ tsp table salt. Heat a large, wide sauté pan or skillet over medium-high heat. Add 1 tbsp vegetable oil.

    Working in batches, brown the thighs first (good color on both sides), then transfer to a plate. Brown the chicken breast pieces briefly until lightly golden, then transfer to a separate plate. Do not overcrowd the pan.

    Build the Caramel

    Carefully pour the sauce into the hot pan. Bring to a boil, scraping up any browned bits. Boil over high heat until the sauce reduces to a glossy, syrupy consistency—similar to maple syrup and able to coat the back of a spoon.

    Glaze and Simmer

    Return the chicken thighs to the pan and turn to coat in the caramel. Cook 2–3 minutes.

    Add the chicken breasts, reduce heat to medium, and simmer gently 6–8 minutes, turning occasionally, until the chicken is cooked through and evenly glazed.

    Finish

    Add jalapeños (to taste), green onions, peanuts, and the remaining 1 tbsp fresh ginger. Cook 1–2 minutes, just until fragrant.

    Remove from heat and stir in sesame oil and lime juice. Taste and adjust lime or heat as desired.

    Serve

    Serve over steamed jasmine rice. Garnish generously with cilantro and serve with lime wedges on the side.


    Notes

    Preparation

    • Palm sugar substitution: If you don’t have palm sugar, use ½ cup dark brown sugar + an additional ⅓ cup dark brown sugar (for a total of ⅚ cup dark brown sugar).
    • Pan choice: A wide skillet helps the sauce reduce quickly and glaze the chicken instead of braising it.

    Serving Suggestions

    • This dish pairs especially well with a crisp green salad dressed in our homemade ginger dressing, which helps cut the sweetness of the caramel glaze and refresh the palate. For a simple vegetable side, lightly blanched green beans—kept clean and restrained with just a touch of garlic and sesame oil—add freshness and texture without competing with the main flavors. Served together over jasmine rice, the plate feels balanced, bright, and complete.
    • Jasmine rice is ideal, but it’s also great over sticky rice or alongside a simple cucumber salad.
    • Serve with extra lime wedges so everyone can brighten their bowl to taste.

    Variations

    • More heat: Add a spoonful of chili oil or sambal at the end (to taste) for extra kick without changing the glaze texture.
    • Heat control: For milder heat, remove jalapeño seeds and ribs before slicing.

    Make-Ahead & Storage

    • Refrigerate leftovers in an airtight container for up to 4 days.
    • Reheat gently on the stovetop with a small splash of water or stock to loosen the glaze.
  • Southern-Style Sausage Gravy

    Southern-Style Sausage Gravy

    Sausage gravy, a Southern staple, has been a Huggins family favorite for generations. No true Southern breakfast is complete without buttery biscuits smothered in creamy sausage gravy. The sage sausage pays homage to my grandma Lena — a true Southern lady who loved using sage in her cooking. I learned to make this gravy watching my mom prepare it time and time again in our family kitchen in Southern California. I may just be superstitious, but I swear the gravy tastes best when it’s made in my favorite cast iron pan!


    Ingredients

    • 1 lb sage breakfast sausage
    • ½ cup (1 stick) butter
    • ½ cup flour, lightly mounded
    • 4–6 cups whole milk, divided (start with 4 cups and add more to adjust thickness)
    • salt, to taste
    • freshly ground black pepper or white pepper, to taste

    Directions

    Cook the Sausage:

    In a large skillet or cast iron pan over medium heat, cook the sausage until browned and crumbled, breaking it into small pieces as it cooks. When fully cooked, push the sausage to one side of the pan, leaving the drippings in the skillet.

    Make the Roux:

    Add the butter to the sausage drippings and let it melt completely. Sprinkle the flour over the melted butter and drippings, stirring constantly to form a smooth paste. Cook the roux for 2–4 minutes, stirring continuously, until it turns a pale blond color and smells lightly nutty. Do not let it brown.

    Add the Milk:

    Reduce the heat to medium-low. Slowly pour in about 6 cups of the milk while whisking or stirring constantly, scraping along the bottom of the pan to prevent scorching (especially when using cast iron). Continue to cook and stir until the gravy thickens and begins to gently bubble.

    Finish and Season:

    Stir the cooked sausage back into the thickened gravy. If the gravy is thicker than you prefer, add additional milk ½ cup at a time, stirring well heating after each addition, until it reaches your desired consistency—smooth, creamy, and thick enough to coat the back of a spoon while still pouring easily.

    Season with salt to taste and a generous amount of freshly ground black pepper or white pepper. Traditional Southern-style gravy is fairly pepper-forward, so don’t be shy unless you prefer it milder.

    Serve:

    Serve hot over warm Buttermilk Biscuits. This gravy is also excellent with fried eggs, soft-scrambled eggs, or grated boiled eggs alongside your biscuits.


    Notes

    Preparation

    • Milk scorches easily, especially in cast iron. Once the milk is added, keep the heat at medium-low and stir frequently, scraping along the bottom of the pan.
    • A pale blond roux (2–4 minutes of cooking) helps remove any raw flour taste while keeping the gravy light in color and flavor.
    • The gravy will continue to thicken as it sits off heat. If it becomes too thick, gently rewarm and whisk in a little extra milk until it loosens to your preferred consistency.

    Serving Suggestions

    • Serve over hot buttermilk biscuits for a classic Southern breakfast.
    • Pair with fried eggs, soft-scrambled eggs, or grated boiled eggs for added protein and richness.
    • Try serving with hash browns, breakfast potatoes, or over toasted bread when biscuits aren’t available.

    Variations

    • Add a few drops of Worcestershire sauce to the gravy for deeper savoriness.
    • Stir in a dash of your favorite hot sauce (such as Crystal or Tabasco) for gentle heat that complements the sage and sausage.
    • If your sausage is not very sage-forward, add a tiny pinch of rubbed sage toward the end of cooking, tasting as you go to avoid overpowering the gravy.
    • Use white pepper instead of black pepper if you prefer a smoother look while keeping a robust, peppery flavor.

    Make-Ahead & Storage

    • Sausage gravy can be made up to 2 days in advance and cooled completely before refrigerating in an airtight container.
    • Reheat gently over low heat, adding a splash of milk as needed to loosen the gravy back to a smooth, creamy consistency.
    • For food safety, avoid leaving the gravy at room temperature for extended periods; promptly refrigerate leftovers.
  • Pralines & Cream Buttermilk Ice Cream

    Pralines & Cream Buttermilk Ice Cream

    The Huggins Family traces its roots to some of the earliest settlers in the American South, and although several generations have since made their homes in the West, many of the foods we love still reflect that Southern heritage. Pralines—those sweet, buttery pecan confections tied to countless Southern kitchens—capture that legacy perfectly. This ice cream honors that connection with a silky buttermilk custard base swirled with ribbons of praline cream and studded with crisp pecan pralines for a nostalgic, balanced, unmistakably Southern flavor.


    Ingredients

    • Custard Base:

    • 2 cups heavy cream
    • ½ cup whole milk
    • ½ cup buttermilk (added after cooking)
    • ½ cup sugar, divided
    • 5 egg yolks
    • ½ tsp vanilla extract
    • ¼ tsp table salt
    • Praline-Cream Swirl:

    • ¼ cup butter
    • 6 tbsp brown sugar
    • 2 tbsp heavy cream
    • ½ tsp table salt
    • 1 tsp vanilla extract
    • Mix-Ins:

    • 1 cup chopped pecan pralines, frozen before use

    Directions

    Cook the Custard

    In a medium saucepan, whisk together the cream, whole milk, ¼ cup sugar, and salt. Warm over medium heat until mixture begins to steam and the sugar dissolves.

    Temper the Yolks

    In a separate bowl, whisk the egg yolks with the remaining ¼ cup sugar until thick and pale. Slowly temper with ½ cup of the warm cream mixture, then return everything to the saucepan.

    Finish the Base

    Cook gently over low heat, stirring constantly, until the custard coats the back of a spoon (170–175°F / 77–80°C). Do not boil. Strain through a fine mesh sieve, stir in vanilla, and let cool slightly. Add the buttermilk, then chill thoroughly—preferably overnight.

    Make the Praline-Cream Swirl

    In a small saucepan, melt butter with brown sugar and cream. Simmer 1–2 minutes until lightly thickened. Remove from heat, stir in salt and vanilla, and cool completely before layering.

    Churn & Assemble

    Churn the chilled custard in an ice cream maker according to manufacturer instructions. When nearly finished, fold in the frozen chopped pralines. As you transfer to a container, alternate layers of ice cream and thin ribbons of praline-cream swirl. Gently marble with a butter knife and freeze until firm.


    Notes

    Preparation

    • Freeze pralines before folding them in to preserve their crisp texture.
    • Buttermilk provides a gentle tang that balances caramel sweetness; replace with whole milk for a richer, sweeter version.
    • Ensure the praline swirl is fully cooled before layering to avoid melting the churned base.

    Serving Suggestions

    • Top with extra chopped pecan pralines for added crunch.
    • Serve alongside warm apple or pecan pie.
    • Add a drizzle of warm caramel sauce for an extra-sweet presentation.

    Variations

    • Add ¼ tsp cinnamon to the swirl for a deeper Southern praline flavor.
    • Swap half the pralines for toasted pecans for a nuttier variation.

    Make-Ahead & Storage

    • Refrigerate the unchurned custard up to 2 days before freezing.
    • Store praline-cream swirl refrigerated up to 1 week.
    • Finished ice cream keeps 1 week for best texture.
  • Pão de Queijo — Brazilian Cheese Rolls

    Pão de Queijo — Brazilian Cheese Rolls

    Crisp on the outside and chewy within, these Brazilian cheese rolls—known as Pão de Queijo—are irresistibly airy and full of cheesy flavor. Made from tapioca flour, they’re naturally gluten-free and come together quickly in a blender for an easy, crowd-pleasing treat.


    Ingredients

    • 1 egg
    • 1 cup milk
    • ½ cup vegetable oil
    • 1¾ cups tapioca flour
    • ½ cup parmesan, grated
    • ½ cup mozzarella, cheddar, or jack cheese, grated
    • ½ tsp table salt

    Directions

    Prepare the Batter

    Preheat oven to 350°F (175°C). Spray a 24-cup mini muffin tin with nonstick cooking spray.

    In a blender, combine egg, milk, and oil. Blend for 30 seconds, then add the remaining ingredients and blend for another 30 seconds until smooth.

    Bake

    Pour batter into the prepared muffin cups, filling each about ¾ full. Bake for 20–25 minutes, or until the cheese rolls are puffed and golden.

    Serve warm for the best texture. Makes about 35–40 cheese rolls.

    Store

    Allow cheese rolls to cool completely before storing. Place in an airtight container and refrigerate up to 3 days or freeze up to 1 month. Reheat in a 350°F oven for 5–10 minutes until warmed through.


    Notes

    Preparation

    • Avocado oil is preferred, but olive oil or any neutral vegetable oil works well.
    • Tapioca flour gives Pão de Queijo its signature chewy texture—do not substitute with wheat flour.

    Serving Suggestions

    • Serve as a snack, breakfast bread, or alongside soups and stews.
    • Enjoy warm with butter, cream cheese, or fruit preserves for a sweet-savory contrast.

    Variations

    • Add ½ tsp garlic powder or minced herbs for extra flavor.
    • Swap in pepper jack for a spicy version or gouda for a milder flavor.

    Make-Ahead & Storage

    • Refrigerate baked rolls up to 3 days in an airtight container.
    • Freeze baked or unbaked batter portions up to 1 month.
    • Reheat frozen rolls directly in a 350°F oven for 10–12 minutes until hot and crisp.
  • Blueberry Cheesecake Ice Cream

    Blueberry Cheesecake Ice Cream

    This Blueberry Cheesecake Ice Cream captures all the comfort and flavor of a classic cheesecake in frozen form—tangy, creamy, and just sweet enough. A silky cream cheese custard base provides authentic cheesecake flavor, balanced by a bright blueberry swirl and crunchy browned-butter graham crumble that evokes a perfectly toasted crust.


    Ingredients

    Blueberry Swirl

    • ¼ cup sugar
    • 1 tbsp cornstarch
    • ½ cup water
    • 1¼ cups blueberries (fresh or frozen)
    • 1 tbsp lemon juice
    • pinch table salt

    Browned Butter Graham Crumble

    • 2 cups graham cracker crumbs
    • 1 tbsp sugar
    • ½ tsp cinnamon
    • ½ cup (1 stick) unsalted butter
    • ½ tsp vanilla extract
    • pinch table salt

    Cheesecake Ice Cream Base

    • 6 oz cream cheese, softened
    • 1½ cups whole milk
    • 1½ cups heavy cream
    • ¾ cup sugar
    • 4 egg yolks
    • ½ tsp vanilla extract
    • 1 tsp lemon zest (optional)
    • pinch table salt

    Directions

    Prepare the Blueberry Swirl

    In a small saucepan, combine sugar, cornstarch, and salt. Gradually whisk in water until smooth, then stir in blueberries and lemon juice.

    Bring to a gentle boil and simmer for 5–6 minutes, stirring occasionally, until thickened and jam-like.

    Cool completely before using.

    Make the Browned Butter Graham Crumble

    In a small saucepan over medium heat, melt butter and cook, swirling occasionally, until it turns golden and smells nutty (about 4–5 minutes). Immediately remove from heat and stir in vanilla and a pinch of salt.

    In a large bowl, combine graham cracker crumbs, sugar, and cinnamon. Pour the browned butter mixture over the crumbs and stir until evenly coated.

    Spread on a parchment-lined baking sheet and bake at 350°F for 10–12 minutes, stirring once, until fragrant and lightly toasted. Cool completely, then crumble into small clusters.

    For best texture, spread the cooled crumble on a parchment-lined baking sheet and freeze for 20–30 minutes before mixing into the ice cream.

    Prepare the Cheesecake Ice Cream Base

    In a saucepan, warm milk and cream over medium heat until steaming.

    In a separate bowl, whisk yolks and sugar until pale and thick. Slowly temper with ½ cup of the warm milk mixture, whisking constantly, then return everything to the saucepan.

    Cook gently over low heat, stirring constantly, until the custard coats the back of a spoon (170–175°F / 77–80°C).

    Remove from heat and whisk in cream cheese, vanilla, lemon zest, and salt until smooth. Strain through a fine mesh sieve if needed for texture.

    Chill thoroughly, preferably overnight.

    Churn & Assemble

    Churn the chilled custard in an ice cream maker according to the manufacturer’s instructions. When nearly finished, fold in the frozen graham crumble.

    In a freezer-safe container, layer the churned ice cream with alternating spoonfuls of blueberry swirl and additional crumble.

    Swirl gently with a butter knife (do not overmix). Freeze until firm.


    Notes

    Preparation

    • Freeze the graham crumble before folding it into the ice cream to help preserve crunch and prevent softening.
    • Chilling the blueberry swirl thoroughly helps prevent it from bleeding into the custard during layering.
    • For an extra-cheesecake tang, replace ¼ cup of the milk with buttermilk (stir it in after cooking the custard).
    • Browning the butter is essential for a warm, nutty aroma that mimics a true cheesecake crust.

    Serving Suggestions

    • Serve with fresh blueberries, strawberries, or raspberries.
    • Add a drizzle of warm blueberry sauce for a sundae-style presentation.
    • Top with extra graham crumble for added texture.

    Variations

    • Swap the blueberries for raspberries, strawberries, or blackberries using the same proportions.
    • Add a **lemon cheesecake** twist by doubling the lemon zest and adding 1 tsp lemon juice to the custard after cooking.
    • For a swirl-forward ice cream, increase the blueberry mixture to 1½× the recipe.

    Make-Ahead & Storage

    • Refrigerate the custard base for up to 2 days before churning.
    • Store the blueberry swirl for up to 1 week in the refrigerator.
    • Keep graham crumble at room temperature for 3 days, or freeze for longer storage.
    • Store churned ice cream in an airtight container for up to 1 week for best texture.
  • German Chocolate Cake — Bakery Structure with Box Convenience

    German Chocolate Cake — Bakery Structure with Box Convenience

    Every year on my wife’s birthday, there’s only one request — German chocolate cake. It’s become one of our family traditions, the kind of ritual you never change because it carries as much sentiment as flavor. But over time I also realized that while boxed mixes make the process easy, they often fall short of the tall layers, defined slices, and deep chocolate-and-coconut flavor we’ve come to expect. So this version became the answer: a handful of smart upgrades that turn a simple mix into something closer scratch-made, with richer flavor, a sturdier crumb, and bakery-worthy presentation. The layers bake up taller and slice beautifully, the frosting wraps the cake without slipping, and the whole thing feels celebratory without adding hours of prep. It’s the shortcut I make every year for my wife, and the version that finally gives us the flavor we love with the structure a three-layer cake needs.


    Ingredients

    Cake Layers

    • 1 boxed German chocolate cake mix (prefer one that calls for milk; if not, substitute whole milk for the water)
    • 1 cup (240 ml) whole milk (use 2–3 tbsp less than the package amount if milk is listed)
    • 1 cup (225 g) melted butter plus 2 tbsp (28 g) extra
    • 4–5 large eggs (two more than the box calls for; 4 for softer crumb, 5 for maximum stability)
    • ½ cup (60 g) all-purpose flour
    • 1 tbsp (8 g) cornstarch
    • ½ tsp baking powder
    • 1 tbsp Dutch-process cocoa powder
    • ½ tsp instant espresso powder (enhances chocolate depth without adding coffee flavor)
    • 1 tsp powdered gelatin, bloomed in 1 tbsp warm water
    • 2 tbsp (30 g) sour cream or Greek yogurt

    Coconut–Pecan Frosting

    • 8 egg yolks
    • 2 cans (each 12 oz / 354 ml) evaporated milk
    • 3 cups (600 g) sugar
    • 1½ cups (340 g / 3 sticks) butter
    • 5⅓ cups (about 400 g) unsweetened shredded coconut (sweetened coconut also works with no measurement changes; frosting will simply be sweeter)
    • 3 cups (300 g) chopped pecans
    • 2 tbsp finely ground pecans
    • ½ tsp table salt
    • 1 tbsp (15 ml) vanilla extract

    Directions

    Prepare the Cake Layers

    Bloom the gelatin by sprinkling it over 1 tbsp warm water in a small bowl. Let stand 5 minutes to fully hydrate. If the gelatin has set very firmly, gently warm it in the microwave for a few seconds until fluid before adding to the batter.

    Preheat the oven to 320°F (160°C). Grease three 8-inch round cake pans lightly and dust with flour, then line the bottoms with parchment rounds for best release and to help prevent overbrowning on the base.

    In a medium bowl, whisk together the cake mix, all-purpose flour, cornstarch, baking powder, Dutch-process cocoa powder, and instant espresso powder until evenly combined.

    In a separate large bowl, whisk together the melted butter, eggs, milk, bloomed (and fluid) gelatin, and sour cream or Greek yogurt until smooth.

    Add the dry ingredients to the wet ingredients and mix just until incorporated. Avoid overbeating to keep the crumb tender.

    Divide the batter evenly among the three prepared pans, smoothing the tops.

    Bake for about 24–30 minutes, or until the tops spring back lightly when touched, a toothpick inserted in the center comes out with moist crumbs (not wet batter), and the internal temperature in the center of each layer registers around 195°F (90°C) for the best balance of structure and moisture.

    Cool the cakes in the pans for 10 minutes, then turn out onto wire racks to cool completely. For the cleanest slices, wrap and chill the cooled layers before assembly.

    Make the Frosting

    In a large saucepan, whisk together the egg yolks and evaporated milk until smooth and well combined.

    Add the sugar and butter to the pan.

    Cook over medium heat, stirring constantly, until the mixture reaches a gentle simmer. Once simmering, continue to cook for about 12 minutes, stirring frequently to prevent scorching and to develop a thicker, more stable frosting.

    Remove the pan from the heat and stir in the salt first, making sure it dissolves fully in the warm mixture.

    Add the vanilla extract and stir until fully incorporated.

    Stir in the chopped pecans, finely ground pecans, and shredded coconut until evenly distributed.

    Allow the frosting to cool completely; it will thicken significantly as it cools and will be much easier to spread on the cake.

    Assemble the Cake

    If needed, level the chilled cake layers using a serrated knife so they stack evenly.

    Place the first layer on a serving plate. Spread a very thin “seal coat” of frosting over the top to trap crumbs, then chill briefly. Follow with a more generous layer of frosting for the filling.

    Repeat with the second layer: add the layer, apply a thin seal coat, chill briefly, then spread on a full layer of frosting.

    Place the third layer on top and apply a thin coat of frosting over the top and sides to lock in crumbs. Chill briefly again, then finish with a final, even layer of frosting over the top and sides. The extended cook time and finely ground pecans help the frosting cling well to the sides.

    Chill the assembled cake for at least 2 hours (or overnight) before slicing for the cleanest, bakery-style cuts.


    Notes

    Preparation

    • Choose a German chocolate cake mix that calls for milk when possible. If your mix uses water, substitute whole milk and reduce the amount slightly (about 2–3 tbsp less than the listed water volume).
    • The added Dutch-process cocoa and espresso powder deepen the chocolate flavor without making the cake taste like coffee, helping the chocolate stand up to the rich coconut–pecan frosting.
    • Using 4 eggs will give a slightly softer crumb, while using 5 eggs increases structure and height, which is ideal for very clean slices and tall layers.
    • Fully blooming the gelatin and incorporating it with the wet ingredients strengthens the slice without making the cake dense or rubbery. If the gelatin sets too firmly, gently warm it until fluid before whisking it into the wet mixture.
    • This cake was tested at a higher altitude using dark metal pans and a baking temperature of 320°F (160°C), with doneness judged by the spring of the cake, a clean toothpick with moist crumbs, and an internal temperature around 195°F (90°C) in the center of each layer.
    • Frosting distribution: For evenly layered, bakery-style assembly, divide the frosting into four equal portions. Use about 25% between the first and second layers, 25% between the second and third layers, 25% on top of the cake, and the remaining 25% for the sides.

    Serving Suggestions

    • For the cleanest, restaurant-style slices, cut the cake while it is well chilled using a thin, sharp knife dipped in hot water and wiped dry between cuts.
    • Let individual slices rest at room temperature for 10–15 minutes before serving so the crumb and frosting soften slightly and the flavors bloom.
    • This cake pairs nicely with lightly sweetened vanilla or coconut ice cream, or with a dollop of softly whipped cream to balance the richness.

    Make-Ahead & Storage

    • Cake layers can be baked, cooled, wrapped tightly, and refrigerated for up to 2 days or frozen for up to 1 month before assembly.
    • The coconut–pecan frosting can be made up to 2–3 days in advance and stored in an airtight container in the refrigerator. Bring it to a cool room temperature and stir until spreadable before using.
    • The fully assembled cake should be stored covered in the refrigerator and is best enjoyed within 3–4 days.
    • Extra frosting can be refrigerated for up to 1 week or frozen for longer storage; it works well as a topping for brownies, cupcakes, or ice cream.
  • Salsa Verde

    Salsa Verde

    Taquitos are high on the list of Huggins Family most loved foods. And, our favorites come from the little stand on Olvera Street in downtown Los Angeles, Cielito Lindo, where taquitos were invented in the mid 1930s. Every trip home to Southern California includes a trek downtown for Combination #1: 3 Taquitos, Beans and Cheese. The taquitos are smothered in “guacamole”. Cielito Lindo’s version of guacamole is a delicious green salsa that you can’t help but dream about. This recipe is the closest I’ve come to replicating its flavor.


    Ingredients

    • 1 can (28 oz) tomatillos, drained
    • 1 bottle (40 oz) roasted green chiles, mild
    • ½ onion, sliced
    • 4–5 whole garlic cloves
    • 1 bunch cilantro (stems and leaves)
    • 1–2 avocados (optional)
    • 1–2 tbsp avocado oil
    • 1½ tsp table salt, plus more to taste

    Directions

    Broil the Aromatics

    Separate the onion into segments and tuck the whole garlic cloves underneath them. Broil until the onion edges are charred and nearly black on some spots, and the garlic is softened and lightly browned.

    Blend

    Add the broiled onion and garlic to a blender along with the drained tomatillos, roasted green chiles (drain whole green chiles), cilantro, avocado oil, and optional avocado. Blend until completely smooth.

    Adjust Seasoning

    Add 1½ tsp salt, then taste and adjust as needed. Depending on your green chiles, you may need a bit more—most batches end up around 2 tsp total.

    Chill and Serve

    Chill for one hour or more before serving. Serve with tacos, taquitos, burritos, or tortilla chips.


    Cielito Lindo’s Home Version

    After working for some time to recreate Cielito Lindo’s recipe, I learned from Pam that Cielito Lindo published a home version of their guacamole. The recipe can be found below, with some very minor alterations.

    Ingredients

    • 8 fresh chiles gueritos (yellow chiles), seeded and deveined
    • 5 cloves garlic, chopped
    • 15 medium tomatillos, peeled and halved
    • 2½ cups cilantro, chopped
    • 6 cups water
    • 2 medium avocados
    • 4 tsp table salt

    Directions

    In a large pan, combine chiles, garlic, tomatillos, cilantro, and water; bring to boil. Lower heat to medium and cook for 5 minutes.

    Remove mixture from water and place in blender; reserve water. Add avocado and salt to blender. Blend, adding water in small installments and blend until smooth.

    Place in refrigerator overnight to allow flavors to meld. Adjust salt, if necessary.

  • Double-Fried Belgian Frites

    Double-Fried Belgian Frites

    Ok, my friends, don’t get me started! Just believe me when I say, Fries are NOT French! Whether it be because of the style of the cut (frenched) or the native language of many of their early purveyors, french and fries have been erroneously linked as the name of a true Belgian creation, Frites! Calling these spears of deliciousness French is, well, just wrong.

    Real frites are presoaked and double fried, delivering a soft and fluffy interior and crisp exterior. They are traditionally salted and served with mayonnaise. But, if you are feeling a bit more adventurous, try some of the typical toppings for Frites from the Netherlands and Belgium found under Serving Suggestions at the end of the recipe. My personal favorite… Patat Speciaal!


    Ingredients

    • Large potatoes (Russet or Bintje preferred)
    • Cold water
    • Neutral oil for frying (peanut or canola)
    • Salt, to taste
    • Pepper (optional)

    Directions

    Prepare the Potatoes

    Wash and scrub potatoes well. Peel if desired, then cut into thick fries (about ⅜–½ inch / 1 cm thick). Place in a large bowl of cold water and soak for at least 20 minutes, or up to several hours, to remove excess starch.

    Drain and pat the fries completely dry with paper towels before frying.

    First Fry (Par-Cook)

    Heat oil in a deep fryer or heavy pot to 275–300°F (135–150°C). Fry the potatoes in batches for about 4–6 minutes, just until tender but not browned. Avoid overcrowding to maintain temperature.

    Remove fries and transfer to a paper towel–lined tray or a large paper bag to drain and cool. Let rest at least 20–30 minutes.

    Second Fry (Crisp & Golden)

    Increase oil temperature to 375–400°F (190–205°C). Fry the cooled potatoes again in batches for 3–5 minutes, until golden brown and crisp.

    Transfer to fresh paper towels to drain. Immediately season with salt (and pepper, if desired).

    Serve

    Serve hot in a paper cone, bowl, or basket—Belgian style—with plenty of mayonnaise or one of the regional variations listed below.


    Notes

    Preparation

    • For the most authentic texture, use starchy potatoes such as Russets or Bintjes.
    • Soaking the potatoes helps remove starch for crisper results—don’t skip this step.
    • Always cool fries completely between the first and second fry for best crispness.
    • Use a thermometer to maintain accurate oil temperature during frying.

    Serving Suggestions

    • Patat Met – Fries with mayonnaise.
    • Patat Speciaal – Fries with mayonnaise, curry ketchup, and chopped onions.
    • Patatje Oorlog – Fries with mayonnaise, peanut sauce, sambal oelek, and chopped onions.
    • Patatje Joppie – Fries with mayonnaise mixed with yellow curry spices and topped with onions.
    • Frieten met Stoofvlees – Fries served with Belgian beef stew.
  • German Chocolate Cake — From Scratch

    German Chocolate Cake — From Scratch

    The not-so-German, German Chocolate Cake is actually an American classic. The recipe comes from a Texas homemaker, Mrs. Clay, whose cake calling for German’s Sweet Chocolate was first published in the Dallas Morning News in 1957. German’s Sweet Chocolate itself was created much earlier, in 1852, by Samuel German—an American baker of English descent—for Baker’s Chocolate Company. Originally known as “German’s Chocolate Cake,” the possessive was eventually dropped, but the cake’s rich flavor and nostalgic charm have endured for generations.


    Ingredients

      Cake

    • 2¼ cups all-purpose flour
    • 1 pkg (4 oz) Baker’s German sweet chocolate
    • ½ cup water
    • 1 tsp baking soda
    • ¼ tsp table salt
    • 1 cup (2 sticks) butter, softened
    • 2 cups sugar
    • 4 eggs, separated
    • 1 tsp vanilla extract
    • 1 cup buttermilk
    • ⅛ tsp espresso powder (optional, enhances chocolate flavor)
    • Frosting

    • 4 egg yolks
    • 1 can (12 oz) evaporated milk
    • 1½ tsp vanilla extract
    • 1½ cups sugar
    • ¾ cup (1½ sticks) butter
    • 2⅔ cups unsweetened shredded coconut
    • 1½ cups pecans, chopped
    • ¼ tsp table salt (optional, to balance sweetness)

    Directions

    Prepare the Cake

    Preheat oven to 350°F (175°C). Line the bottoms of three 9-inch round cake pans with parchment or wax paper and lightly grease the sides.

    Microwave chocolate and water in a heatproof bowl for 1½–2 minutes, stirring every 30 seconds until almost melted. Stir until smooth and set aside to cool slightly.

    In a medium bowl, whisk together flour, baking soda, salt, and espresso powder (if using). Set aside.

    In a large mixing bowl, beat butter and sugar with an electric mixer on medium speed until light and fluffy, about 3 minutes. Add egg yolks one at a time, mixing well after each addition. Blend in melted chocolate and vanilla.

    Add the flour mixture alternately with the buttermilk, beginning and ending with flour, and beat until just combined.

    In a separate bowl, beat egg whites until soft peaks form. Gently fold into the batter using a spatula until evenly incorporated.

    Bake

    Divide batter evenly among prepared pans. Bake for 30 minutes or until a toothpick inserted in the center comes out clean. Immediately run a thin knife around the edges to loosen the cakes.

    Cool in pans for 15 minutes, then remove from pans and transfer to wire racks. Discard parchment and cool completely before frosting.

    Make the Frosting

    In a medium saucepan, whisk together egg yolks, evaporated milk, and vanilla until blended. Add sugar and butter. Cook over medium heat, stirring constantly, until the mixture thickens and turns golden brown (about 12 minutes).

    Remove from heat and stir in coconut, pecans, and salt (if using). Mix well and cool completely before spreading. The frosting will thicken as it cools.

    Assemble the Cake

    Spread frosting between layers and on top of the cake. Garnish with extra pecans if desired. This recipe yields about 16 servings. (For generous layers, we often double the frosting recipe — a must for a three-layer cake!)


    Notes

    Preparation

    • Ensure chocolate has cooled slightly before mixing into batter to prevent scrambling the eggs.
    • Adding espresso powder enhances chocolate depth without changing flavor.
    • Frosting thickens as it cools—spread only when fully cooled for best texture.
    • Double the frosting for a three-layer cake.

    Serving Suggestions

    • Serve at room temperature for the best flavor and texture.
    • Top with extra toasted pecans or a drizzle of melted chocolate for an elegant finish.

    Make-Ahead & Storage

    • Frosting can be made up to 3 days in advance; refrigerate and bring to room temperature before using.
    • Cake layers freeze beautifully—wrap individually and freeze up to 2 months. Thaw completely before frosting.
    • Store frosted cake covered at room temperature for up to 2 days, or refrigerated for up to 5 days.

    Shortcut Option

    • For a simpler approach with equally impressive results, try our German Chocolate Cake — Bakery Structure with Box Convenience, which upgrades a boxed mix for richer flavor, taller layers, and beautifully clean slices.
  • Birria de Res

    Birria de Res

    Rich, smoky, and deeply spiced, this family favorite Birria de Res captures the essence of traditional Jalisco-style beef birria. Slow-simmered with a blend of toasted chiles and warm spices, it can be served as a hearty stew or transformed into crispy, cheesy Quesabirria tacos with plenty of the rich consommé for dipping. A perfect centerpiece for any gathering.


    Ingredients

      Birria Base

    • 7 dried guajillo chiles
    • 7 dried morita chiles
    • 4 dried ancho chiles
    • 3 dried chiles de árbol (optional for heat)
    • 1 liter boiling water
    • 5 lb beef chuck, cut into 4-inch chunks
    • 2 lb beef short ribs
    • Salt and freshly ground black pepper
    • 2 tbsp neutral oil
    • 2 tsp Mexican oregano
    • 2 tsp cumin seeds
    • 1 tsp black peppercorns
    • 1 tsp whole cloves
    • 1 tsp allspice berries
    • 3 bay leaves
    • 1 tbsp onion powder
    • 1 tsp paprika
    • 1 tsp ground cinnamon
    • 1 can (28 oz) whole tomatoes with juice
    • 1 tbsp minced garlic (about 3 cloves)
    • 2 tbsp table salt
    • 2 tbsp vinegar (white or apple cider)
    • ½ cup vegetable oil
    • For Quesabirria Tacos

    • Corn tortillas
    • Oaxaca, mozzarella, or jack cheese (shredded)
    • Diced onion
    • Chopped cilantro
    • Lime wedges, for serving

    Directions

    Prepare the Chiles

    Remove stems and seeds from the dried chiles. Toast lightly in a dry skillet over medium heat, pressing gently until fragrant (about 15–20 seconds per side). Transfer to a bowl and cover with boiling water. Soak for 30 minutes until softened.

    Toast and Grind Spices

    In a spice grinder or mortar and pestle, grind Mexican oregano, cumin seeds, peppercorns, cloves, allspice, and bay leaves into a coarse powder. Stir in onion powder, paprika, and cinnamon; set aside.

    Brown the Meat

    Pat beef dry and season generously with salt and pepper. In a large Dutch oven, heat 2 tbsp oil over medium-high heat until shimmering. Brown the meat in batches on all sides until deeply golden; transfer to a bowl and set aside.

    Build the Chile Base

    In the same Dutch oven, add the spice mixture and toast briefly (15–30 seconds) until aromatic. Add tomatoes with their juice, crushing them with the back of a wooden spoon. Stir in garlic, salt, and vinegar. Blend the softened chiles with their soaking liquid until smooth and add to the pot. Let the mixture simmer over medium heat for 2–3 minutes to bloom the chile flavors before adding the browned meat back. Scrape up any browned bits from the bottom as you stir.

    Simmer Low and Slow

    Add ½ cup oil, stir, and reduce heat to low. Cover partially and simmer gently for 3–4 hours, or until meat is tender enough to shred easily. If the liquid reduces too much, add a splash of hot water or beef broth as needed.

    Adjust and Strain (Optional)

    Remove the meat and shred. Skim off the red chile oil that rises to the top and reserve for frying tortillas. For a more refined consommé, strain the sauce through a fine sieve. For a more rustic texture (as our family prefers), leave it unstrained.

    Serve as Stew or Tacos

    For stew service, return shredded meat to the sauce and serve in bowls with diced onion, cilantro, and lime wedges. For Quesabirria tacos, continue below.

    Quesabirria Tacos

    Shred the beef and moisten with a few tablespoons of birria sauce. Reserve the skimmed chile oil for frying. Dip a corn tortilla into the red oil and lay it on a hot skillet or griddle. Spoon shredded meat and cheese onto one side; fold and press lightly. Cook until crisp and golden on both sides, about 1–2 minutes per side.

    Serve tacos with diced onion, chopped cilantro, and lime wedges. Include a small bowl of the birria sauce for dipping (consommé).


    Notes

    Preparation

    • Toasting the chiles deepens their smoky flavor and prevents bitterness — avoid burning them.
    • Blooming the chile-tomato base briefly enhances color and richness before simmering.
    • Use beef chuck and short ribs for the perfect balance of tenderness and flavor.
    • For a richer taco crust, mix the reserved chile oil with a bit of ghee or butter before frying.
    • Birria tastes even better the next day as the flavors meld and intensify.

    Serving Suggestions

    • Serve the birria as a stew with warm corn tortillas, onion, cilantro, and lime wedges.
    • Use the same base for Quesabirria tacos — crisp, cheesy tacos dipped in the rich chile consommé.
    • Offer lime wedges on the table for brightness and balance.

    Variations

    • For milder heat, reduce or omit chiles de árbol.
    • Add a touch of smoked paprika for a subtle, smoky accent if morita chiles are unavailable.
    • Try goat or lamb shoulder for traditional birria de chivo or birria de borrego.
  • Nutty Coconut Ice Cream

    Nutty Coconut Ice Cream

    Jane’s favorite ice cream, and Opa’s, has always been Nutty Coconut—a flavor that balances creamy coconut sweetness with the satisfying crunch of toasted nuts. This homemade version captures that nostalgic combination in a silky coconut custard base, layered with toasted coconut, almonds, and pecans. Smooth, nutty, and tropical, it’s a rich yet refreshing treat that brings a little taste of the islands to every scoop.


    Ingredients

    Coconut Custard Base:

    • 1 can (14 oz) full-fat coconut milk
    • 1 cup heavy cream
    • ¾ cup sugar
    • 4 large egg yolks
    • pinch table salt
    • ½ tsp coconut extract
    • ½ tsp vanilla extract

    Add-Ins:

    • ¾ cup sweetened shredded coconut, toasted
    • ½ cup chopped toasted pecans
    • ½ cup chopped toasted almonds

    Directions

    Prepare the Toasted Nuts & Coconut

    Spread the shredded coconut, pecans, and almonds on a parchment-lined baking sheet. Toast at 325°F until fragrant and golden—about 5–8 minutes for coconut and 8–10 minutes for nuts. Cool completely and set aside.

    Make the Coconut Custard Base

    In a medium saucepan, whisk together coconut milk, heavy cream, half the sugar, and salt. Heat until steaming but not boiling.

    In a separate bowl, whisk egg yolks with the remaining sugar until pale and thick. Slowly temper with ½ cup hot coconut mixture, then return everything to the saucepan.

    Cook over low heat, stirring constantly, until the custard coats the back of a spoon (170–175°F / 77–80°C). Do not boil.

    Finish & Chill

    Strain through a fine mesh sieve into a clean bowl. Stir in coconut and vanilla extracts. Cover and chill thoroughly—preferably overnight.

    Churn & Add Mix-Ins

    Churn the chilled custard in an ice cream maker according to manufacturer’s instructions. Add toasted coconut and nuts during the last minute of churning. Freeze until firm, about 4 hours.


    Notes

    Preparation

    • Use full-fat coconut milk for best texture; light coconut milk makes the base thinner.
    • Replace half the heavy cream with coconut cream for deeper coconut flavor.
    • Lightly salt the toasted nuts before cooling to balance sweetness.
    • Strain the custard to ensure a perfectly smooth base.

    Serving Suggestions

    • Top with extra toasted coconut for crunch.
    • Pair with warm caramel sauce or pineapple compote.
    • Serve alongside grilled fruit for a tropical dessert.

    Make-Ahead & Storage

    • Refrigerate the custard base up to 2 days before churning.
    • Store churned ice cream in an airtight container for up to 1 week.
    • Let soften 5–10 minutes before scooping.
  • Neapolitan-Style Tomato Sauce

    Neapolitan-Style Tomato Sauce

    This uncooked Neapolitan-style pizza sauce preserves the bright, fresh flavor of San Marzano tomatoes—sweet, rich, and perfectly balanced for high-heat baking. Using true DOP-certified tomatoes gives an authentic taste of Naples, with a smooth texture and naturally sweet finish that perfectly complements a light, airy crust.


    Ingredients

    • (For about 6–8 pizzas)
    • 1 can (28 oz / 800 g) whole peeled San Marzano tomatoes (DOP if possible)
    • ½ tbsp table salt (adjust to taste)
    • 2 tbsp extra-virgin olive oil
    • 2–4 fresh basil leaves, torn (optional but recommended)

    Directions

    Prepare the Sauce

    Drain excess juice from tomatoes into a bowl, reserving it in case the sauce needs thinning. Crush tomatoes by hand until mostly smooth but still slightly textured—avoid over-crushing for best flavor and body.

    Stir in salt, olive oil, and basil until evenly mixed.

    Use the Sauce

    Spread thinly over stretched dough just before baking (Neapolitan Pizza Dough works beautifully). Use approximately 2–2½ oz (60–70 g) of sauce per 10–12″ pizza.

    Do not pre-cook the sauce—the natural sugars in the tomatoes caramelize under high oven heat, producing rich, authentic flavor.


    Notes

    Preparation

    • Use only high-quality San Marzano tomatoes with the DOP seal for the sweetest, least acidic results.
    • Do not blend the sauce completely smooth; a slightly rustic texture gives better flavor and adhesion.

    Serving Suggestions

    • Use as the base for Pizza Margherita—add mozzarella, parmesan, and fresh basil.
    • Try on Pizza Marinara with garlic, oregano, and a drizzle of olive oil.
    • Use in Shoarma Pizza or Carnitas Pizza for a Dutch or Mexican-inspired twist.

    Variations

    • For a smoother sauce, pulse briefly with an immersion blender (1–2 seconds only).
    • For a hint of depth, add a tiny pinch of sugar if your tomatoes are unusually acidic.
    • For a garlic-forward version, rub a cut clove of garlic over the dough before adding sauce.

    Make-Ahead & Storage

    • Store sauce in an airtight container in the refrigerator for up to 5 days.
    • Freeze for up to 3 months; thaw in the refrigerator overnight before using.
  • Neapolitan Pizza Dough

    Neapolitan Pizza Dough

    Pizza has always been a go-to meal for our family. Who can resist the combination of chewy dough, flavorful sauce, tasty toppings, and gooey cheese? Our first taste of true Neapolitan-style pizza was on our family trip to Italy—staying across the square from the Pantheon, exploring the Colosseum and Vatican museums, and often ending the day with perfectly blistered pizza from a tiny Roman restaurant. This recipe recreates that chewy, flavorful crust at home, whether you choose the cold-ferment version for deep flavor, the quick version for same-day pizza, or the freezer version for easy make-ahead dough.


    Ingredients

    • 1360 g (~3 lb) 00 flour (100%)
    • 952 g cold water (70%)
    • 27 g table salt (2%)
    • Active Dry Yeast

    • Cold Ferment: 0.41 g for 72 hours (0.03%) or 0.82 g for 48 hours (0.06%)
    • Quick Version: 2.72 g for same-day use (0.2%)
    • Freezer Version: 3.54 g for use the same day as thawed (0.26%)

    Note: Use a digital scale accurate to 0.01 g for yeast precision, or approximate to the nearest small pinch if unavailable.

    Directions

    Select Fermentation Version

    Cold Ferment (48–72 hours)

    In a large bowl, combine flour, yeast, and cold water. Mix until no dry bits remain (shaggy dough). Cover and rest 20–30 minutes.

    After resting, sprinkle salt over dough and gently pinch and squeeze to incorporate. Every 30 minutes for 2 hours, perform a set of stretch and folds (see Notes).

    After the final folds, place dough in a clean bowl, cover, and rest at room temperature (75–80°F / 23–27°C) for 1–2 hours. Divide into 8 oz (225 g) balls, lightly oil, and place in individual containers or on a floured tray covered tightly. Refrigerate 48–72 hours. Remove from refrigerator 2–3 hours before baking to come to room temperature.

    Quick Version (Same-Day)

    In a large bowl, combine flour and cold water. Mix until no dry bits remain; cover and rest 20–30 minutes.

    In a small cup, dissolve yeast in 2 tbsp warm water (105°F / 40°C) and let stand 5–10 minutes until foamy.

    Sprinkle salt over dough, then add yeast mixture. Gently pinch and squeeze to incorporate. Every 30 minutes for 2 hours, perform a set of stretch and folds (see Notes).

    After the final folds, cover and rest at warm room temperature (75–80°F / 23–27°C) for 2–3 hours, until nearly doubled. Divide into 8 oz (225 g) balls, lightly oil, and place in proofing containers or on a floured tray. Cover and proof 1–2 hours, until puffy and relaxed.

    Freezer Version (Make-Ahead)

    In a large bowl, combine flour and cold water. Mix until no dry bits remain; cover and rest 20–30 minutes.

    In a small cup, dissolve yeast in 2 tbsp warm water (105°F / 40°C) and let stand 5–10 minutes until foamy.

    Sprinkle salt over dough, then add yeast mixture. Gently pinch and squeeze to incorporate. Every 30 minutes for 2 hours, perform a set of stretch and folds (see Notes).

    After the final folds, cover and rest at warm room temperature (75–80°F / 23–27°C) for 2–3 hours, until nearly doubled. Divide into 8 oz (225 g) balls. Lightly oil, wrap tightly in plastic wrap, and place in freezer-safe bags or airtight containers. Freeze up to 3 months.

    To thaw, transfer to refrigerator for 24 hours. Then allow 1–3 hours at room temperature before stretching and baking.

    Bake the Pizzas

    Place a pizza steel on the top rack of the oven and preheat to 500–550°F (260–290°C) for at least 45 minutes. Just before baking, switch to broil for 5–10 minutes to superheat the surface.

    Stretch a dough ball gently by hand (don’t roll), top lightly with sauce, cheese, and desired toppings, and slide onto the steel. Bake 4–5 minutes, rotating halfway through. For extra char, broil the final 30–60 seconds.

    For an even closer match to wood-fired results, bake in an outdoor pizza oven at 750–850°F (400–455°C) for 60–90 seconds.


    Notes

    Preparation

    • Hydration note: The 70% hydration gives the dough an open crumb and extensible texture typical of Neapolitan-style pizza. Adjust slightly based on flour absorbency.
    • Stretch & Folds: With wet hands, grab one edge, stretch it up, and fold it over. Rotate 90°, repeat until all four sides are folded. After 3–4 rounds, the dough will feel smoother and more elastic.
    • Use minimal toppings and well-drained mozzarella to prevent sogginess during high-heat baking.
    • This dough also works for homemade pita: reduce hydration to 65%, roll ⅛–¼ inch thick, and bake 1½–2 minutes at 475–500°F (245–260°C).

    Serving Suggestions

    • Top with traditional Neapolitan tomato sauce, fresh mozzarella, and basil for a Pizza Margherita.
    • Drizzle with extra virgin olive oil after baking to enhance flavor and aroma.
    • Pair with a simple arugula salad or Italian antipasti for a complete meal.

    Variations

    • Pizza MargheritaNeapolitan tomato sauce, mozzarella, parmesan, basil; after baking add a drizzle of extra virgin olive oil.
    • Pizza MarinaraNeapolitan tomato sauce, garlic, oregano, salt; after baking add a drizzle of extra virgin olive oil.
    • Pizza CapricciosaNeapolitan tomato sauce, mozzarella, ham, artichokes, mushrooms, olives; after baking add a drizzle of extra virgin olive oil.
    • Pizza BoscaiolaNeapolitan tomato sauce, mozzarella, mushrooms, Italian sausage, and parmesan; after baking add a drizzle of extra virgin olive oil.
    • Pizza Quattro FormaggiNeapolitan tomato sauce (optional), mozzarella, ricotta, gorgonzola, parmesan, garlic, oregano (or, more traditionally, mozzarella, gorgonzola, parmigiano-reggiano, fontina; and after baking add a drizzle of extra virgin olive oil).
    • Pizza alla NapoletanaNeapolitan tomato sauce (optional), mozzarella, anchovies, capers, oregano; and after baking add a drizzle of extra virgin olive oil.
    • Pizza Prosciutto e FunghiNeapolitan tomato sauce, mozzarella, prosciutto, mushrooms; and after baking add a drizzle of extra virgin olive oil.
    • Spicy SausageNeapolitan tomato sauce, mozzarella, spicy Italian sausage, pickled jalapeños.
    • Sweet & SpicyNeapolitan tomato sauce, mozzarella, spicy Italian sausage, pickled jalapeños; after baking add a drizzle of honey.
    • Spinach & Sun-dried TomatoNeapolitan tomato sauce, mozzarella, provolone, ricotta, Parmesan, spinach, sun-dried tomatoes; after baking add fresh basil and a drizzle of extra virgin olive oil.
    • Loaded HawiianNeapolitan tomato sauce, mozzarella, ham, rotisseri chicken, bacon, pineapple, red onion, pickled jalapeños.
    • Shoarma PizzaNeapolitan tomato sauce, mozzarella, chicken shoarma; after baking add a drizzle of knoflooksaus (Dutch Garlic Sauce) and poestasaus.
    • Barbecue ChickenDr Pepper barbecue sauce, mozzarella, rotisseri chicken, bacon, pickled jalapeños.
    • Fig & PigNeapolitan tomato sauce, mozzarella, fresh sliced figs, fig jam, prosciutto, honey.
    • Fig, Pig, & GoatNeapolitan tomato sauce, goat cheese, fresh sliced figs, caramelized onions, prosciutto; after baking add arugula and a drizzle of honey.
    • Chicken Pestopesto sauce, mozzarella, rotisseri chicken, ricotta, thinly sliced tomatoes.
    • Mushroom & OliveNeapolitan tomato sauce, mozzarella, ham, mushroom, olives, pickled jalapeños.
    • Pear & Gorgonzolagarlic oil pizza base, thinly sliced pear, gorgonzola, mozzarella, walnuts or pecans; after baking add arugula and balsamic glaze.
    • Prosciutto & BurrataNeapolitan tomato sauce, mozzarella; after baking add torn burrata, prosciutto, arugula, and olive oil.
    • The MeatsNeapolitan tomato sauce, mozzarella, pepperoni, Italian sausage, ham, bacon.
    • Chicken, Spinach, & Fetagarlic oil pizza base , rotisserie chicken, spinach, feta, Parmesan, mozzarella.
    • Indo Satépeanut sauce thinned with coconut milk, saté ayam, mozzarella, blanched vegetables (thinly sliced carrots, small pieces of green beans, thin shavings of cabbage); after baking add bean sprouts tossed in lime juice and roasted sesame oil, thin cucumber slices, sambal, fresh cilantro, and a drizzle of ketjap manis.
    • Chicken FajitaNeapolitan tomato sauce with a sprinkle of cumin & paprika, mozzarella, Jack cheese, fajita chicken, red onion, roasted bell pepper strips, and pickled jalapeños; after baking add a drizzle of salsa verde and crema, with a squeeze of lime juice.
    • Saag Paneer—Pureed spinach “saag” base (spinach, blanched & puréed, sautéed onion, garlic, ginger, garam masala, cumin, coriander, a little chili, finished with cream or yogurt for silkiness) spread in a thin, even layer topped with paneer cubes, red onion, serrano chile slices; after baking add fresh cilantro, a light dusting of crumbled kasoori methi, and a drizzle of yogurt.
    • Carnitasgarlic oil pizza base, carnitas, mozzarella, red onion, roasted poblano chile strips, pickled jalapeños; after baking add fresh cilantro, diced white onion, crumbled cotija cheese or queso fresco, and a drizzle of salsa verde and crema.