Bags of Spices

Favorite Recipes

North American

Comfort from the Americas — barbecue, Mexican street food, Tex-Mex, Southern specialties, and regional favorites.

  • Mexican Rice

    Mexican Rice

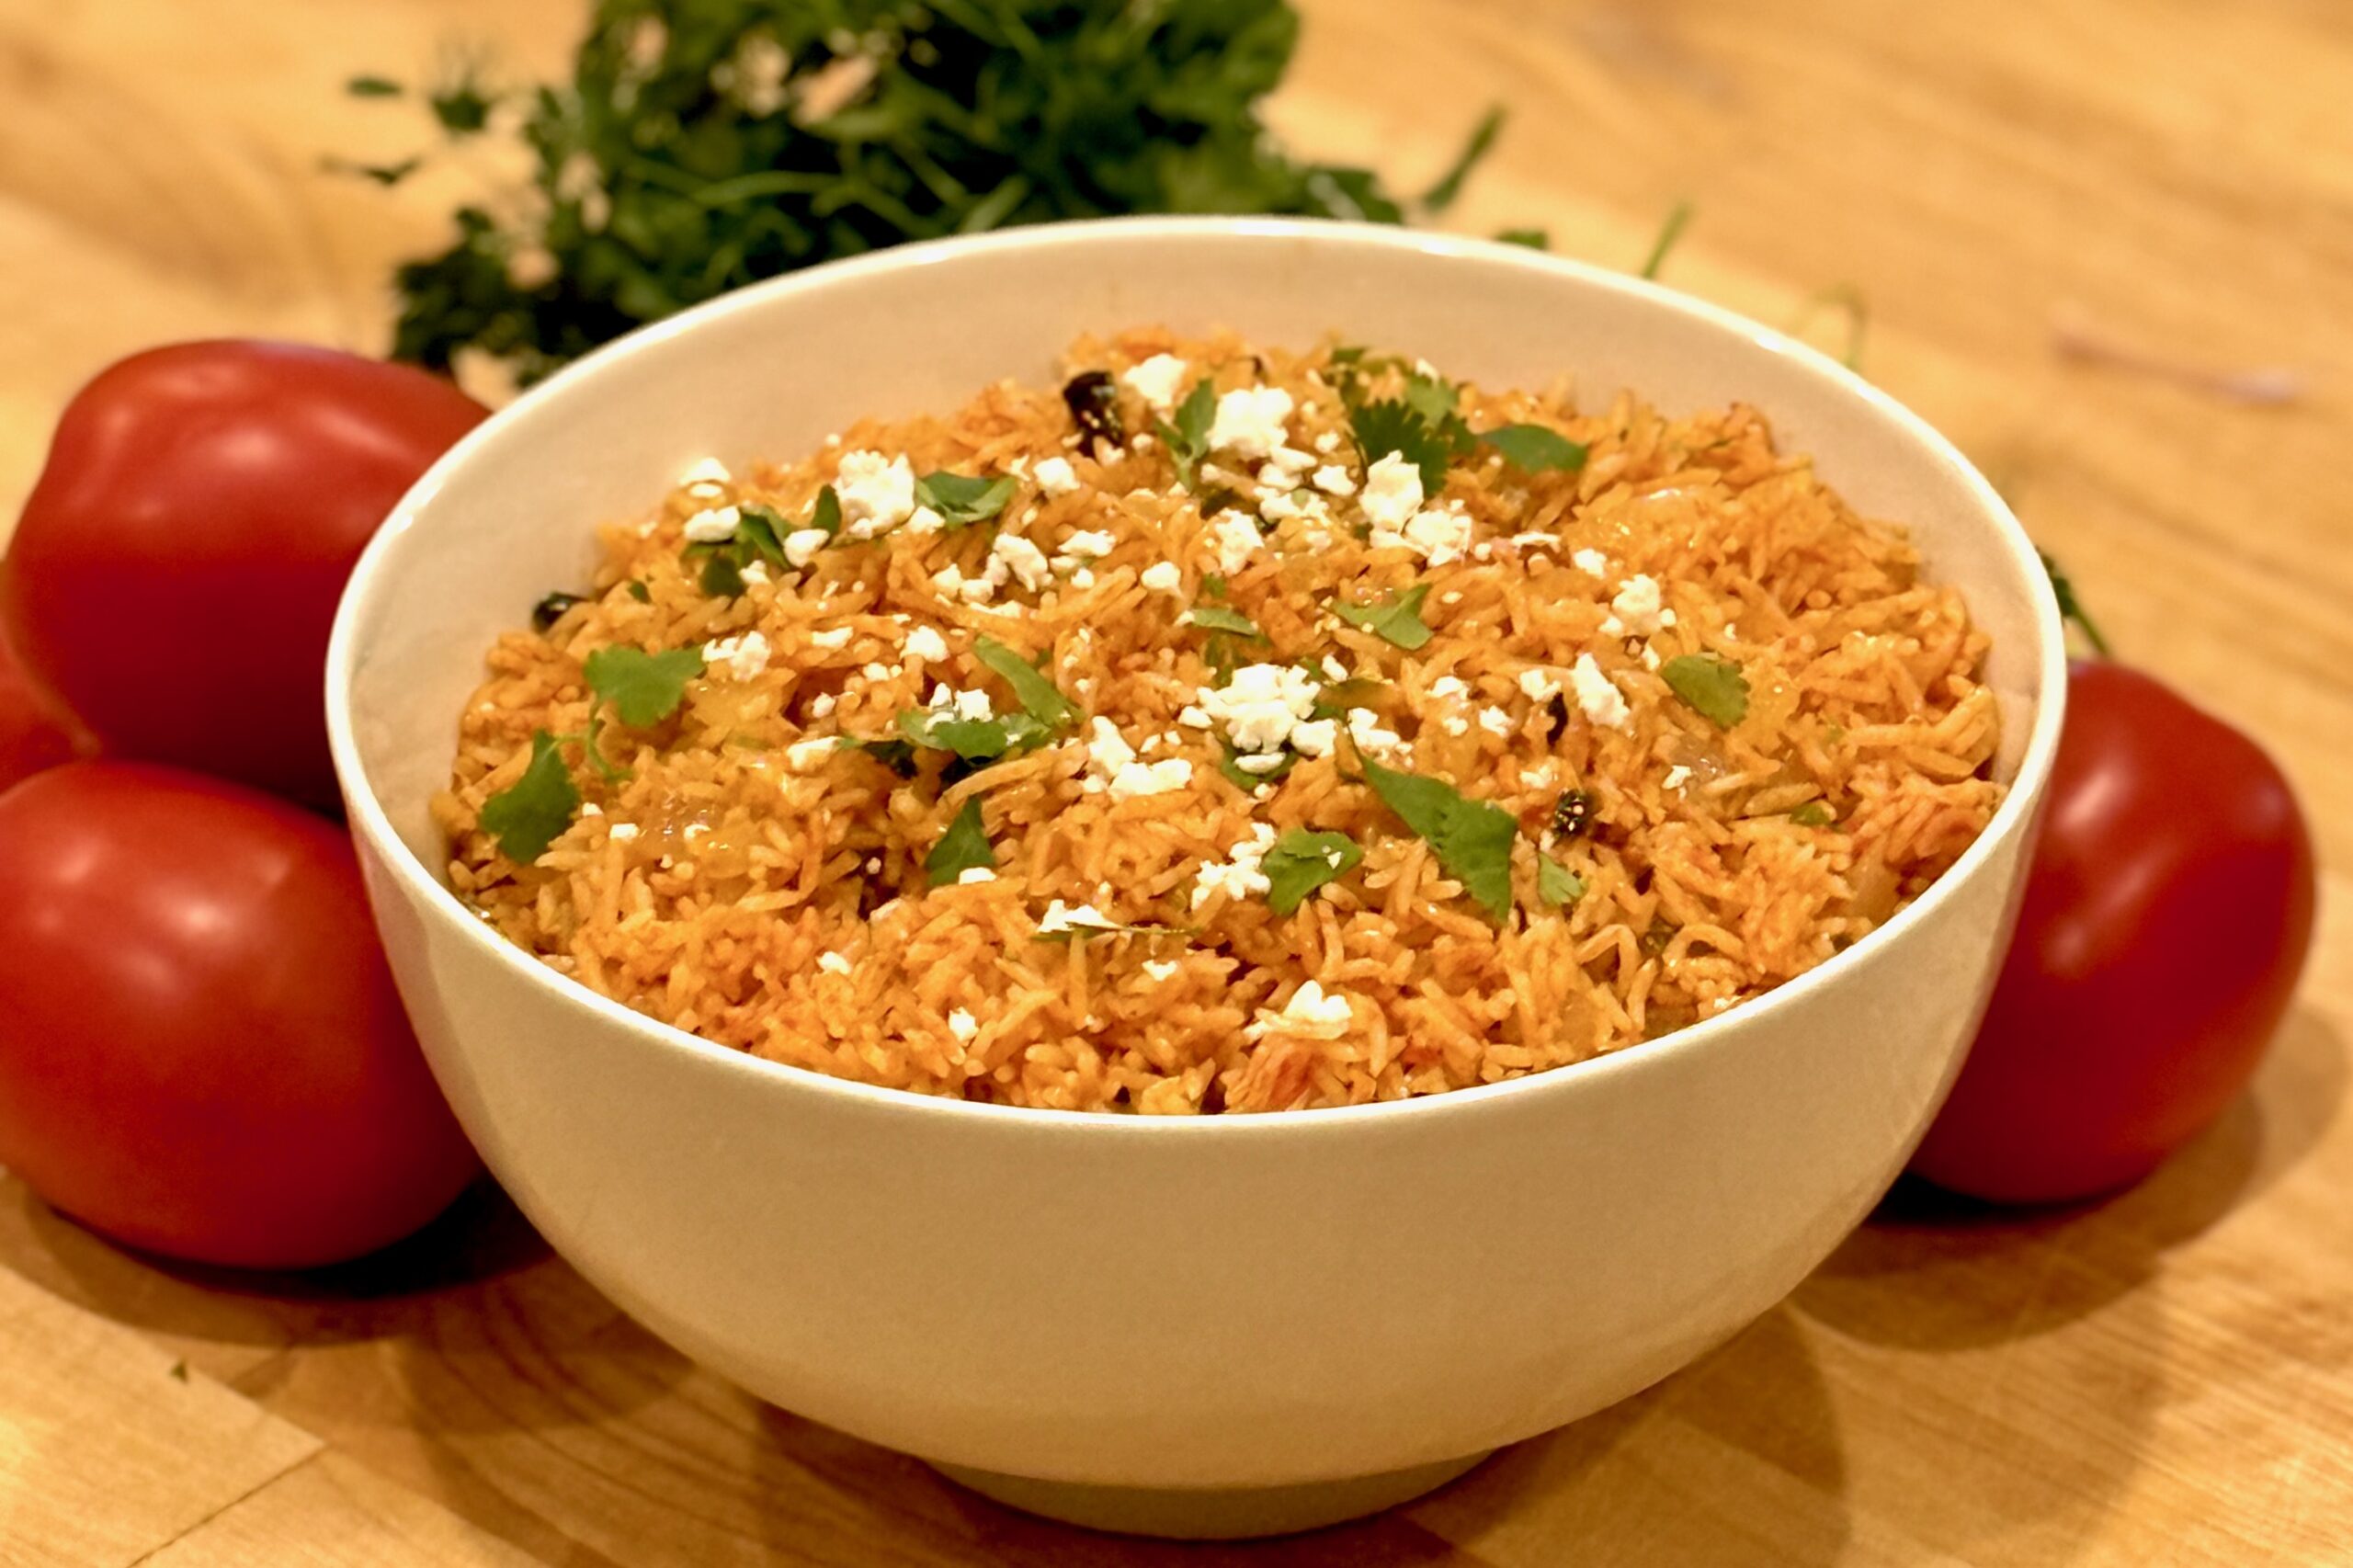
    Fluffy, richly flavored Mexican rice made in the Instant Pot without the risk of burning. Toasted rice, sautéed aromatics, and a homemade Mexican Tomato Sauce create deep color and balanced heat, while careful layering and adjusted liquid ratios ensure perfect texture every time.


    Ingredients

    • 3 cups basmati rice, rinsed and drained
    • 3 tbsp avocado oil
    • 1 tbsp lard (optional, for richness)
    • ½ tsp annatto powder (optional, for color)
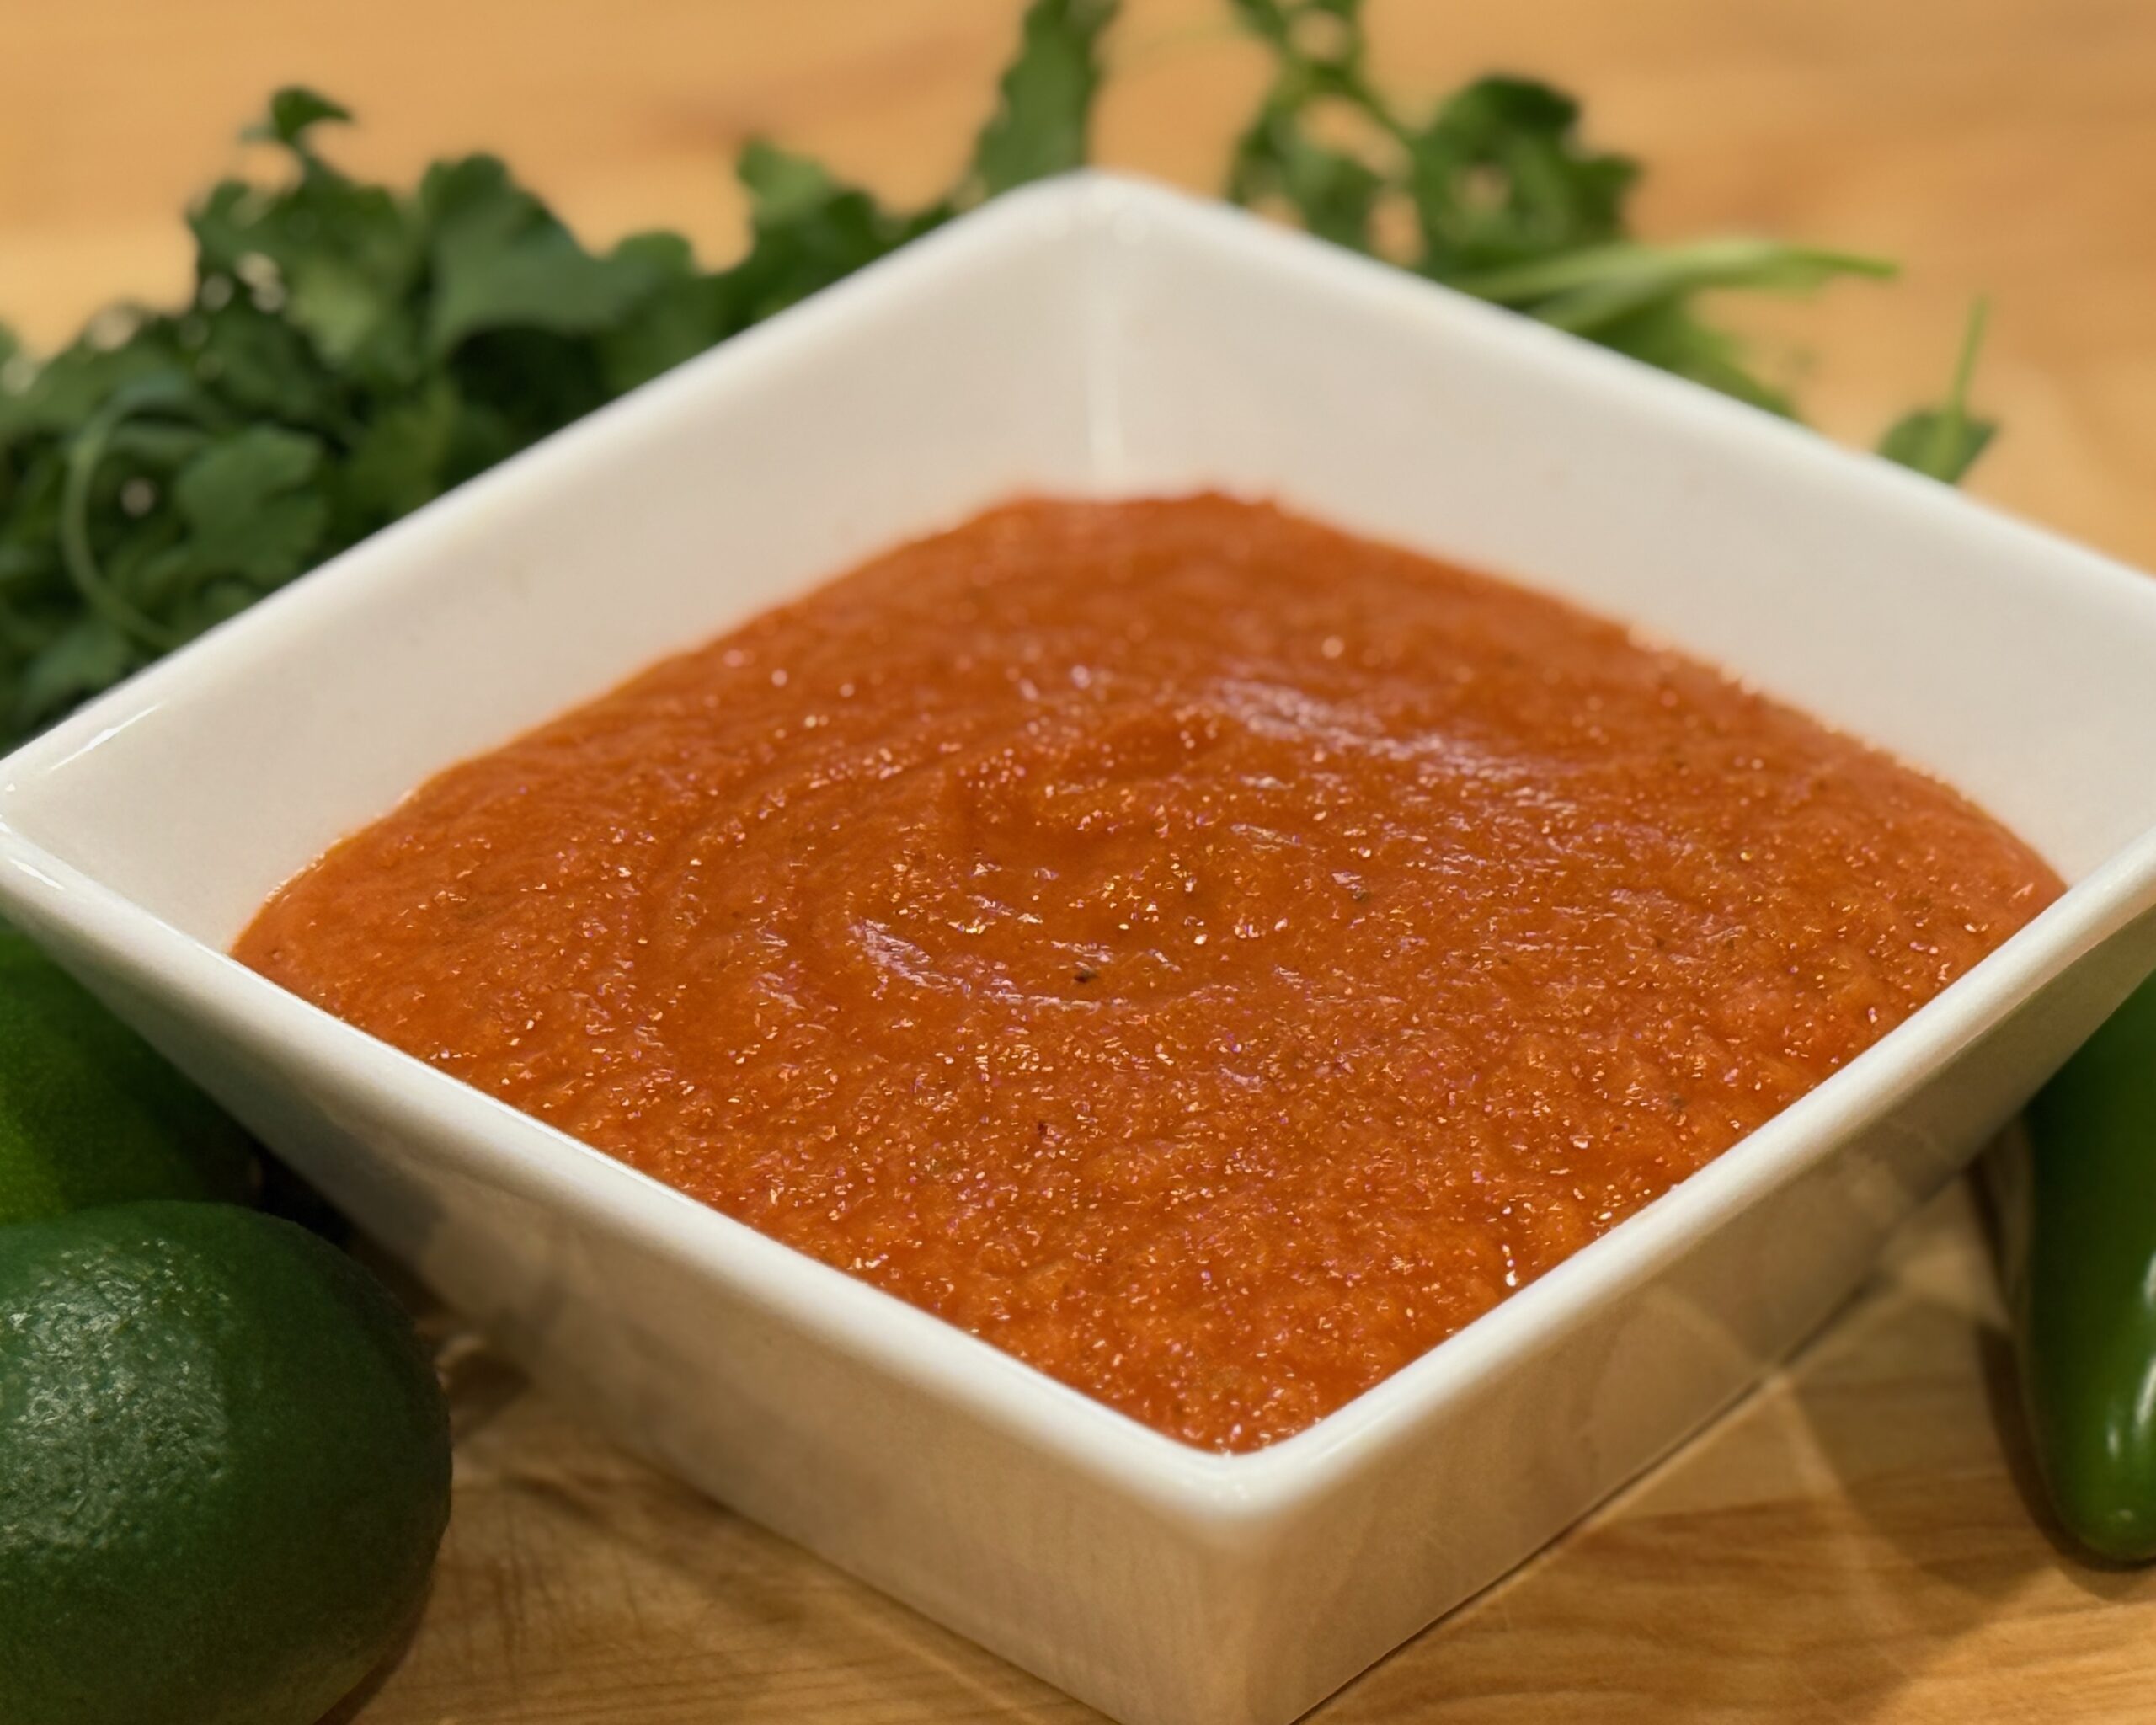
    • 1½ cups prepared Mexican Tomato Sauce (see recipe)
    • 2¾ cups chicken broth
    • ½ tsp table salt
    • ½ medium onion, diced
    • 1–2 jalapeños, diced
    • 1 tbsp butter (for finishing)
    • fresh cilantro, chopped, for garnish
    • lime wedges, for serving

    Directions

    Rinse the Rice

    Place rice in a fine-mesh strainer and rinse under cold running water for 1–2 minutes, or until the water runs mostly clear. Drain well.

    Sauté the Aromatics

    Heat a deep sauté pan over medium-high heat; add 1 tbsp avocado oil. When shimmering, add onion and jalapeño. Sauté until the edges of the onion begin to brown and the jalapeño softens slightly. Transfer the mixture to a bowl and set aside.

    Toast the Rice

    Add remaining 2 tbsp avocado oil and the lard (if using) to the same pan. Once the oil is hot, add the drained rice and cook, stirring occasionally, until lightly golden and fragrant, 5–7 minutes.

    Stir in annatto powder (if using) for 30 seconds, just until color deepens. Deglaze the pan with a few tablespoons of chicken broth, scraping up any toasted bits. Transfer the rice to the Instant Pot.

    Layer and Pressure Cook

    Pour the remaining chicken broth into the Instant Pot over the rice. Sprinkle in salt but do not stir. Gently pour the Mexican Tomato Sauce over the top—again, do not stir. This layering prevents the thicker sauce from touching the bottom and triggering a burn warning.

    Secure the lid and set to Pressure Cook – High for 3 minutes. Allow pressure to release naturally for 10 minutes with Keep Warm on, then turn off Keep Warm and release any remaining pressure manually.

    Fluff and Finish

    Let the rice rest for 2–3 minutes after opening the lid. Fluff gently with a fork, then fold in the reserved jalapeño mixture and the butter. Allow residual heat to melt the butter and evenly coat the grains.

    Let rest uncovered for 3–5 minutes before serving to release excess steam and preserve texture.

    Serve

    Garnish with chopped cilantro and serve with lime wedges. For a stronger tomato flavor, drizzle with additional Mexican Tomato Sauce before serving.


    Notes

    Preparation

    • Total liquid increased to 4¼ cups (2¾ cups broth + 1½ cups sauce) for even cooking and no burn warnings.
    • Layer liquids—broth first, sauce last—and avoid stirring before cooking.
    • Deglaze the pan after toasting the rice to remove any stuck bits that can trigger burn errors.
    • Natural release for 10 minutes ensures fluffy, separate grains without overcooking.
    • Rest uncovered briefly after fluffing to let excess steam escape for perfect texture.

    Serving Suggestions

    • Serve with enchiladas, tacos, grilled meats, or any saucy main dish.
    • Use as a flavorful base for burrito bowls or stuffed peppers.
    • Top with extra cilantro and a squeeze of lime for brightness.

    Variations

    • Substitute vegetable broth for chicken broth for a vegetarian version.
    • For deeper color and richness, always include annatto and lard.
    • For milder heat, use just one jalapeño or remove the seeds before dicing.

    Make-Ahead & Storage

    • This rice reheats beautifully and maintains texture when stored properly.
    • Refrigerate in an airtight container up to 4 days.
    • Reheat gently on the stove or in the microwave with a splash of broth to restore moisture.
    • Freeze up to 2 months; thaw overnight in the refrigerator before reheating.
  • Mexican Tomato Sauce

    Mexican Tomato Sauce

    This classic Mexican-style tomato sauce is richly flavored with roasted tomatoes, onion, garlic, and a touch of Mexican oregano. Tomato bouillon adds umami depth, while a hint of lime or vinegar brightens the flavor. It’s a perfect complement to enchiladas, chiles rellenos, burritos, and rice dishes—smooth, versatile, and beautifully balanced.


    Ingredients

    • 5 ripe Roma tomatoes (or two 14.5 oz cans fire-roasted tomatoes)
    • ½ medium onion, chopped
    • 2–3 cloves garlic
    • ½ tsp Mexican oregano
    • 1 tbsp tomato bouillon with chicken (Knorr or similar)
    • 3 tbsp avocado oil
    • 1–2 tbsp tomato paste
    • ½–1 tsp lime juice or ¼ tsp apple cider vinegar (optional, for brightness)
    • kosher salt & freshly ground black pepper, to taste

    Directions

    Roast the Vegetables

    Place tomatoes (if using fresh), chopped onion, and garlic on a baking sheet and roast at 450ºF (230ºC) for 15–20 minutes, until blistered and slightly charred.

    Blend the Sauce

    Transfer roasted vegetables to a blender. Add Mexican oregano and tomato bouillon. Blend until smooth and uniform.

    Sauté & Simmer

    Heat avocado oil in a deep skillet over medium heat until shimmering. Carefully pour in the blended sauce—it should sizzle on contact. Stir, bring to a boil, then reduce heat to medium-low and simmer for 10–15 minutes, stirring occasionally, until reduced by about half and thickened.

    Finish the Sauce

    Whisk in tomato paste to enrich the color and texture. Simmer gently for 1–2 minutes to bloom the paste and deepen sweetness. Adjust consistency with a splash of chicken broth or water if needed. Add lime juice or vinegar (if using), and season to taste with salt and pepper. For an extra-smooth texture, strain through a fine-mesh sieve before serving.


    Notes

    Preparation

    • Taste the sauce before adding salt—tomato bouillon already contributes salinity.
    • Blooming the tomato paste for 1–2 minutes enhances color, sweetness, and depth.
    • Simmer until the sauce lightly coats the back of a spoon for proper texture.
    • For deeper roasted flavor, char the tomatoes directly over a flame before blending.

    Serving Suggestions

    • Use as the base for Mexican rice, enchiladas, burritos, chilaquiles, or wet burritos.
    • Serve with grilled chicken, carne asada, carnitas, or roasted vegetables.

    Make-Ahead & Storage

    • The sauce deepens in flavor after resting overnight.
    • Refrigerate in an airtight jar for up to 5 days.
    • Freeze up to 3 months; thaw in the refrigerator.
    • Reheat gently over low heat; add a splash of broth or water if it becomes too thick.
  • Beer  Battered Halibut

    Beer Battered Halibut

    Each year I attended the same trade show in London. While I love the city, I didn’t love traveling without my wife—especially this trip because it always fell during her birthday week. The year we decided she’d come along was eventful, to say the least. But before we get to London, some backstory.

    Pregnancy was not something that came easy for us. A lot of very fun attempts, but at least to that point, no resulting pregnancies. Before we left I shared a dream where while in London she’d told me she was pregnant. We laughed as we continued to prepare for the trip.

    Wile I worked the show, my beautiful bride explored the city. On her birthday, we met up after my work day to celebrate with a delicious dinner followed by the theatre to see ‘Les Misérables’—an unforgettable night!

    Back at the hotel, she disappeared into the bathroom. Moments later I heard her voice, “I think we’re pregnant.” I laughed—until she rounded the corner with a pregnancy test, the two pink lines unmistakable. That London trip became our first family journey with our two sons. Later, five and seven years after the whirlwind of welcoming twins, we were blessed with two beautiful daughters, completing our little family.

    As a remembrance of our London getaway, and our life-changing news, I created this recipe; my not-so-authentic version of fish and chips.


    Ingredients

    • 4–6 halibut filet portions
    • 1½ cups (185g) all-purpose flour, plus extra for coating filets
    • 1¼ cups (160g) corn starch
    • 2 tsp baking powder
    • ½ tsp table salt
    • ½ tsp white pepper (optional)
    • 1 can (16 oz / 475 ml) light beer
    • Optional Batter Add-Ins:

      • garlic powder
      • onion powder
      • paprika
      • shoarma spice blend
      • Old Bay

    Directions

    Prepare the Fish:

    Preheat 2″ to 3″ of neutral oil in a skillet or deep fryer to 350º–375ºF. Coat cold halibut filets on all sides with flour; place on a wire rack set over a baking sheet and refrigerate.

    Make the Batter:

    In a large bowl, whisk together flour, corn starch, baking powder, salt, and white pepper. Whisk in enough ice-cold beer to reach the consistency of a thin pancake batter. Refrigerate the batter for 10 minutes to rest and chill.

    Fry the Halibut:

    Dip each filet into the chilled batter and allow excess to drip off. Fry for 1–2 minutes per side, or until crispy and deep golden brown.

    Transfer to a wire rack and immediately sprinkle lightly with salt. Allow the oil temperature to return to 350º–375ºF before frying the next batch.

    Serve hot with Belgian frites, tartar sauce, and/or malt vinegar.


    Notes

    Preparation

    • Keeping the fish cold is essential—cold fillets meeting hot oil creates the highest-crisp batter.
    • Use ice-cold beer. Colder batter expands more rapidly when fried, creating a lighter, airier crust.
    • Halibut works beautifully, but cod, haddock, or rockfish are excellent alternatives.
    • To prevent sticking, make sure your oil is at temp before adding the first piece.

    Serving Suggestions

    • Serve with tartar sauce, malt vinegar, or a squeeze of fresh lemon.
    • Belgian-style frites or hand-cut fries complement the crispy halibut perfectly.
    • A quick cabbage slaw with lemon and dill keeps the plate light and balanced.

    Variations

    • Add ½ tsp paprika or smoked paprika for a deeper color and warmth.
    • Shoarma spice or Old Bay give a fun twist while keeping the classic texture.
    • Substitute half the beer with sparkling water for an extra-light batter.
    • For heat, add a pinch of cayenne or chili powder.

    Make-Ahead & Storage

    Fish and chips are best eaten immediately, but here are some tips:

    • If needed, keep fried pieces warm on a wire rack in a 225ºF oven for up to 20 minutes.
    • Leftovers may be reheated in an air fryer at 375ºF for 4–6 minutes to restore crispness.
    • Batter can be mixed dry (without beer) up to 2 days ahead; just whisk in cold beer before frying.
  • Tartar Sauce

    Tartar Sauce

    This creamy, tangy tartar sauce comes together in minutes and tastes far fresher than anything store-bought. Bright citrus, briny capers, and herbs make it a perfect companion for fried fish, crab cakes, or roasted vegetables.


    Ingredients

    • 1 cup mayonnaise
    • ½ cup dill relish
    • 1 tbsp capers, rinsed and chopped
    • 1 tbsp fresh parsley (or 1 tsp dried)
    • 1 small shallot, finely chopped (or ½ tsp onion powder)
    • 1 tbsp lemon or lime juice
    • 1 tsp lemon or lime zest
    • 2 tsp Worcestershire sauce
    • 1 tsp Dijon mustard
    • ¼ tsp Tapatío hot sauce
    • salt & pepper, to taste
    • Optional Add-Ins

    • 1 tbsp fresh tarragon (or 1 tsp dried)
    • ½ tbsp fresh dill (or ½ tsp dried)
    • 1 tsp honey
    • ¼ cup crème fraîche or sour cream

    Directions

    Mix the Sauce

    Whisk together all ingredients in a bowl until well combined.

    Chill for at least 1 hour before serving to let the flavors meld.


    Notes

    Preparation

    • Please taste and adjust acidity—add more citrus juice if serving with rich fried foods.
    • For a chunkier texture, use whole dill pickles and hand-chop them instead of relish.
    • Fresh herbs brighten the sauce significantly, but dried herbs still work well.

    Serving Suggestions

    • Serve with beer-battered halibut, fish sticks, crab cakes, or shrimp.
    • Use as a spread for fish sandwiches or grilled chicken.
    • Try as a dip for roasted potatoes or fries.

    Variations

    • Swap dill relish for chopped cornichons for a sharper, French-style flavor.
    • Add a pinch of smoked paprika for a subtle smoky note.
    • Fold in a spoonful of crème fraîche for a lighter, silkier version.

    Make-Ahead & Storage

    • Keeps 4–5 days in the refrigerator in an airtight container.
    • Stir before serving, as some separation is normal.
    • Not suitable for freezing due to the mayonnaise base.
  • Espiau’s Vinaigrette

    Espiau’s Vinaigrette

    In the 1970s and 1980s, our family would frequently make the drive to Pomona to eat at Espiau’s Mexican Restaurant. At that time it was located on the west end of Holt. The restaurant dates back to the early 20th century and was founded by an early Pomona Valley pioneer. The business moved to Claremont in the 1990s and can still be found in the Claremont Village. Our family’s favorite dish there is the Tostada Salad. Their tostada is unique. Instead of salsa, theirs is topped with a vinaigrette. This recipe is my attempt to replicate their dressing.


    Ingredients

    • 1 cup red wine vinegar
    • 3 tbsp water
    • ¾ cup vegetable oil
    • ⅓ cup sugar
    • 2 tbsp Lowry’s seasoned salt
    • 1 tbsp onion powder
    • ¼ tsp black pepper, finely ground
    • ¼ tsp dried oregano

    Directions

    Mix the Dressing

    Place all ingredients in a jar; shake to combine. Allow several hours for flavors to meld. Store in refrigerator.


    Notes

    Preparation

    Extra-virgin olive oil or avocado oil may be used, but both become semi-solid in the refrigerator. Let the dressing rest at room temperature or place the sealed jar under warm water until fluid again.

    Shake well before each use—the sugar and spices will naturally settle since this vinaigrette contains no emulsifiers.

    The flavor improves dramatically after resting. Overnight is ideal, allowing the oregano to bloom, the vinegar to soften, and the seasoning to fully dissolve.

    Serving Suggestions

    To mimic Espiau’s tostada experience, allow the vinaigrette to warm slightly before serving. The aromatics brighten when the dressing is not ice-cold.

    Excellent on tostadas, chopped salads, shredded cabbage, grilled chicken salads, sliced cucumbers, tomatoes, and mixed vegetables.

    Variations

    For a low-calorie or low-carbohydrate option, substitute monk fruit sweetener. Start with the full ⅓ cup equivalent and adjust to taste after resting.

    For a sharper dressing, increase black pepper or add a pinch of crushed red pepper flakes.

    Make-Ahead & Storage

    This vinaigrette keeps well for 7–10 days in the refrigerator. The high acidity helps preserve the flavor, though it is best within the first week.

    If the dressing tastes too sharp immediately after mixing, allow more resting time—its acidity mellows as the aromatics hydrate.

  • Poutine

    Poutine

    Poutine is the ultimate Canadian comfort classic—crispy hot fries, soft squeaky cheese curds, and rich gravy melting everything into one irresistible bite. It’s simple, hearty, and perfect for nights when you want something warm and satisfying without overthinking the prep.


    Ingredients

    • Southern gravy
    • Belgian frites, or oven fried fries
    • white cheddar cheese curds

    Directions

    Assemble the Poutine

    Plate hot fries and sprinkle generously with cheese curds. Cover with hot gravy and serve immediately.


    Notes

    Preparation

    • For best texture, use hot, freshly cooked fries so the curds soften slightly but don’t fully melt.
    • If your cheese curds are refrigerated, let them sit at room temperature for 15–20 minutes before assembling for maximum “squeak.”
    • Warm gravy thoroughly just before serving so it coats evenly and heats the curds.

    Serving Suggestions

    • Add shredded rotisserie chicken, pulled pork, or leftover brisket for a heartier variation.
    • Top with chopped green onions or a sprinkle of smoked paprika for extra flavor depth.
    • Serve alongside burgers, grilled meats, or as a standalone comfort meal.

    Variations

    • Use mushroom gravy instead of brown gravy for a vegetarian option.
    • Try peppercorn gravy for a bolder, steakhouse-style version.
    • Make it “fully loaded” with bacon, caramelized onions, or jalapeños.

    Make-Ahead & Storage

    • Fries are best freshly cooked; avoid storing once assembled as they become soggy.
    • Gravy can be made up to 3 days ahead and reheated gently before serving.
    • Cheese curds keep well refrigerated for 1–2 weeks; bring to room temperature before using.
  • Cilantro Lime Rice

    Cilantro Lime Rice

    Fluffy jasmine rice infused with fresh lime and cilantro—simple, bright, and perfectly balanced to complement tacos, grilled meats, or saucy dishes. A touch of butter enhances richness while the zest and juice keep every bite fresh and aromatic. Click here for the Instant Pot version of this recipe.


    Ingredients

    • 1 cup jasmine rice, rinsed and drained
    • 1 tbsp butter
    • 1½ cups chicken broth (or vegetable broth)
    • 1 clove garlic, minced (optional)
    • Zest of 1 lime
    • 1–1½ tbsp fresh lime juice (to taste)
    • ½ cup cilantro leaves, finely chopped
    • ⅛ tsp sugar (to round acidity)
    • Salt to taste

    Directions

    Toast the Rice

    In a saucepan or rice cooker insert, melt butter over medium heat. Add rice (and garlic, if using) and sauté 2–3 minutes until grains appear glossy and lightly golden.

    Cook the Rice

    Add broth and a generous pinch of salt. Stir once, bring to a simmer, then cover and reduce heat to low. Cook for 15 minutes, then remove from heat and let stand, covered, for 10 minutes to finish steaming.

    Finish with Lime and Cilantro

    In a small pan, warm lime zest with a few drops of butter until aromatic (optional but enhances flavor).

    Fluff rice gently with a fork and fold in lime zest, lime juice, cilantro, and sugar. Taste and adjust salt or lime as desired.

    Serve

    Serve warm as a side or base for tacos, grilled meats, or saucy dishes where a bright, citrusy accent balances richness.


    Notes

    Preparation

    • Rinse jasmine rice until water runs mostly clear to remove excess starch and keep grains fluffy.
    • Let cooked rice rest 10 minutes before fluffing to allow steam to redistribute for perfect texture.
    • Warming lime zest in butter releases aromatic oils and coats grains more evenly.
    • Adjust lime and salt balance at the end—rice should taste bright but not sharp.

    Serving Suggestions

    • Pairs beautifully with tacos, fajitas, or grilled seafood.
    • Excellent base for burrito bowls or enchilada platters.
    • Top with extra cilantro and a sprinkle of lime zest for presentation.

    Variations

    • Subtle Coconut Version: Replace ¼ cup of broth with ¼ cup unsweetened coconut milk (1¼ cups broth + ¼ cup coconut milk). Adds gentle creaminess and a faint coconut aroma while maintaining lime-cilantro brightness.
    • Coconut-Forward Version: Replace ½ cup of broth with ½ cup coconut milk (1 cup broth + ½ cup coconut milk). Creates a richer, tropical flavor—use 2 tbsp lime juice and season more assertively with salt.
    • Use coconut versions for fusion dishes like Korean Pulled-Pork Tacos, jerk chicken, or grilled shrimp where a creamy contrast enhances spice and smoke.

    Make-Ahead & Storage

    • Cooked rice can be held warm for up to 30 minutes before adding lime and cilantro.
    • Refrigerate leftovers in an airtight container up to 3 days; reheat gently with a drizzle of broth or water to restore moisture.
    • Fresh cilantro and lime juice should always be added just before serving for best color and flavor.
  • Aguachile Rojo de Camaron

    Aguachile Rojo de Camaron

    Our family’s take on northern Mexican aguachile rojo: quick-blanched shrimp finished in fresh lime, a vivid red base of toasted dried chiles and Camaronazo, and a crisp bed of cucumber, red onion, cilantro, and just-ripe avocado. Bright, spicy, and ice-cold—made to serve immediately with tostadas, salsa negra, and wedges of lime.


    Ingredients

      Shrimp & Lime Cure

    • 2 lb large raw shrimp, peeled, deveined, halved lengthwise
    • 1 cup fresh lime juice (just enough to cover shrimp)
    • 2 tsp table salt, divided (to season curing liquid and sauce)
    • Vegetables & Herbs

    • 1 red onion, very thinly sliced
    • 3 cucumbers, thin half-moons
    • 3 avocados, diced (add just before serving)
    • ½ bunch cilantro, chopped, plus leaves for garnish
    • radishes, thinly sliced (garnish, optional)
    • lime wedges, for serving
    • Red Base

    • 24–28 oz Camaronazo spicy tomato cocktail with shrimp
    • 4 dried chiles de árbol
    • 2 dried pequín chiles
    • 1 dried guajillo chile
    • 1 clove garlic
    • ¼ tsp chicken bouillon powder (Knorr-style), or to taste
    • Optional Balancers

    • ½ tsp sugar (to soften bitterness from toasted chiles)
    • 1–2 tbsp soy sauce or Maggi seasoning (depth; Sinaloan style)
    • 2–3 tbsp cold water (only if base is too thick)

    Directions

    Blanch and Cure the Shrimp

    Bring a pot of well-salted water to a gentle boil. Add shrimp and blanch 10–15 seconds—just until edges blush pink—then immediately transfer to an ice bath to stop cooking. Drain well and pat dry.

    Place shrimp in a shallow bowl and pour in just enough fresh lime juice to cover. Refrigerate 20–25 minutes, stirring once halfway, until opaque and slightly firm. Avoid over-marinating.

    Soak the Onion

    Soak sliced red onion in ice water for 10 minutes to mellow sharpness and keep a crisp bite; drain thoroughly.

    Toast & Hydrate the Chiles

    Toast árbol, pequín, and guajillo chiles in a dry skillet over medium heat until fragrant, ~30 seconds per side. Remove stems and most seeds.

    Soak guajillo in hot water 10 minutes to soften; reserve a spoonful of soaking liquid.

    Blend the Red Base

    Blend about ¼ of the Camaronazo with toasted chiles, garlic, 1 tsp of the salt, chicken bouillon, and a splash of guajillo soaking liquid until completely smooth and vivid red.

    Add remaining Camaronazo and optional soy sauce or Maggi; pulse to combine. If using, add sugar to round bitterness.

    If the base is too thick, add 2–3 tbsp cold water. If it tastes too sweet, brighten with more lime. Taste and adjust salt at the end.

    Combine the Vegetables

    In a large chilled bowl, mix cucumber, drained onion, and chopped cilantro. Pour in the red base and stir to coat evenly.

    Finish with Shrimp & Avocado

    Add the cured shrimp along with their lime marinade; fold gently to combine so the broth stays bright and balanced.

    Add avocado just before serving and fold lightly to keep the cubes intact.

    Serve

    Serve immediately in chilled bowls or on tostadas. Garnish with cilantro leaves, sliced radish, and lime wedges; drizzle with salsa negra or salsa macha if desired.


    Notes

    Preparation

    • Blanching locks in a crisp, restaurant-quality texture; the short lime cure finishes the “cook” without turning mushy.
    • Toast all dried chiles briefly to deepen flavor and color; soak guajillo for a smoother blend.
    • Onion soak: 10 minutes in ice water keeps texture while taming harshness.
    • If the base is too thick, add 2–3 tbsp cold water; if sweetness dominates, add a squeeze of lime; always taste and adjust salt at the end.
    • Add avocado only at the end to prevent bruising and mushiness.

    Serving Suggestions

    • Serve with crisp tostadas (not just chips) for structure and crunch.
    • Add thinly sliced radish and extra cilantro leaves for color and freshness.
    • Offer salsa negra or salsa macha for a glossy, smoky-spicy drizzle.
    • Pass extra lime wedges at the table for last-second brightness.
    https://thehugginsfamily.com/wp-content/uploads/2025/08/AguachileRojo.jpeg

    Variations

    • Soy sauce or Maggi (1–2 tbsp) adds savory depth common in Sinaloan versions—use to taste.
    • A pinch of sugar (½ tsp) can smooth bitterness from well-toasted chiles.
    • For extra heat, add another árbol or a small amount of the chile seeds; for milder heat, reduce árbol/pequín.

    Make-Ahead & Storage

    • The red chile base can be blended up to 1 day ahead; keep refrigerated and whisk before using.
    • Blanch shrimp and chill the onion/cucumber ahead, but cure shrimp in lime and add avocado just before serving.
    • Best served immediately once assembled; leftovers lose texture quickly—consume the same day.
  • Braised Fennel

    Braised Fennel

    This elegant side transforms fennel’s natural sweetness into something truly special. Lightly caramelized and gently braised with shallots, garlic, and white wine, the tender fennel is finished with butter, lemon zest, and fresh fennel fronds for a glossy, aromatic dish worthy of any restaurant table.


    Ingredients

    • 2–3 fennel bulbs, trimmed and quartered lengthwise (cores intact)
    • 2 tbsp olive oil or butter
    • 1 shallot, thinly sliced
    • 1 clove garlic, thinly sliced
    • ¼ cup dry white wine or 1 tbsp lemon juice
    • 1 cup chicken stock
    • ½ tsp honey (optional)
    • 1 tbsp butter (for finishing)
    • salt and freshly ground black pepper, to taste
    • zest of ½ lemon, for garnish
    • chopped fennel fronds or parsley, for garnish

    Directions

    Brown the Fennel

    In a large sauté pan, heat olive oil or butter over medium-high heat. Add fennel quarters cut-side down and cook until deeply golden on both cut sides, about 3–4 minutes per side. Remove and set aside.

    Build the Aromatic Base

    Add shallot and garlic to the pan; sauté 30 seconds, just until fragrant. Deglaze with white wine (or lemon juice), scraping up any browned bits.

    Braise

    Add chicken stock and honey, if using. Return fennel to the pan, cut-side up. Bring to a simmer, reduce heat to low, and cover. Braise gently for 15–20 minutes, turning once, until fennel is tender but still holds its shape.

    Glaze & Finish

    Remove the lid and simmer uncovered for 5–7 minutes more, allowing the liquid to reduce into a glossy glaze. Stir in butter off heat to finish the sauce and season with salt and pepper.

    Serve

    Transfer fennel to a serving dish and drizzle with the reduced pan juices. Garnish with lemon zest and chopped fennel fronds or parsley before serving.


    Notes

    Preparation

    • Proper browning is essential—golden edges enhance both flavor and appearance.
    • Use vegetable stock for a vegetarian version.
    • Finishing with butter gives the glaze a rich, silky texture.

    Serving Suggestions

    • Serve as a side with roasted chicken, fish, or creamy polenta.
    • For a richer presentation, finish with freshly grated Parmesan or a drizzle of aged balsamic.
    • Add a sprinkle of toasted breadcrumbs or flaky salt for texture.

    Make-Ahead & Storage

    • Can be braised up to 1 day ahead; cool and refrigerate in its cooking liquid.
    • Reheat gently over low heat, spooning juices over the fennel to re-glaze.
    • Best served warm, but can also be enjoyed at room temperature as part of an antipasto spread.
  • Refried Beans

    Refried Beans

    Rich, creamy, and deeply savory, our family’s recipe for refried beans captures the heart of traditional Mexican cooking with a fraction of the usual time. Each bite balances earthy depth and a hint of sweetness from slow-simmered pinto beans. Whether tucked inside burritos, layered beside Mexican rice, or served simply with warm tortillas, they bring comfort and authenticity to any meal—and once you’ve made them this way, you may never reach for canned beans again.


    Ingredients

      Beans

    • 2 cups dry pinto beans, rinsed and drained
    • 1 onion, diced (or 1 tbsp onion powder)
    • 1 tsp table salt
    • ½ tsp ground cumin
    • 5 cups chicken broth or water
    • Fat (Choose One or a Blend)

    • 2–3 tbsp avocado oil, lard, butter, or a combination
    • Optional Flavor Boosters

    • ¼ cup Mexican Tomato Sauce (recommended for deeper flavor)
    • OR ½ tsp soy sauce or Maggi (for umami depth without tomato flavor)
    • Optional Add-Ins

    • ⅛ tsp Mexican oregano
    • 1 tsp garlic powder (add after cooking)
    • 1 sachet ham bouillon or sazón (optional, for savory richness)

    Directions

    Sauté Aromatics (Optional but Recommended)

    Using the Sauté function, heat 1 tbsp of the fat in the Instant Pot. Add diced onion and cook 2–3 minutes until translucent and fragrant. If using onion powder, add during the Mash step.

    Deglaze with a splash of broth if any browning occurs.

    Cook the Beans

    Add pinto beans, broth, cumin, and salt to the pot. (If using butter, reserve it for after cooking.) If using Mexican Tomato Sauce for integrated flavor, stir it in now—or stir it in later during the refry step as a finisher.

    Set to Pressure Cook – High for 60 minutes. When complete, allow natural release for 10–15 minutes, then release remaining pressure manually.

    Mash or Refry

    Drain beans lightly, reserving at least ½ cup of the cooking liquid. For classic mashed texture, return beans to the pot, add fat, and mash to desired smoothness using a potato masher, hand mixer, or immersion blender. Add liquid as needed for consistency.

    For authentic refried texture, heat remaining fat in a large skillet over medium-high heat. Add beans and mash directly in the pan, stirring occasionally until thickened and slightly toasty (about 5 minutes). Stir in reserved broth as needed for a silky, spreadable consistency. If using Mexican Tomato Sauce as a finisher, add 2–3 tbsp during this stage and cook until slightly reduced and glossy.

    Rest and Serve

    For best flavor, refrigerate overnight and reheat before serving. The beans thicken slightly as they cool, deepening both flavor and texture.


    Notes

    Preparation

    • For richer flavor, add ¼ cup Mexican Tomato Sauce or ½ tsp soy sauce/Maggi during cooking or mashing (omit if serving entrées with green sauce bases).
    • Mashing the beans in hot fat develops a nutty flavor and glossy, restaurant-style finish.
    • Reserve some cooking liquid and add as needed to reach your preferred consistency.
    • Beans improve overnight as flavors meld and starches set.

    Serving Suggestions

    Make-Ahead & Storage

    • Refrigerate up to 5 days in an airtight container.
    • Freeze up to 3 months; thaw overnight in the refrigerator before reheating.
    • Reheat gently on the stovetop or in the microwave, adding a splash of broth or water to loosen if thickened.