Bags of Spices

Favorite Recipes

  • Vanilla Bean Ice Cream

    Vanilla Bean Ice Cream

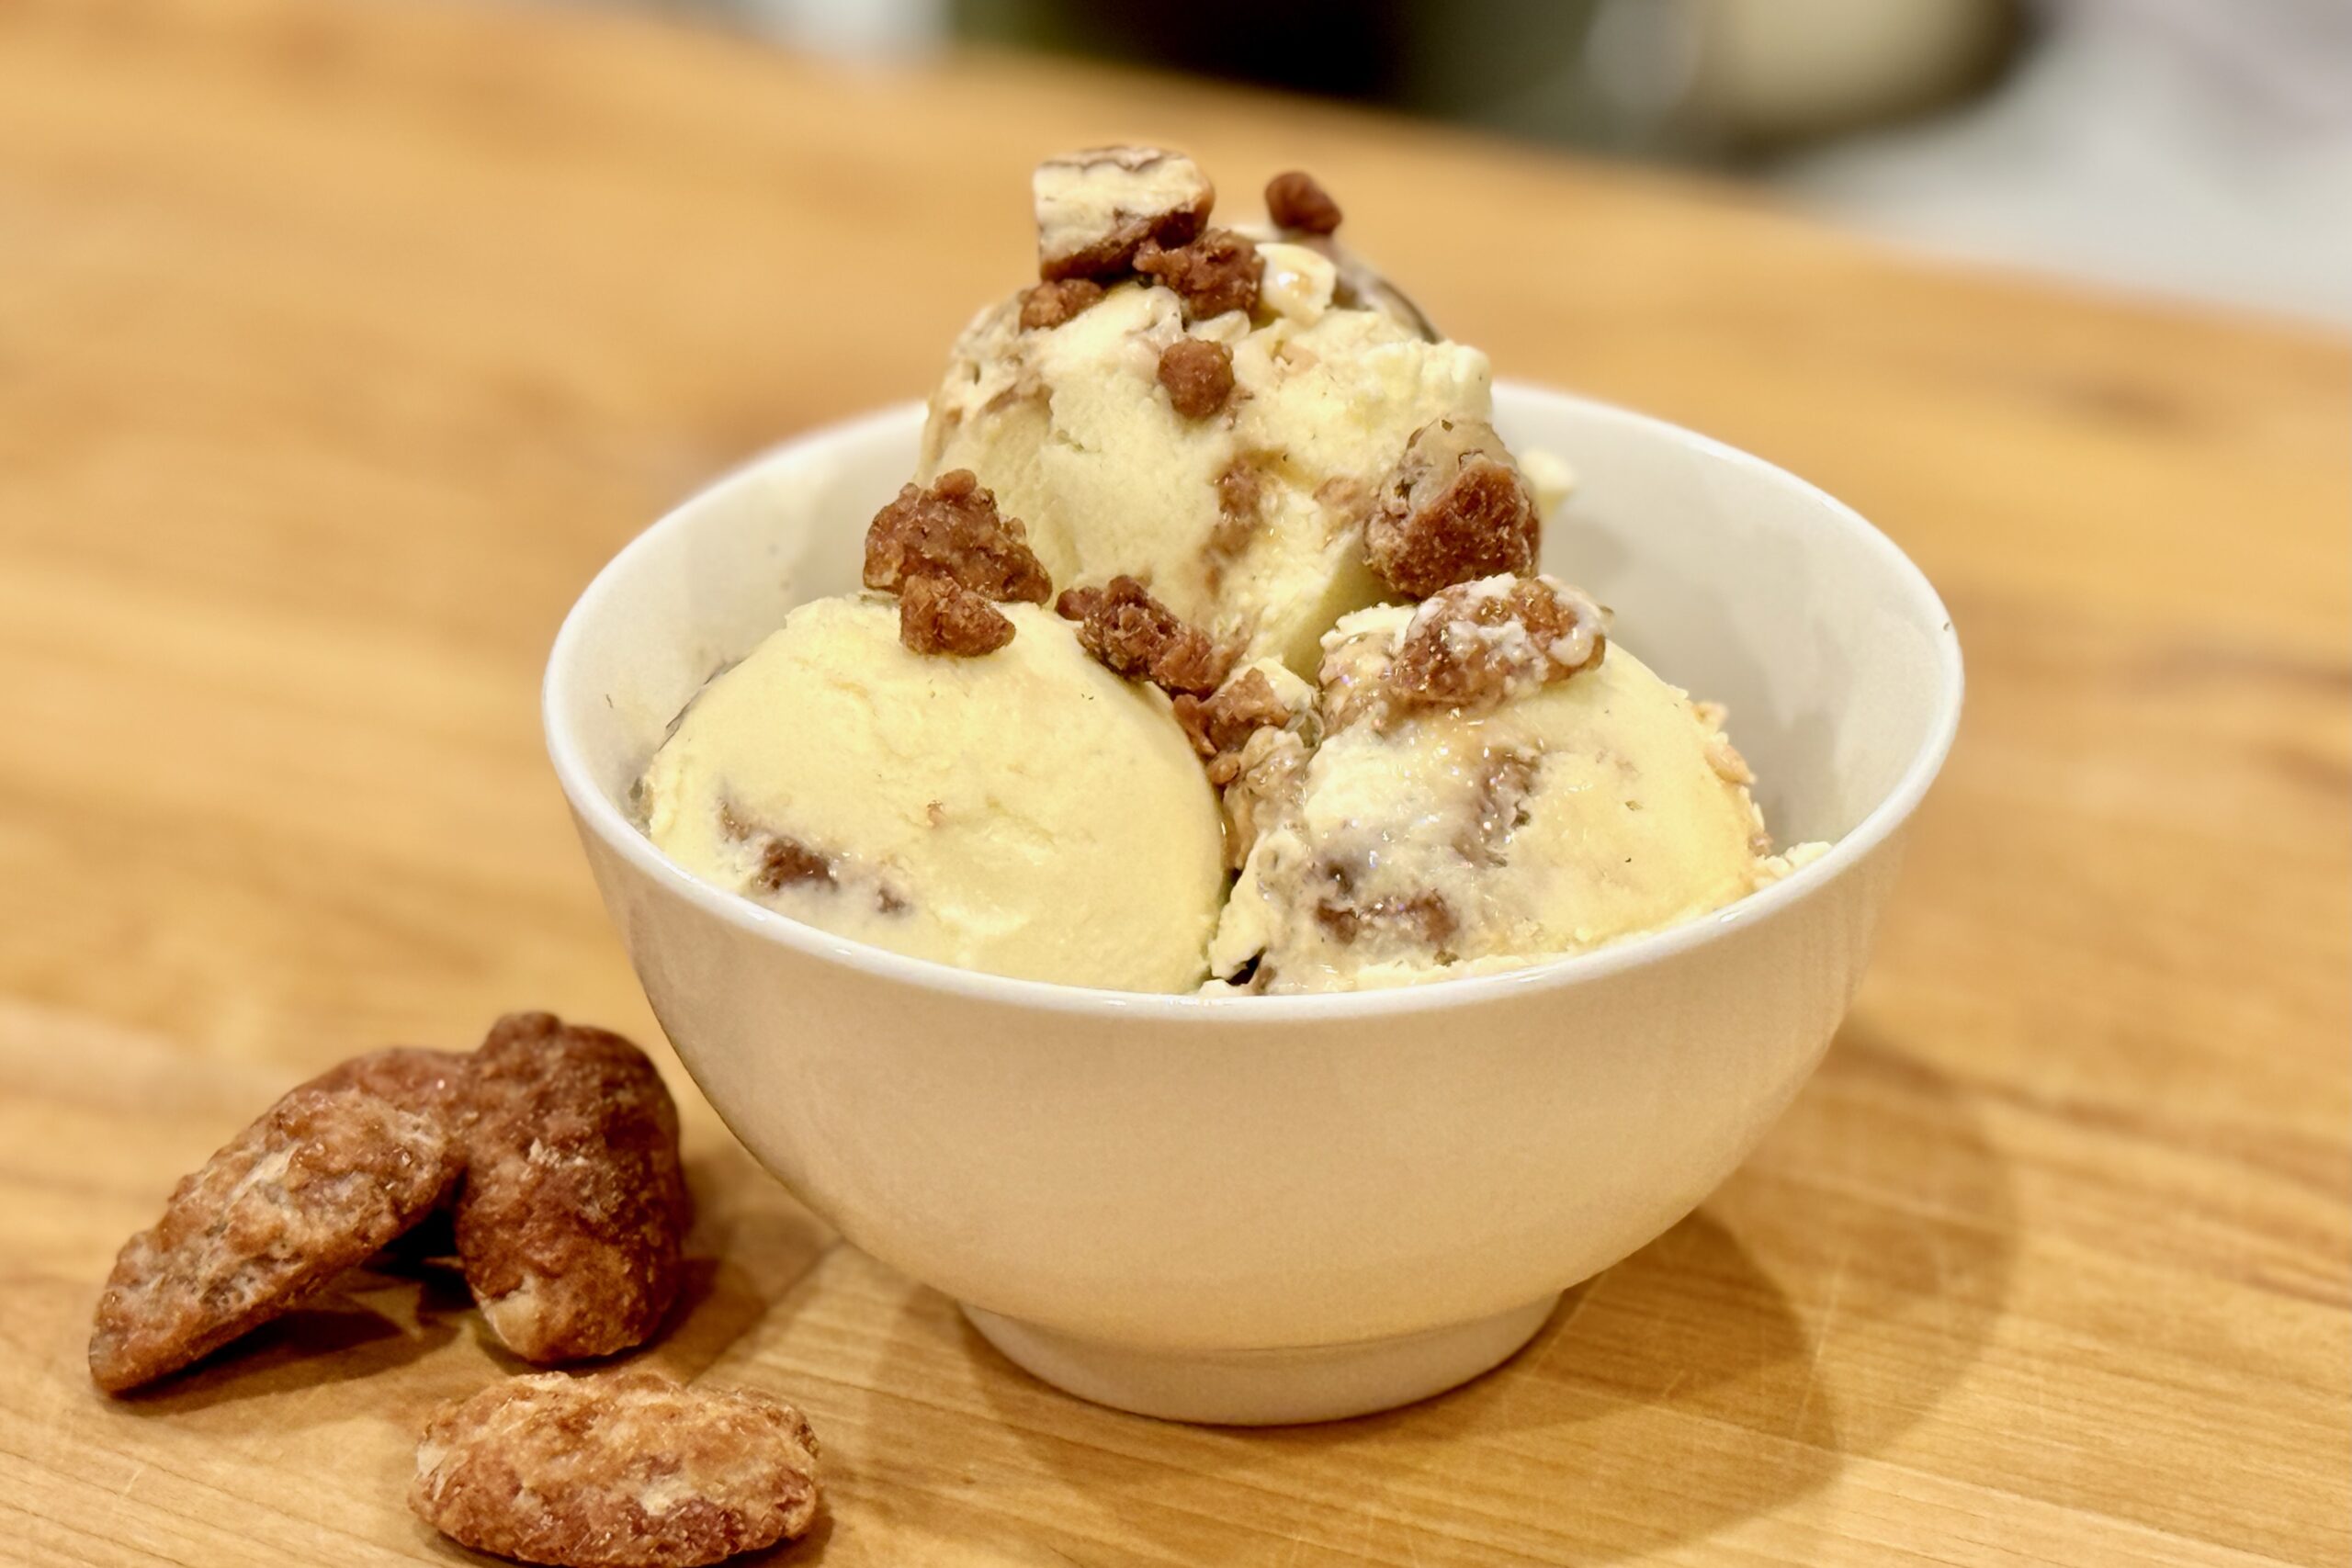
    This lighter-style vanilla bean ice cream puts the spotlight squarely on the ingredients—fresh cream, whole milk, and a full Madagascar vanilla bean. Cooking the custard to a slightly higher temperature strengthens the structure without adding heaviness, allowing the vanilla to shine with clean, bright aroma and a naturally silky texture.


    Ingredients

      Ice Cream Base

    • 2 cups whole milk
    • 1 cup heavy cream
    • ⅔ cup granulated sugar, divided
    • 4 large egg yolks
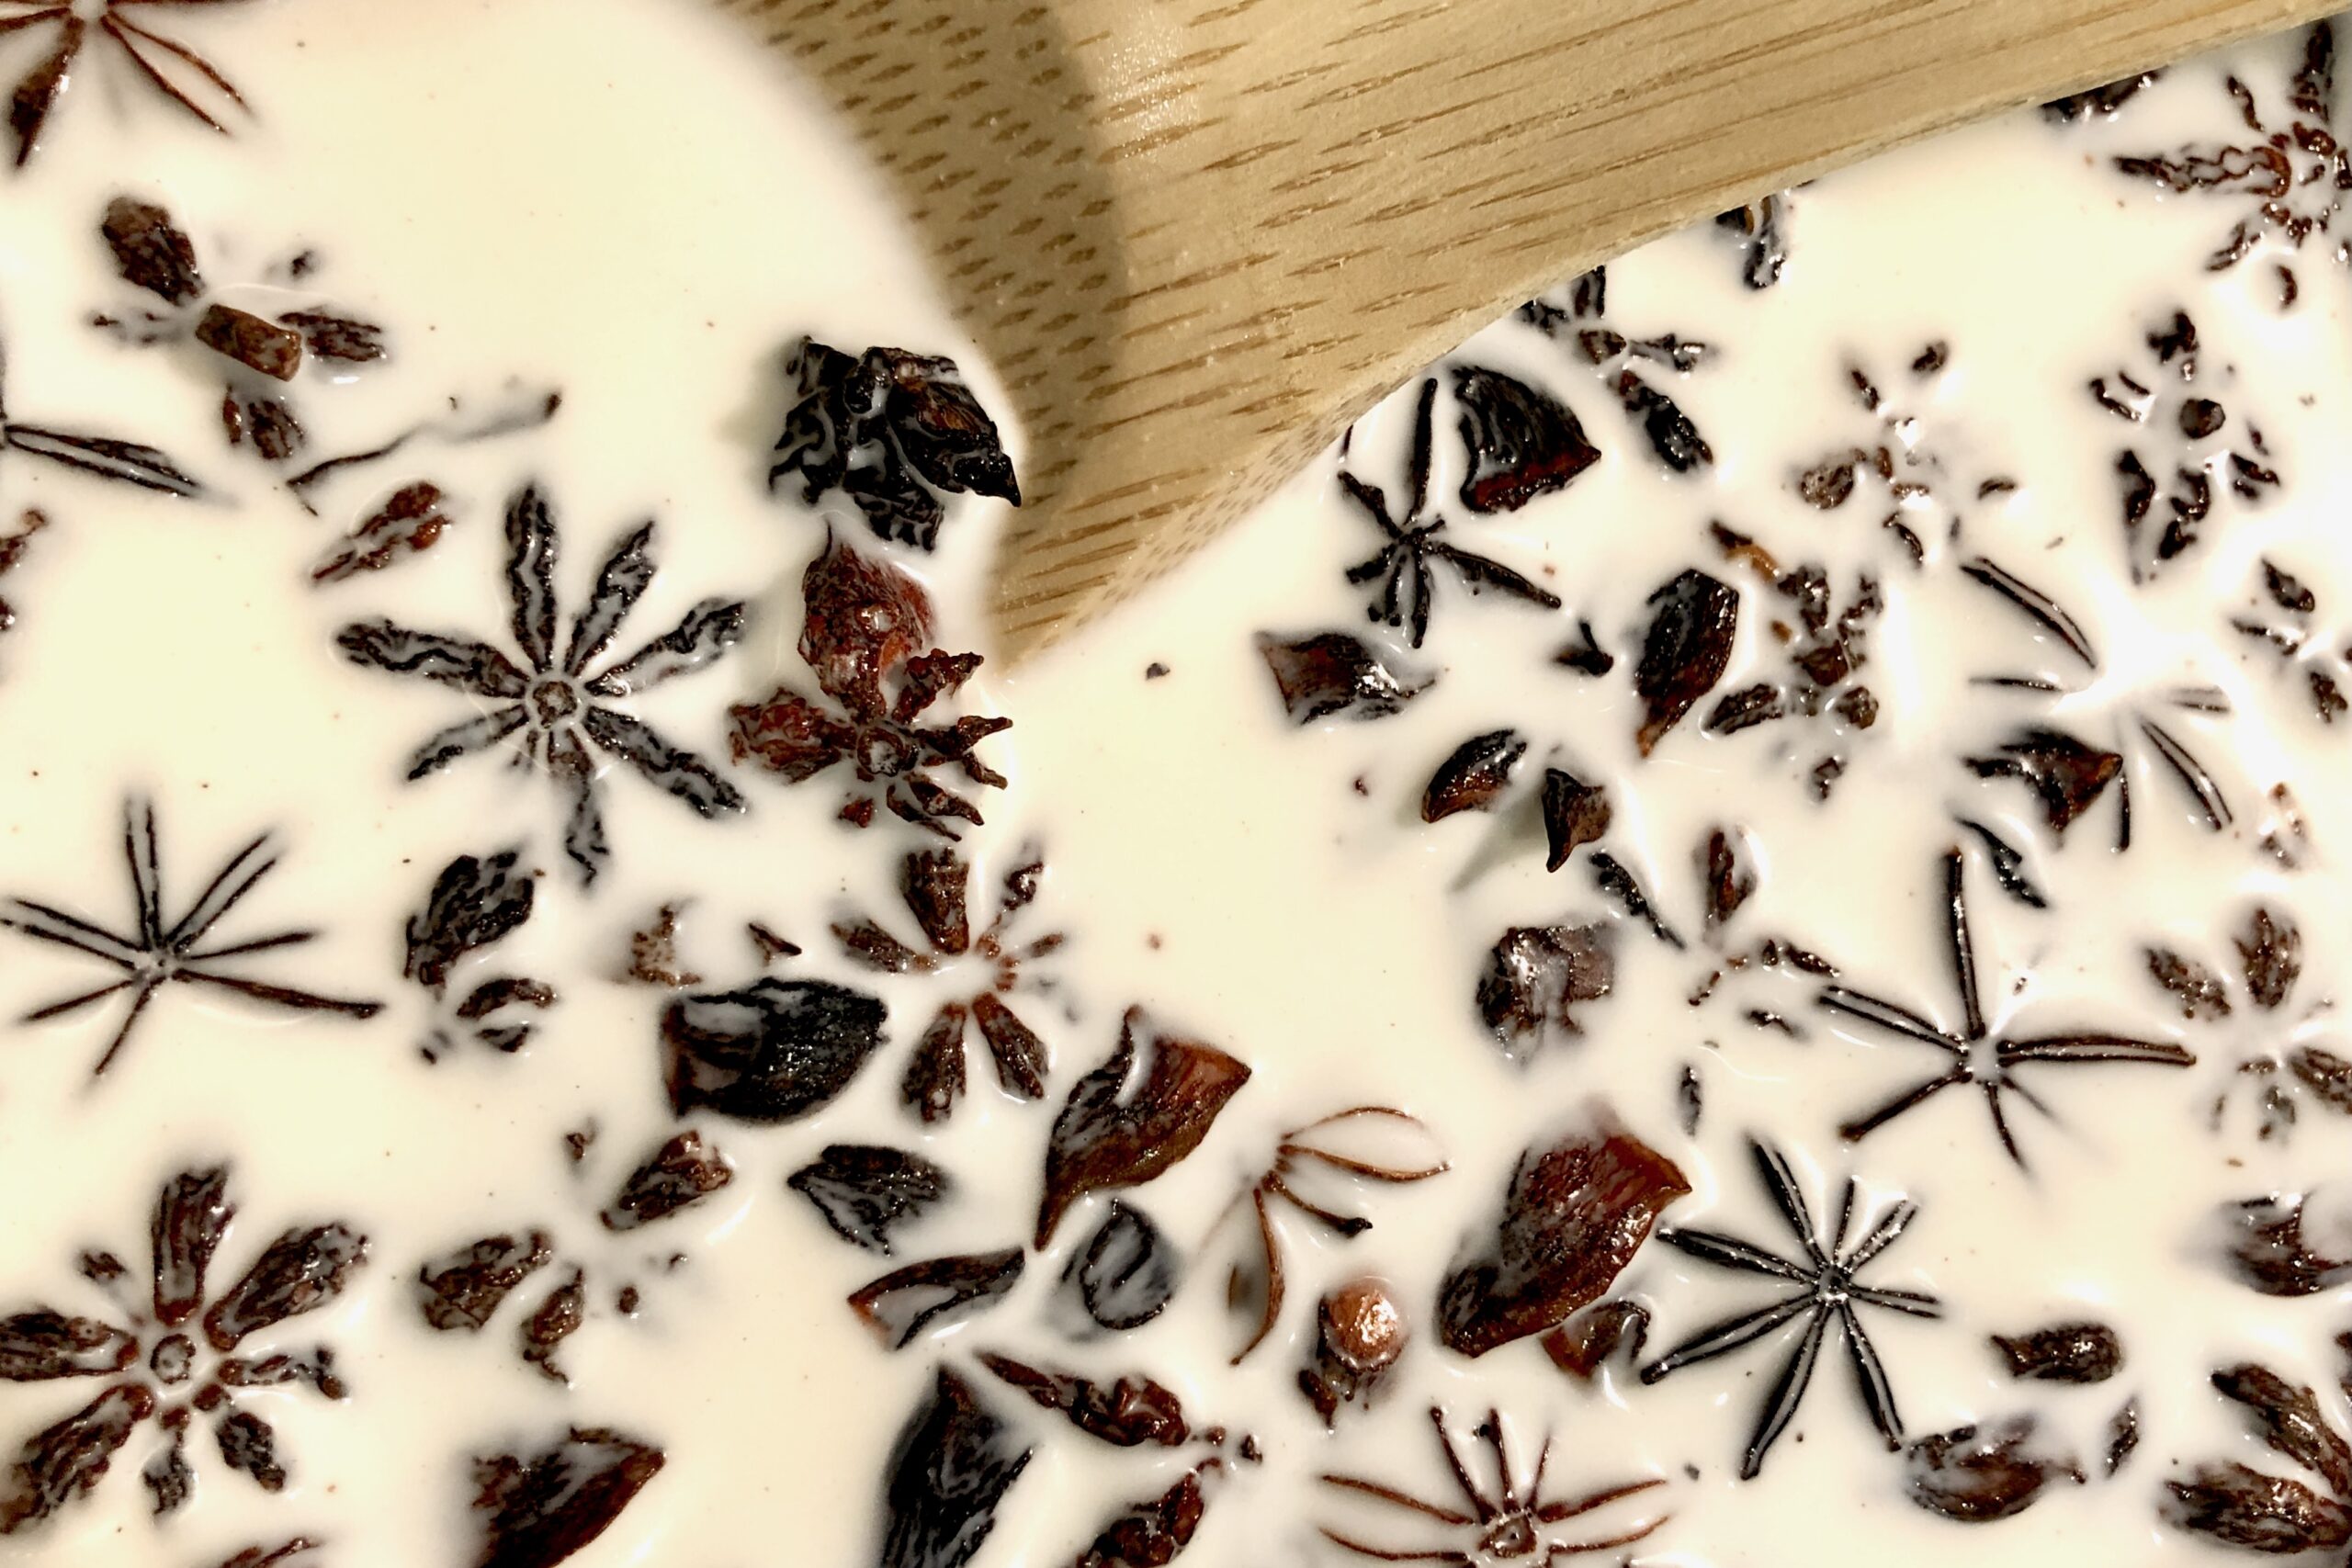
    • 1 Madagascar vanilla bean, split and scraped
    • 1 tbsp vanilla extract
    • ⅛ tsp xanthan gum
    • ¼ tsp fine salt

    Directions

    Prepare the Vanilla Base

    In a medium saucepan, combine the whole milk, half of the sugar, salt, vanilla bean seeds, and the scraped pod. Heat over medium until steaming but not boiling.

    In a separate bowl, whisk the egg yolks with the remaining sugar until well combined and slightly lightened.

    Slowly ladle some of the warm milk into the yolks while whisking, then return the tempered yolk mixture to the saucepan.

    Cook the Custard

    Cook over medium heat, stirring constantly with a rubber spatula, until the custard thickens enough to coat the spatula and reaches 174–176°F.

    Remove from heat and whisk in the heavy cream.

    Add Xanthan Gum

    Sprinkle the xanthan gum over the warm custard and blend with an immersion blender (or whisk vigorously) to fully disperse.

    Let the mixture steep for 20–30 minutes for maximum vanilla extraction.

    Chill the Base

    Strain the custard through a fine-mesh sieve into a bowl, removing the vanilla pod.

    Stir in the vanilla extract.

    Cover and refrigerate for at least 6 hours or overnight.

    Churn

    Churn the chilled base in your ice cream maker until soft-serve consistency.

    Transfer to a container, press parchment against the surface, and freeze until firm.


    Notes

    Preparation

    • Cook the custard slowly to avoid scrambling the yolks; constant stirring ensures even thickening.
    • Allowing the custard to steep briefly after cooking extracts additional flavor from the vanilla bean.
    • For a slightly creamier, more stable texture, whisk 1–2 tbsp nonfat dry milk powder into the sugar before heating the custard. This increases milk solids without making the base noticeably sweeter.

    Serving Suggestions

    • Serve alongside pies, crisps, or berry desserts—its lighter profile pairs beautifully with richer sweets.
    • For extra aroma, add a light drizzle of warm caramel or a spoonful of fresh berries.

    Variations

    • Vanilla Bean Paste Shortcut: Replace the vanilla bean and vanilla extract with 2–3 tsp vanilla bean paste. Stir it in after straining the custard when you would normally add the extract.
    • Improved Scoopability: Replace 3 tbsp of the granulated sugar with 3 tbsp light corn syrup or glucose syrup. This helps reduce ice crystal formation and keeps the ice cream a little softer straight from the freezer.
    • French Vanilla: Add an additional egg yolk and increase sugar to ¾ cup for a richer, custard-forward style.
    • Tahitian Vanilla: Substitute Tahitian vanilla extract for Madagascar for a more floral, fruity aroma.

    Make-Ahead & Storage

    • Ice cream keeps best for 1–2 weeks when stored in an airtight container.
    • To prevent ice crystals, press parchment paper directly against the surface before freezing.
  • Gnocchi

    Gnocchi

    Light, pillowy gnocchi made from baked potatoes for the best possible texture. Rooted in northern Italian tradition, this simple dish traveled across the Atlantic with generations of Italian immigrants and found a second home in Argentina. Our family’s version emphasizes gentle handling, minimal flour, and a buttery golden finish—echoing the gnocchi Jane enjoyed while living in the mountains of Argentina, where gracious families gathered around humble tables to share food, laughter, and the quiet joy of good company.


    Ingredients

    • 2 lbs (900 g) russet or Yukon Gold potatoes
    • ¾ tsp table salt
    • 1–1½ cups all-purpose flour (start with 1 cup; add only as needed)
    • 1 large egg, lightly beaten (see variation)

    Directions

    Bake the Potatoes

    Bake whole, unpeeled potatoes at 400°F (200°C) until tender, about 1 hour. Split immediately after baking to allow steam to escape—this prevents sogginess.

    Scoop out the flesh and rice or mash while still warm.

    Prepare the Dough

    Spread the riced potatoes out on a board or tray and allow to cool slightly until just warm to the touch. Sprinkle evenly with salt.

    Add about ¾ of the flour over the potatoes, then drizzle the beaten egg over the top. Using your hands or a bench scraper, gently fold and press the mixture together, adding only enough additional flour to form a soft dough.

    Turn out onto a lightly floured surface and gently knead for 15–20 seconds, just until smooth. The dough should feel soft and slightly tacky, but not sticky—avoid overworking.

    Shape the Gnocchi

    Roll dough into ¾-inch ropes. Cut into ¾–1 inch pieces using a bench scraper for cleaner cuts.

    Shape on a fork or gnocchi board if desired. Lightly dust formed gnocchi with semolina or flour to prevent sticking.

    Cook the Gnocchi

    Bring a large pot of salted water (as for pasta) to a boil. Cook gnocchi in 2–3 batches until they float, then cook 30 seconds longer. Remove gently with a strainer and keep warm.


    Notes

    Preparation

    • Russets make the lightest gnocchi; Yukon Golds give a slightly richer, denser texture.
    • Flour should equal roughly 20–30% of potato weight. Less flour yields lighter, more delicate gnocchi.
    • Chill dough for 10–15 minutes before shaping if it feels too soft.
    • Salt cooking water generously—about 1–2 tbsp per gallon.
    • Test one gnocchi before cooking the full batch. If it falls apart, gently knead in 1–2 tbsp more flour.
    • For best texture, avoid kneading more than 15–20 seconds.
    • Remember: once gnocchi float, cook for an additional 30 seconds.

    Serving Suggestions

    • Toss with Browned Butter Sage Sauce and finish with parmesan and a squeeze of lemon.
    • Sauté boiled gnocchi in butter until golden, then toss with a light cream sauce, browned mushrooms, spinach, and spicy Italian sausage.
    • Serve with Pomodoro, Pesto alla Genovese, or Gorgonzola Cream Sauce.

    Variations

    • Use 1 egg for pillowy, restaurant-style gnocchi. Add a second egg for a firmer, rustic dough.
    • Add a pinch of nutmeg and 1–2 tbsp ricotta for a richer dough (add flour as needed).
    • For a classic eggless northern Italian version, omit the egg and increase flour slightly to reach a soft, workable dough.

    Make-Ahead & Storage

    • Shaped gnocchi may be refrigerated on a lightly floured tray for up to 4 hours before cooking.
    • To freeze, arrange uncooked gnocchi in a single layer until solid, then transfer to a freezer bag. Cook directly from frozen—do not thaw.
    • Cooked gnocchi can be refrigerated for 2–3 days and pan-seared in butter just before serving.
  • Nacho Cheese Sauce

    Nacho Cheese Sauce

    This smooth and flavorful nacho cheese sauce blends cheddar, colby jack, green chiles, warm spices, and a touch of cream cheese for richness—perfect for dipping, drizzling, or spooning over anything that needs a bold, melty kick.


    Ingredients

    • 2 tbsp butter
    • ¼ tsp powdered annatto (optional)
    • ¼ tsp garlic powder
    • ¼ tsp onion powder
    • ¼ tsp ground cumin
    • ¼ tsp chipotle chile powder
    • 2 tbsp flour
    • 1½ cups milk
    • 1½ tsp sodium citrate (optional)
    • 4 oz cream cheese, cut into small chunks
    • 4 oz cheddar cheese, grated
    • 4 oz colby jack cheese, grated
    • ½ tsp table salt
    • ¼ tsp fish sauce (optional)
    • 2–4 oz diced green chiles

    Directions

    Make the Sauce

    Heat butter in a skillet over medium heat. When melted and bubbling, add annatto (if using) and bloom for 15 seconds.

    Add garlic powder, onion powder, cumin, and chipotle chile powder; whisk briefly to bloom the spices. Add flour to form a roux and cook until the mixture is bubbling and the raw flour scent dissipates.

    Dissolve sodium citrate in the milk, then whisk the milk mixture into the roux. Continue whisking until the mixture thickens and reaches a gentle boil.

    Whisk in the cream cheese until fully incorporated. Remove the skillet from heat.

    Add the cheddar and colby jack a handful at a time, whisking thoroughly between additions until smooth. Stir in salt, fish sauce (if using), and green chiles.


    Notes

    Preparation

    Powdered annatto gives a warm reddish color and mimics classic cheddar coloring. It is a natural antioxidant with additional health benefits.

    Sodium citrate enhances smooth meltability, adds gentle tanginess, and helps prevent the sauce from separating. Increasing to 1½ tsp improves stability, especially during reheating.

    Fish sauce adds subtle umami depth and rounds out the flavors but remains undetectable as a distinct ingredient.

    Serving Suggestions

    For extra heat, stir in a splash of your favorite hot sauce just before serving.

    Pickled jalapeños or 1–2 tsp jalapeño brine may be added for brightness and acidity.

    Variations

    Optional Add-Ins:

    • Diced pickled jalapeños
    • Jalapeño brine for acidity
    • Extra green chiles for mild heat

    These additions adjust heat and acidity without changing the core sauce flavor.

    Make-Ahead & Storage

    Store cooled sauce in an airtight container for up to 4 days.

    Reheat gently over low heat on the stovetop or in the microwave in 20–30 second bursts, stirring between intervals.

    If the sauce thickens during storage or reheating, whisk in 1–3 tbsp milk as needed to adjust consistency.

  • Coconut Korma

    Coconut Korma

    This Coconut Korma brings together deeply caramelized onions, warm spices, and a silky coconut-cashew base to create a rich, comforting curry. Whether you choose chicken, beef, lamb, or paneer, the sauce adapts beautifully—creamy, aromatic, and gently sweetened with just a touch of sugar.


    Ingredients

      Desired Protein (Choose One):

    • 1½ lb (700g) chicken, beef, or lamb, cut into bite-size chunks, OR
    • 1 recipe (400–500g) paneer
    • Marinade for Meats:

    • ½ cup plain yogurt
    • 1 tbsp lemon juice
    • 1 tsp turmeric
    • 1 tsp paprika (or Kashmiri chili powder for deeper color)
    • 1 tsp garam masala
    • 1 tsp salt
    • Korma Base:

    • 2 tbsp ghee or oil
    • 2 medium onions, thinly sliced
    • 4 cloves garlic, minced
    • 1½ inch piece fresh ginger, minced
    • ¼ cup unsweetened shredded coconut
    • ¼ cup cashews
    • 1 tsp ground coriander
    • ½ tsp ground cumin
    • ½ tsp ground cinnamon
    • ¼ tsp ground cloves
    • ¼ tsp ground cardamom
    • 1½ tsp garam masala
    • ½ tsp turmeric
    • 1 tsp salt (plus more to taste)
    • 1½ cups full-fat coconut milk
    • ½ cup water or stock (match to your chosen protein)
    • 1 tsp sugar
    • Optional Finishings:

    • 2 tbsp heavy coconut cream
    • Chopped cilantro and chopped cashews (for garnish)

    Directions

    Prepare the Protein:

    For chicken, beef, or lamb: Combine marinade ingredients in a bowl. Add meat and marinate according to type:

    • Chicken: 30 minutes to overnight
    • Beef/lamb: 2–12 hours

    For paneer: Cut into cubes. Optional—pan-fry in ghee until golden. Mix the marinade separately and set aside to stir into the sauce later for added richness.

    Make the Korma Base:

    Heat ghee or oil in a large pan. Add sliced onions and sauté until deeply golden and caramelized, 15–20 minutes. Add garlic, ginger, shredded coconut, and cashews. Cook 2–3 minutes until fragrant. Cool slightly, then blend with a splash of water until completely smooth.

    In the same pot, add a bit more ghee/oil if needed and sear marinated meat until browned on all sides. Remove and set aside. (Skip searing if using paneer.)

    Return the blended paste to the pan and stir in all dry spices. Toast 30 seconds. Add coconut milk, water or stock, and sugar. Return meat or paneer to the pot and simmer:

    • Chicken: simmer uncovered 10–15 minutes
    • Beef/lamb: simmer covered 60–90 minutes, adding water as needed
    • Paneer: gently simmer 8–10 minutes

    Adjust salt and sweetness to taste. Stir in coconut cream for extra richness if desired. Garnish with cilantro and chopped cashews.


    Notes

    Preparation

    • For paneer, marinating isn’t required, but adding the marinade mixture to the sauce enhances depth and flavor.
    • Kashmiri chili powder gives a richer red color and mild heat compared to paprika.
    • Rotisserie chicken can be used as a shortcut—mix the marinade and stir both into the sauce along with chopped chicken.
    • Beef or lamb can be pressure-cooked (20–25 minutes high pressure, natural release) to significantly shorten simmer time.

    Serving Suggestions

    • Serve over basmati rice or with warm naan.
    • Add a drizzle of coconut cream for a more luxurious finish.
    • Top with toasted cashews for added texture.

    Variations

    • Use vegetable stock and paneer for a vegetarian version.
    • Add vegetables such as peas, carrots, or potatoes during the simmering stage.
    • Increase chili powder or add a serrano pepper for a spicier korma.

    Make-Ahead & Storage

    • Korma improves on day two as flavors deepen.
    • Refrigerate up to 4 days in an airtight container.
    • Freeze up to 3 months; thaw overnight in the fridge and reheat gently.
  • Ensalada Serrana — Peruvian Mountain Salad

    Ensalada Serrana — Peruvian Mountain Salad

    This bright, colorful, heavily-dressed salad from the Andean highlands of Peru brings together tender vegetables, a creamy oregano-lime dressing, and the sweet earthiness of beets—a refreshing side inspired by the rustic cooking of Central Peru. It’s simple, vibrant, and pairs beautifully with grilled meats or roasted chicken.


    Ingredients

      Dressing

    • ¾ cup mayonnaise
    • ¼ cup whole milk
    • juice of 1 lime
    • 1 tbsp prepared yellow mustard
    • 1 tsp garlic, minced
    • 1 tbsp dry Mexican or Peruvian oregano, crushed
    • ½ tsp black pepper, coarsely ground
    • ¼ tsp kosher salt (to taste)
    • ½–1 tsp ají amarillo paste (optional)
    • ¼ cup water
    • Salad

    • 4 oz fresh green beans, strings removed and halved
    • 2 small carrots, thinly sliced on a bias or julienned
    • 1 large beet, roasted until tender and sliced
    • 1 large tomato, cored, seeded, and sliced into strips
    • ½ cup frozen peas, defrosted
    • 2 oz lettuce, washed and spun dry
    • ½ cup dressing (from above)

    Directions

    Make the Dressing

    In a blender, combine all ingredients except the water; blend until smooth and creamy. Thin with water to reach your desired consistency. Adjust salt to taste. Dressing will thicken in the refrigerator; thin with additional water as needed.

    Prepare the Salad

    Blanch green beans for 4–5 minutes, or until crisp-tender; transfer immediately to a bowl of ice water. Blanch carrots until crisp-tender and add them to the same ice water bowl. Dry beans and carrots thoroughly. Combine beans, carrots, and remaining salad ingredients in a large bowl; toss gently with dressing.


    Notes

    Preparation

    For the optional ají amarillo paste, you can create a reasonable substitute by blending 1 roasted, peeled, and seeded yellow or orange bell pepper with ½ of a seeded habanero. This provides similar fruitiness and gentle heat.

    Beets can be roasted ahead of time and chilled until ready to assemble the salad.

    Serving Suggestions

    This salad pairs beautifully with roasted chicken, grilled steaks, anticuchos, or Peruvian-style rice dishes.

    Variations

    Try adding thinly sliced red onion, diced avocado, or boiled potatoes for a heartier version.

    Make-Ahead & Storage

    Store dressing separately from the vegetables to keep the salad crisp.

    • Dressing keeps 4–5 days refrigerated.
    • Prepared vegetables keep 2–3 days in an airtight container.
    • Toss just before serving for best texture.
  • Salsa Huancaína

    Salsa Huancaína

    This creamy Central Peruvian classic blends peppers, queso fresco, and milk into a silky, vibrant sauce with gentle heat and rich, comforting flavor. Enjoyed throughout Peru, salsa huancaína is one of those dishes that feels deeply personal—nearly every family has their own version, adjusted by memory, preference, or what’s on hand. Traditionally spooned generously over tender potatoes, it’s just as delicious used as a dip, drizzle, or spread, bringing its unmistakable balance of warmth and creaminess to countless dishes.


    Ingredients

    Sauce Base

    • ½ medium yellow onion, diced and sautéed until translucent
    • 1 large yellow or orange bell pepper, roasted, peeled, and seeded
    • ½ habanero (to taste)
    • ¼ cup whole or evaporated milk
    • ⅓–½ cup queso fresco
    • 6–8 saltine crackers (adjust to desired thickness)
    • 1–2 tbsp vegetable oil
    • salt to taste

    Optional Add-Ins

    • 1 clove garlic
    • splash of lime juice (for brightness)

    Directions

    Sauté the Aromatics

    Sauté the diced onion in a small amount of oil until soft and fragrant, then let cool slightly.

    Prepare the Peppers

    Roast, peel, and seed the bell pepper. Adjust heat by adding part or all of the habanero.

    Blend the Sauce

    Blend the onion, roasted bell pepper, habanero, milk, and queso fresco until smooth.

    Add 6 saltine crackers and blend again. Adjust consistency by adding more crackers to thicken or additional milk to thin.

    Blend in a small amount of oil for a silkier, more emulsified texture. Season with salt to taste.


    Notes

    Preparation

    • Peruvian recipes traditionally use ají amarillo (2–3 peppers, roasted, peeled, and seeded). If you have access to frozen or paste ají amarillo, use it for the most authentic flavor.
    • Evaporated milk gives a creamier, more traditional consistency, but whole milk works well in a pinch.
    • Queso fresco is classic, but queso blanco or feta can be used for a saltier, brinier profile.
    • Saltines thicken the sauce while keeping the flavor mild; stale bread is a suitable substitute.

    Serving Suggestions

    • Classic: Spoon over boiled yellow potatoes (papas a la huancaína) and garnish with hard-boiled eggs, black olives, and lettuce.
    • As a dip: Serve with potato fries, yuca fries, fresh vegetables, or plantain chips.
    • As a sauce: Drizzle over grilled chicken, steak, or roasted vegetables for a creamy, pepper-forward accent.
    • For best texture, chill lightly before serving so the sauce thickens and clings beautifully to potatoes or vegetables.

    Variations

    • Increase or decrease the habanero to adjust heat, or add a small amount of yellow chili paste if you have it.
    • Add a garlic clove for deeper aroma, or a splash of lime juice for additional brightness.

    Make-Ahead & Storage

    This sauce improves after a few hours as the flavors meld.

    • Refrigerator: Store in an airtight container for 3–4 days.
    • Freezing is not recommended, as the dairy and crackers may separate.
  • Snert — Erwtensoep — Dutch Split Pea Soup

    Snert — Erwtensoep — Dutch Split Pea Soup

    Snert, or Dutch split pea soup, is a beloved winter tradition in the Netherlands. This hearty, comforting soup warms cold bodies after a day of skating on frozen canals. Every family has its own cherished version, often prepared a day in advance so the flavors can deepen and the soup can thicken to its signature consistency—thick enough that a spoon can stand upright in the bowl. I first tasted snert in the province of Friesland, just after watching ice skaters compete in the Elfstedentocht, the legendary eleven-city race that only takes place in years when the ice is thick enough to carry thousands of racers across the canals.


    Ingredients

      For the Stock

    • 2 smoked ham hocks (about 2 lb total)
    • 10 cups (2.4 L) low-sodium chicken stock
    • 1 onion, halved
    • 1 celery stalk, cut in chunks
    • 1 small carrot, cut in chunks
    • 1 bay leaf
    • 4 parsley stems
    • ½ tsp black peppercorns
    • For the Soup

    • 4 cups (800 g) dried green split peas, rinsed
    • 2 tbsp unsalted butter
    • 1 medium onion, finely diced
    • 1 leek (white and light green parts only), thinly sliced
    • 2 celery stalks, finely diced (reserve a few leaves for garnish)
    • 1 medium carrot, finely diced
    • ½ small celeriac (or 1 potato), finely diced
    • ½ tsp dried thyme
    • ¼ tsp white pepper
    • ½ cup (120 ml) dry white wine (optional but adds brightness)
    • To Finish

    • 8 oz (225 g) rookworst or smoked sausage, thinly sliced
    • 1–2 tsp apple cider vinegar (to taste)
    • Kosher or table salt, to taste
    • Small knob of butter or splash of cream (optional, for gloss)
    • Celery leaves, celery leaf oil or finely chopped parsley, for garnish

    Directions

    Make the Stock (Can Be Done a Day Ahead)

    Place ham hocks, chicken stock, onion, celery, carrot, bay leaf, parsley stems, and peppercorns in a large pot. Bring to a simmer and cook gently for 1½ hours, skimming foam as needed.

    Strain the stock through a fine mesh sieve and set aside. Discard the vegetables but reserve the hocks for meat later.

    Build the Flavor Base

    In a clean soup pot, melt the butter over medium heat. Add onion, leek, celery, carrot, and celeriac. Sweat gently (do not brown) for 6–8 minutes until softened and aromatic. Add thyme and white pepper.

    Deglaze and Simmer

    If using, pour in white wine and simmer 1–2 minutes to reduce slightly. Add split peas and enough of the strained ham stock to cover by about 1 inch (you’ll have some stock left to adjust consistency later). Bring to a simmer, then reduce heat to low and cook gently for 1½–2 hours, stirring occasionally, until peas have completely softened.

    Blend for Smoothness

    Remove from heat. Transfer about ¾ of the soup to a blender (or use an immersion blender) and puree until silky smooth. Pass through a fine mesh sieve or chinois for a restaurant-quality texture.

    Return the puree to the pot along with the remaining unblended portion for a touch of rustic body.

    Add Meats and Adjust Seasoning

    Remove skin and bones from the ham hocks, finely dice the meat, and stir it into the soup with the sliced sausage. Simmer gently for 15–20 minutes to meld flavors.

    Add vinegar, salt, and black pepper to taste. For a glossy finish, swirl in a small knob of butter or a splash of cream.

    Fine-Tune Texture

    Adjust consistency with reserved stock as needed. We prefer that it be thick enough to coat the back of a spoon, but not so dense that it feels heavy, although many like it thick enough to stand a spoon in it.

    Serve

    Ladle the soup into wide, shallow bowls. Arrange a few slices of sausage and cubes of ham neatly in the center. Garnish with a few drops of celery leaf oil or a drizzle of olive oil. Add finely chopped celery leaves or micro herbs for color and freshness. Optionally, serve with a crisp rye toast point or small bacon tuile on the rim.


    Notes

    Preparation

    • Keep heat gentle during simmering to preserve the soup’s bright green hue.
    • The vinegar is key—it sharpens the flavor and keeps it from feeling heavy.
    • Passing through a fine sieve gives the soup that unmistakable restaurant-level smoothness.
    • Like all good snert, it deepens in flavor overnight. Reheat gently and adjust texture before serving.

    EASY RUSTIC VERSION

    Ingredients

    • 4 cups dried split peas, rinsed
    • 2 ham hocks
    • 8 chicken bouillon cubes
    • 1 onion, finely diced
    • 1 bunch leeks, thinly sliced (green tops discarded)
    • 1 bunch celery (including leaves), finely chopped
    • 2 bay leaves
    • kielbasa (or smoked sausage), cut into disks
    • vinegar

    Directions

    Combine all ingredients except kielbasa and vinegar in a crock pot; add water to about 1 inch from the top of the crock pot. Cook on high for approximately 8 hours.

    Remove hocks and bay leaves; slice meat from hocks and add back to soup (discard bones and skin).

    Stir in kielbasa and cook for an additional hour. Add a small amount of vinegar just prior to serving to brighten the flavor.

  • Soft Gingerbread Men

    Soft Gingerbread Men

    Cookies are serious business around our house. Baking dozens of cookies in all varieties is part of our holiday tradition. The box of cookies in the photo held just a sampling of treats baked for our annual Christmas Eve party—and these soft gingerbread men are always a crowd pleaser.


    Ingredients

    • 1 cup packed brown sugar
    • ½ cup butter + ¼ cup shortening (or ¾ cup shortening for a more traditional texture)
    • ¼ cup molasses
    • 1 tbsp honey or dark corn syrup (optional, for extra softness)
    • 1 large egg
    • 2 tsp baking soda
    • 1 tsp ground cinnamon
    • 1 tsp ground ginger
    • 1½ tsp ground cloves
    • ¼ tsp table salt
    • 2¼ cups all-purpose flour

    Directions

    Make the Dough

    In a large bowl, beat together brown sugar, butter, shortening, molasses, honey (if using), and egg until smooth and creamy. Stir in baking soda, cinnamon, ginger, cloves, and salt. Gradually mix in flour until fully incorporated.

    Cover dough and chill for at least 3 hours or overnight, until firm enough to roll.

    Roll and Cut

    Preheat oven to 375°F (190°C). Roll chilled dough between sheets of parchment paper dusted with confectioners’ sugar (instead of flour) to about ¼-inch thickness. Cut into desired shapes using cookie cutters.

    Transfer cookies to a baking sheet lined with parchment paper or release foil.

    Bake

    Bake for 10–12 minutes, or until cookies are fragrant and edges are just set—they’ll continue to bake on the sheet after removal. Avoid overbaking to keep them soft.

    Cool cookies on the baking sheet for several minutes before transferring to a wire rack to cool completely.

    Optional Glaze

    For a glossy finish, whisk together 1 cup confectioners’ sugar, 1–2 tbsp milk, and ½ tsp vanilla or lemon juice. Brush lightly over warm cookies and allow to set.


    Notes

    Preparation

    • Rolling between parchment prevents sticking and eliminates the need for added flour, keeping cookies tender.
    • Adding honey or corn syrup creates a slightly chewier texture.
    • For an even softer cookie, slightly underbake and store while still a bit warm.

    Serving Suggestions

    • Decorate with royal icing, sanding sugar, or a drizzle of glaze.
    • Serve alongside hot cocoa, Anijsmelk, or Aunt Laurie’s Pumpkin Spice Steamer for a cozy holiday pairing.

    Make-Ahead & Storage

    • Dough can be chilled up to 3 days or frozen up to 1 month; thaw in the refrigerator before rolling.
    • Baked cookies keep for about 1 week in an airtight container at room temperature.
    • To retain softness, store with a slice of bread or a piece of apple in the container.
  • Pralines & Cream Buttermilk Ice Cream

    Pralines & Cream Buttermilk Ice Cream

    The Huggins Family traces its roots to some of the earliest settlers in the American South, and although several generations have since made their homes in the West, many of the foods we love still reflect that Southern heritage. Pralines—those sweet, buttery pecan confections tied to countless Southern kitchens—capture that legacy perfectly. This ice cream honors that connection with a silky buttermilk custard base swirled with ribbons of praline cream and studded with crisp pecan pralines for a nostalgic, balanced, unmistakably Southern flavor.


    Ingredients

    • Custard Base:

    • 2 cups heavy cream
    • ½ cup whole milk
    • ½ cup buttermilk (added after cooking)
    • ½ cup sugar, divided
    • 5 egg yolks
    • ½ tsp vanilla extract
    • ¼ tsp table salt
    • Praline-Cream Swirl:

    • ¼ cup butter
    • 6 tbsp brown sugar
    • 2 tbsp heavy cream
    • ½ tsp table salt
    • 1 tsp vanilla extract
    • Mix-Ins:

    • 1 cup chopped pecan pralines, frozen before use

    Directions

    Cook the Custard

    In a medium saucepan, whisk together the cream, whole milk, ¼ cup sugar, and salt. Warm over medium heat until mixture begins to steam and the sugar dissolves.

    Temper the Yolks

    In a separate bowl, whisk the egg yolks with the remaining ¼ cup sugar until thick and pale. Slowly temper with ½ cup of the warm cream mixture, then return everything to the saucepan.

    Finish the Base

    Cook gently over low heat, stirring constantly, until the custard coats the back of a spoon (170–175°F / 77–80°C). Do not boil. Strain through a fine mesh sieve, stir in vanilla, and let cool slightly. Add the buttermilk, then chill thoroughly—preferably overnight.

    Make the Praline-Cream Swirl

    In a small saucepan, melt butter with brown sugar and cream. Simmer 1–2 minutes until lightly thickened. Remove from heat, stir in salt and vanilla, and cool completely before layering.

    Churn & Assemble

    Churn the chilled custard in an ice cream maker according to manufacturer instructions. When nearly finished, fold in the frozen chopped pralines. As you transfer to a container, alternate layers of ice cream and thin ribbons of praline-cream swirl. Gently marble with a butter knife and freeze until firm.


    Notes

    Preparation

    • Freeze pralines before folding them in to preserve their crisp texture.
    • Buttermilk provides a gentle tang that balances caramel sweetness; replace with whole milk for a richer, sweeter version.
    • Ensure the praline swirl is fully cooled before layering to avoid melting the churned base.

    Serving Suggestions

    • Top with extra chopped pecan pralines for added crunch.
    • Serve alongside warm apple or pecan pie.
    • Add a drizzle of warm caramel sauce for an extra-sweet presentation.

    Variations

    • Add ¼ tsp cinnamon to the swirl for a deeper Southern praline flavor.
    • Swap half the pralines for toasted pecans for a nuttier variation.

    Make-Ahead & Storage

    • Refrigerate the unchurned custard up to 2 days before freezing.
    • Store praline-cream swirl refrigerated up to 1 week.
    • Finished ice cream keeps 1 week for best texture.
  • Anijsmelk — Dutch Star-Anise Steamer

    Anijsmelk — Dutch Star-Anise Steamer

    Anijsmelk, the classic star-anise–flavored steamer of the Netherlands, is one of my favorite Dutch treats—simple, soothing, and steeped in nostalgia. Traditionally made by stirring anise-flavored sugar cubes (Anijsblokjes) into warm milk, it’s a comforting drink to warm your soul on a cold winter’s night. This homemade version captures that flavor with whole star anise and a touch of sweetness.


    Ingredients

    • 1 qt milk
    • 5–10 whole star anise
    • ⅛ tsp ground anise seed (optional, for rounder flavor)
    • 1–4 tbsp sugar, to taste (about 1 tsp per cup)
    • Small knob of butter or splash of cream (optional, for richness)

    Directions

    Infuse the Milk

    In a medium saucepan, warm the milk with the star anise over medium-low heat until steaming but not boiling. Reduce heat to low and let steep gently for 5–10 minutes, tasting occasionally to check flavor strength.

    Finish the Drink

    When the milk reaches your desired anise intensity, remove from heat and discard the star anise pods. Stir in sugar to taste and, if desired, add a small knob of butter or splash of cream for extra richness. Whisk briefly to create a light froth.

    Serve

    Pour hot into a teacup or mug and enjoy immediately. Optionally dust with a pinch of ground anise or cinnamon. Serve alongside a small Dutch biscuit or slice of buttered bread for an authentic touch.


    Notes

    Preparation

    • For the most authentic flavor, use a mix of whole star anise and a small pinch of ground anise seed.
    • Warm gently—avoid boiling, which can cause the milk to curdle or the flavor to become harsh.
    • Steep covered to preserve the delicate aroma of the anise.

    Serving Suggestions

    • Traditionally enjoyed as a bedtime drink or on cold evenings.
    • Serve in a warm ceramic cup with a dusting of ground anise, cinnamon, or nutmeg.
    • Pair with speculaas cookies or buttered toast for a cozy Dutch treat.

    Variations

    • Substitute honey or vanilla sugar for a more nuanced sweetness.
    • Add a drop of almond or vanilla extract for a gentle twist.
    • For a creamier version, replace 1 cup of milk with light cream.