Bags of Spices

Favorite Recipes

Italian

  • Pistachio Gelato

    Pistachio Gelato

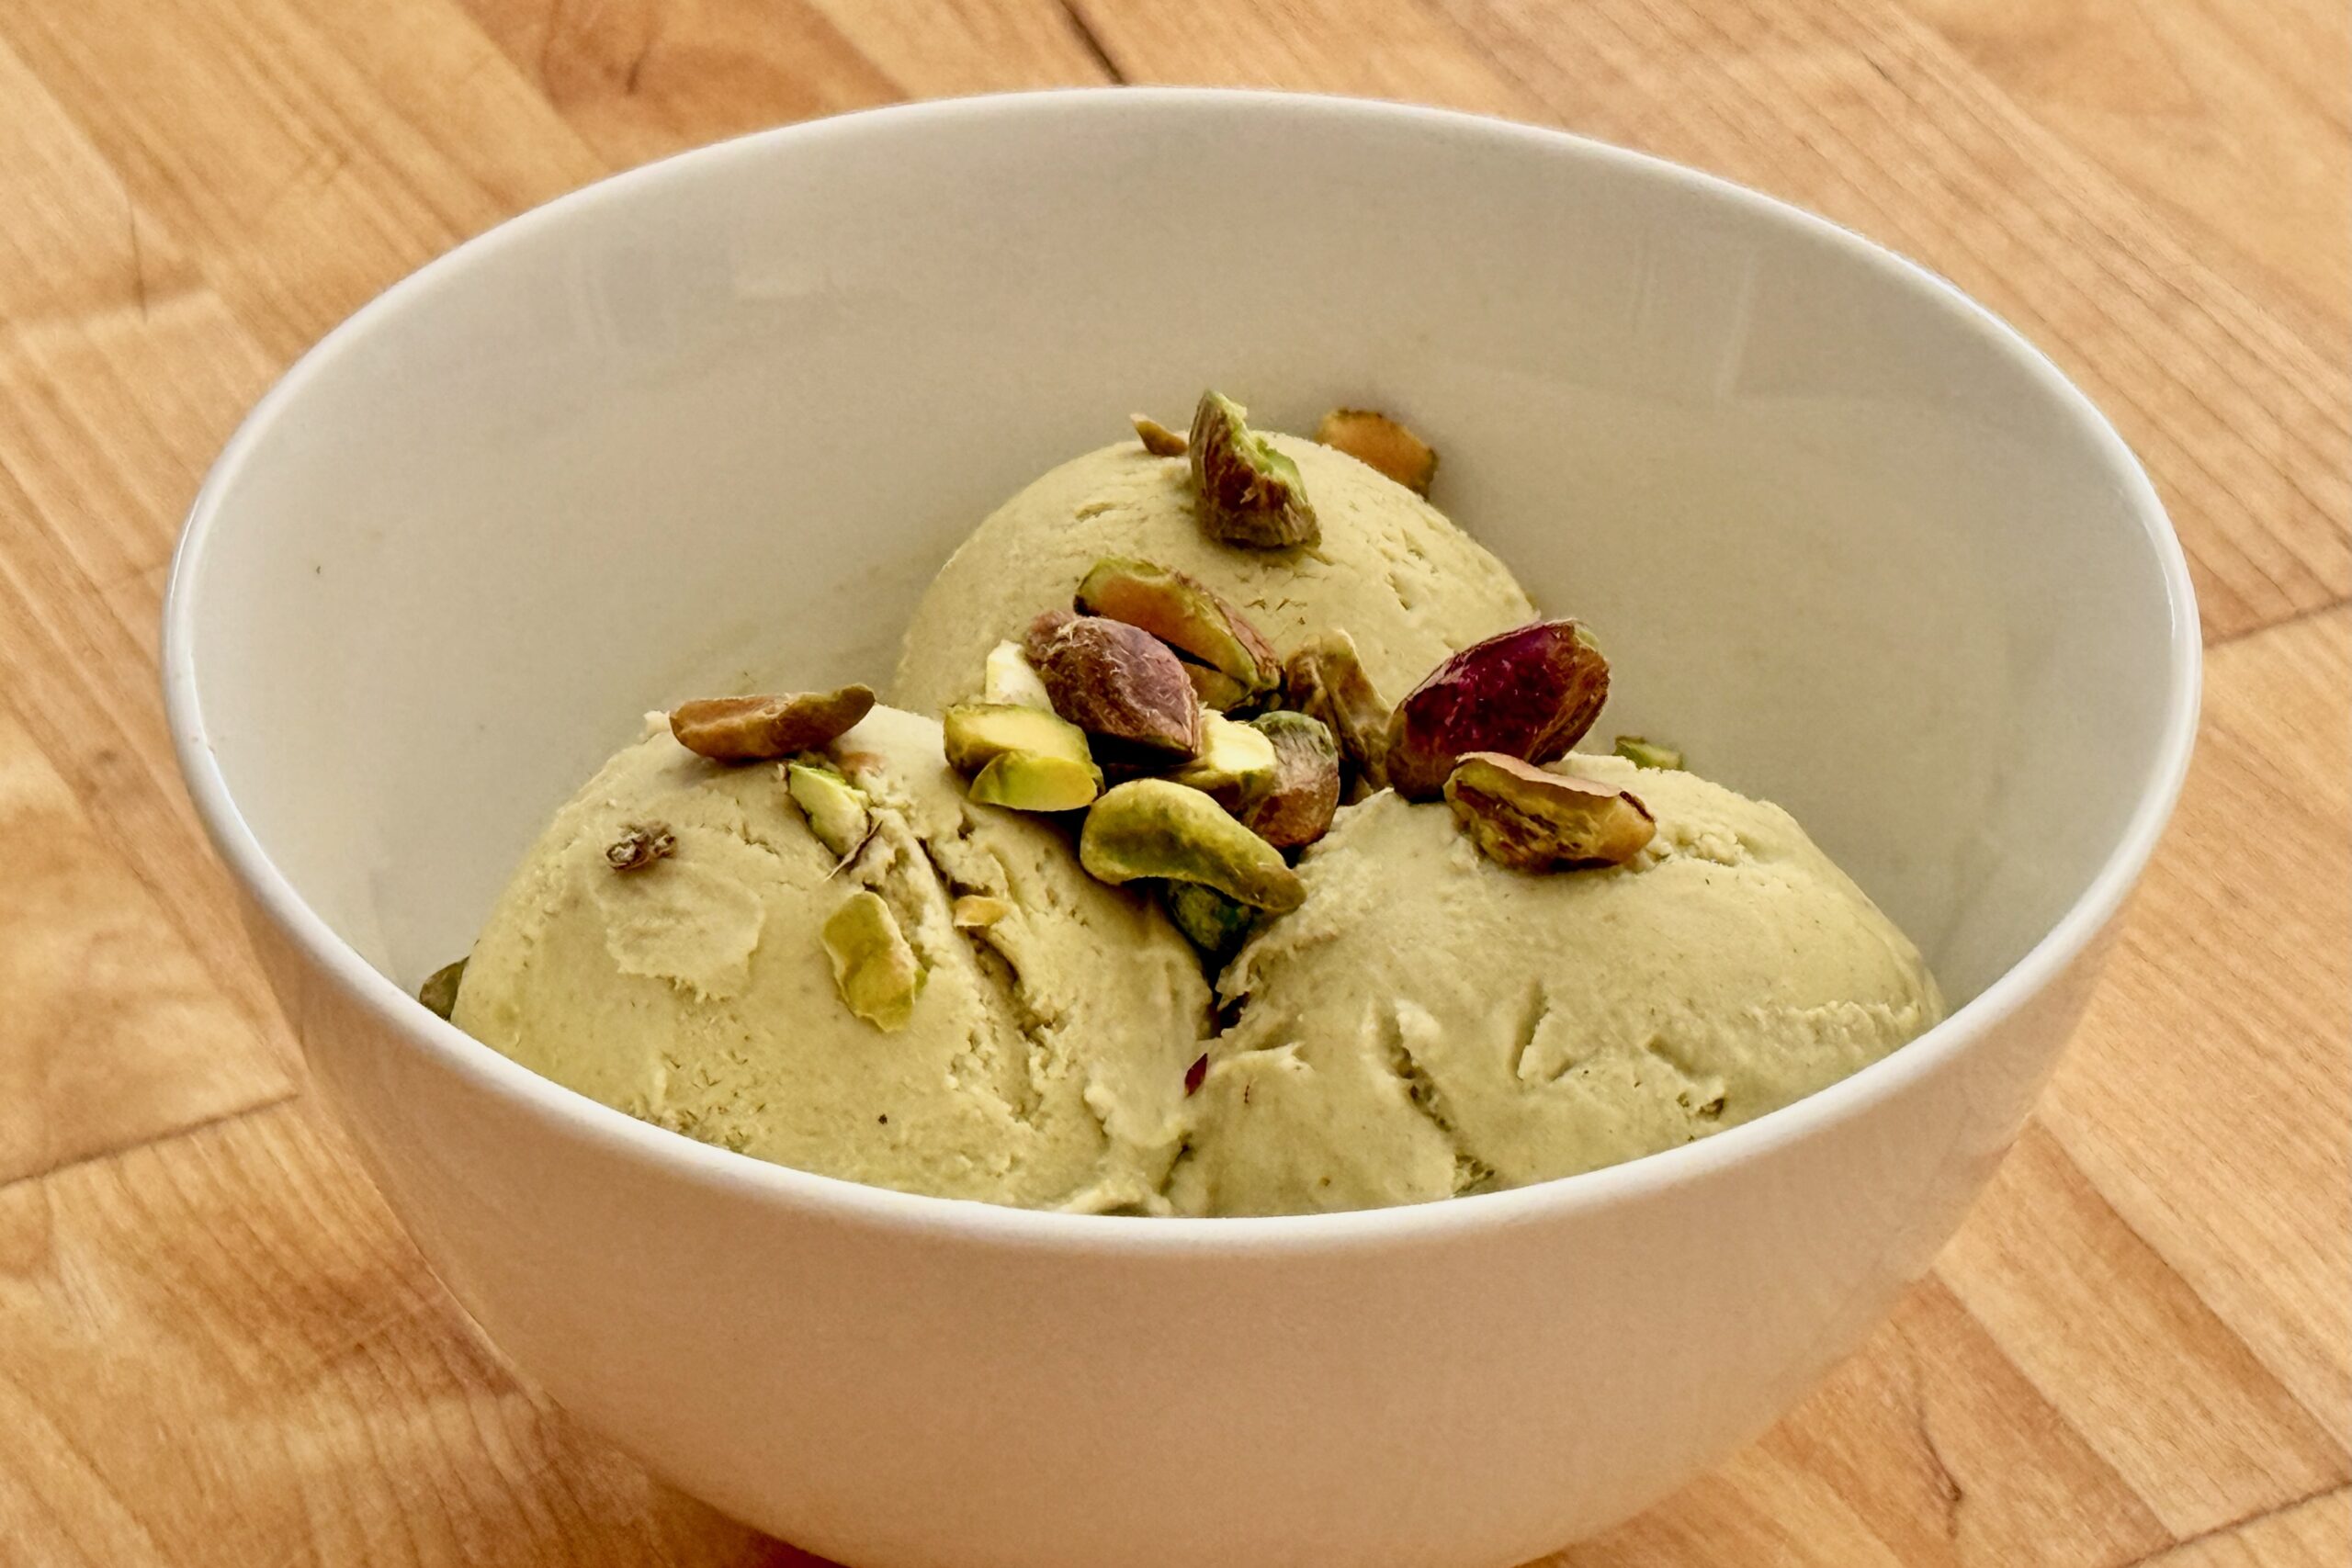
    Pistachio gelato has always held a special place in our family—especially for Grandma Honey, who never passes it up when it’s on the menu. It’s one of those flavors that feels both nostalgic and a little refined at the same time, simple on the surface but deeply satisfying when it’s done right. This pistachio gelato is designed to deliver true pistachio flavor first—deeply nutty, smooth, and satisfying, without drifting into a heavy custard or becoming overly sweet. Lightly toasted pistachios are blended directly into the base for full flavor and body, while a restrained amount of cream, a small number of yolks, and added milk solids create a texture that feels dense and luxurious rather than airy or thin. It churns into a gelato that stays clean on the palate and rich enough to keep you coming back for another spoonful.


    Ingredients

    • 1¼ cups (175 g) raw shelled pistachios
    • 2 tbsp sugar (from the measured sugar below, for blending the pistachios)
    • 2¼ cups (540 g) whole milk, divided
    • ¾ cup (180 g) heavy cream
    • ⅔ cup (135 g) sugar
    • 1½ tbsp light corn syrup
    • 2 tbsp dry milk powder (optional, but recommended)
    • 3 large egg yolks
    • ¼ tsp table salt, plus more to taste
    • ¼ tsp vanilla extract (optional)
    • ⅛ tsp almond extract (optional; use sparingly)

    Directions

    Toast the Pistachios

    Heat the oven to 300°F. Spread the pistachios on a small sheet pan or oven-safe dish in an even layer.

    Toast for 8–10 minutes, just until fragrant. They should smell nutty and aromatic but should not brown. Let cool slightly.

    Blend the Pistachio Base

    Place the warm pistachios in a blender with 2 tbsp of the measured sugar and ¾ cup of the milk.

    Blend until very smooth. The mixture should move well in the blender and become thick, creamy, and fluid rather than forming a stiff paste.

    Leave the pistachio mixture in the blender jar.

    Heat the Dairy Base

    In a medium saucepan, combine the remaining 1½ cups milk, cream, remaining sugar, corn syrup, dry milk powder if using, and ¼ tsp table salt.

    Heat over medium, whisking occasionally, until the mixture is steaming hot and the sugar is dissolved, but do not let it boil.

    Temper the Yolks

    In a separate bowl, whisk the egg yolks until smooth.

    Slowly pour in about 1 cup of the hot milk mixture while whisking constantly.

    Gradually whisk the tempered yolks back into the saucepan.

    Cook the Base

    Cook over medium-low heat, stirring constantly with a heatproof spatula or wooden spoon, until the base thickens slightly and reaches 170–175°F.

    It should lightly coat the back of a spoon. Do not let it boil.

    Combine and Blend Again

    Remove the pan from the heat. Carefully pour the hot custard into the blender with the pistachio mixture.

    Blend until fully smooth and uniform. Stir in the vanilla extract and almond extract, if using.

    For the smoothest final texture, keep this blending step even if the pistachios seemed to break down well the first time.

    Strain and Chill

    Strain the base through a fine-mesh sieve into a clean bowl to catch any remaining pistachio fiber and ensure a smooth, non-gritty texture.

    Cool over an ice bath, then cover and refrigerate until very cold, at least 6 hours and preferably overnight.

    Taste once chilled and add a tiny extra pinch of salt if you want the pistachio flavor to pop a bit more.

    Churn

    Pour the cold base into your ice cream maker and churn according to the manufacturer’s instructions until thick, smooth, and softly mounded.

    The finished texture should resemble soft gelato.

    Freeze to Set

    Transfer to a chilled container, press a piece of parchment or plastic wrap against the surface, cover, and freeze until firm enough to scoop, about 2–4 hours.

    Let stand at room temperature for a few minutes before serving if needed.


    Notes

    Preparation

    • Raw pistachios are ideal here because they give you fresher flavor and better natural color than pre-roasted nuts. Toast them lightly to wake up their flavor, but do not let them brown.
    • If using roasted pistachios, unsalted nuts can be used as-is (skip the toasting step or warm briefly to refresh their aroma). If using salted pistachios, rinse under cool water to remove surface salt, dry thoroughly, and warm briefly in a low oven before using. Adjust added salt in the recipe to taste.
    • This recipe uses fewer yolks than a classic custard ice cream so the pistachio flavor stays clear while still giving the gelato enough body to feel satisfying and rich.
    • The sugar level is intentionally restrained to keep the finish clean and nut-forward. Corn syrup helps preserve smooth texture and scoopability without making the gelato taste sweeter.
    • Dry milk powder is optional, but it noticeably improves body and density, especially in home machines. If you want the most gelato-like texture, it is worth using.
    • Almond extract can make the pistachio flavor seem stronger, but it should remain in the background. Use only a very small amount or leave it out entirely for a purer pistachio profile.
    • Straining the blended base is recommended even if only a small amount of fine pistachio fiber remains. That extra step helps keep the finished gelato smooth rather than faintly gritty.
    • Chill the base thoroughly before churning. A fully cold base churns faster and freezes more smoothly.

    Serving Suggestions

    • Serve on its own to let the pistachio flavor shine, or top with a small spoonful of finely chopped pistachios for contrast.
    • This is excellent with fresh berries, a crisp butter cookie, or a light drizzle of dark chocolate for a more dessert-forward presentation.
    • For the most authentic gelato-style experience, serve slightly softened so the texture is dense, creamy, and supple rather than hard-frozen.

    Variations

    • For a more intense pistachio version, increase the pistachios to 1½ cups (210 g).
    • For added texture, fold in ¼ cup finely chopped toasted pistachios after churning, just before transferring to the freezer container.
    • For a purer pistachio profile, omit the vanilla and almond extracts completely.

    Make-Ahead & Storage

    • The base can be made and refrigerated up to 24 hours before churning.
    • Store the finished gelato tightly covered in the freezer for up to 2 weeks for best texture and flavor.
    • Homemade gelato freezes firmer than what is served in most shops, so let it sit at room temperature for 5–10 minutes before scooping if needed.
  • Fresh Lasagna Pasta Sheets

    Fresh Lasagna Pasta Sheets

    These fresh lasagna sheets are designed for structure, not just tenderness—giving you distinct, satisfying layers that hold their shape through baking. A blend of all-purpose flour and semolina adds just enough bite, while a slightly firmer dough ensures the pasta doesn’t disappear into the sauce. Rolled a bit thicker than traditional recommendations, this version creates a hearty, rustic lasagna with beautifully defined layers in every slice—perfect for dishes like our favorite recipe for Grandma’s Lasagna.


    Ingredients

    • 365 g all-purpose flour
    • 90 g semolina flour
    • ½ tsp table salt
    • 4–5 large eggs (target 240–250 g without shells)
    • 1 tbsp water, if needed

    Directions

    Mix the Dough:

    Add the all-purpose flour, semolina flour, and salt to the bowl of a stand mixer fitted with the paddle attachment. Mix on speed 2 just to combine.

    Add 4 eggs, one at a time, mixing briefly between additions. The mixture should resemble coarse crumbs. If the dough does not begin to come together, add part or all of the remaining egg as needed. Add up to 1 tbsp water only if necessary to bring the dough together into a firm, slightly dry mass.

    Knead:

    Switch to the dough hook and knead on speed 2 for 2–3 minutes, until the dough becomes smooth and cohesive. It should feel firm but pliable, not sticky.

    Rest:

    Wrap the dough tightly in plastic wrap and let rest at room temperature for at least 30 minutes. For best results, refrigerate up to overnight, then allow to come to room temperature before rolling.

    Roll the Sheets:

    Divide the dough into 4 portions. Working with one piece at a time, flatten slightly and run through a pasta roller, folding and passing through the widest setting several times until smooth.

    Gradually reduce the thickness setting until reaching setting #3 or #4 . Cut sheets to fit your baking dish as needed.

    Prepare for Use:

    Lay sheets on a lightly floured surface and allow to rest for 10–20 minutes before using. This slight drying improves texture and handling.

    Cook (Optional):

    These sheets can be used directly in lasagna without boiling, especially when using a well-hydrated sauce.

    If parboiling is preferred, cook in well-salted boiling water for 2–3 minutes, then transfer to cold water and drain before layering.


    Notes

    Preparation

    • For best consistency, weigh the eggs. Aim for 240–250 g total egg weight.
    • The dough should feel slightly firmer than typical pasta dough—this helps it hold structure during baking.
    • Lightly flour sheets as needed to prevent sticking, but avoid excess flour which can dry out the layers.

    Serving Suggestions

    • Use with a rich meat sauce and béchamel for classic lasagna.
    • Pairs well with vegetable-forward lasagnas, including spinach and mushroom or roasted vegetable variations.

    Variations

    • For a more traditional, delicate lasagna, roll sheets to setting #4 or #5.
    • For a richer dough, replace 1 whole egg with 2 egg yolks.
    • For a softer texture, reduce semolina slightly and increase all-purpose flour.

    Make-Ahead & Storage

    • Dough can be refrigerated for up to 24 hours before rolling.
    • Rolled sheets can be lightly floured, layered between parchment, and refrigerated for up to 1 day.
    • For longer storage, freeze sheets flat and transfer to a sealed bag once solid. Cook from frozen or thaw before use.
  • Gnocchi

    Gnocchi

    Light, pillowy gnocchi made from baked potatoes for the best possible texture. Rooted in northern Italian tradition, this simple dish traveled across the Atlantic with generations of Italian immigrants and found a second home in Argentina. Our family’s version emphasizes gentle handling, minimal flour, and a buttery golden finish—echoing the gnocchi Jane enjoyed while living in the mountains of Argentina, where gracious families gathered around humble tables to share food, laughter, and the quiet joy of good company.


    Ingredients

    • 2 lbs (900 g) russet or Yukon Gold potatoes
    • ¾ tsp table salt
    • 1–1½ cups all-purpose flour (start with 1 cup; add only as needed)
    • 1 large egg, lightly beaten (see variation)

    Directions

    Bake the Potatoes

    Bake whole, unpeeled potatoes at 400°F (200°C) until tender, about 1 hour. Split immediately after baking to allow steam to escape—this prevents sogginess.

    Scoop out the flesh and rice or mash while still warm.

    Prepare the Dough

    Spread the riced potatoes out on a board or tray and allow to cool slightly until just warm to the touch. Sprinkle evenly with salt.

    Add about ¾ of the flour over the potatoes, then drizzle the beaten egg over the top. Using your hands or a bench scraper, gently fold and press the mixture together, adding only enough additional flour to form a soft dough.

    Turn out onto a lightly floured surface and gently knead for 15–20 seconds, just until smooth. The dough should feel soft and slightly tacky, but not sticky—avoid overworking.

    Shape the Gnocchi

    Roll dough into ¾-inch ropes. Cut into ¾–1 inch pieces using a bench scraper for cleaner cuts.

    Shape on a fork or gnocchi board if desired. Lightly dust formed gnocchi with semolina or flour to prevent sticking.

    Cook the Gnocchi

    Bring a large pot of salted water (as for pasta) to a boil. Cook gnocchi in 2–3 batches until they float, then cook 30 seconds longer. Remove gently with a strainer and keep warm.


    Notes

    Preparation

    • Russets make the lightest gnocchi; Yukon Golds give a slightly richer, denser texture.
    • Flour should equal roughly 20–30% of potato weight. Less flour yields lighter, more delicate gnocchi.
    • Chill dough for 10–15 minutes before shaping if it feels too soft.
    • Salt cooking water generously—about 1–2 tbsp per gallon.
    • Test one gnocchi before cooking the full batch. If it falls apart, gently knead in 1–2 tbsp more flour.
    • For best texture, avoid kneading more than 15–20 seconds.
    • Remember: once gnocchi float, cook for an additional 30 seconds.

    Serving Suggestions

    • Toss with Browned Butter Sage Sauce and finish with parmesan and a squeeze of lemon.
    • Sauté boiled gnocchi in butter until golden, then toss with a light cream sauce, browned mushrooms, spinach, and spicy Italian sausage.
    • Serve with Pomodoro, Pesto alla Genovese, or Gorgonzola Cream Sauce.

    Variations

    • Use 1 egg for pillowy, restaurant-style gnocchi. Add a second egg for a firmer, rustic dough.
    • Add a pinch of nutmeg and 1–2 tbsp ricotta for a richer dough (add flour as needed).
    • For a classic eggless northern Italian version, omit the egg and increase flour slightly to reach a soft, workable dough.

    Make-Ahead & Storage

    • Shaped gnocchi may be refrigerated on a lightly floured tray for up to 4 hours before cooking.
    • To freeze, arrange uncooked gnocchi in a single layer until solid, then transfer to a freezer bag. Cook directly from frozen—do not thaw.
    • Cooked gnocchi can be refrigerated for 2–3 days and pan-seared in butter just before serving.