Bags of Spices

Favorite Recipes

Savory

  • Chicken Gyro

    Chicken Gyro

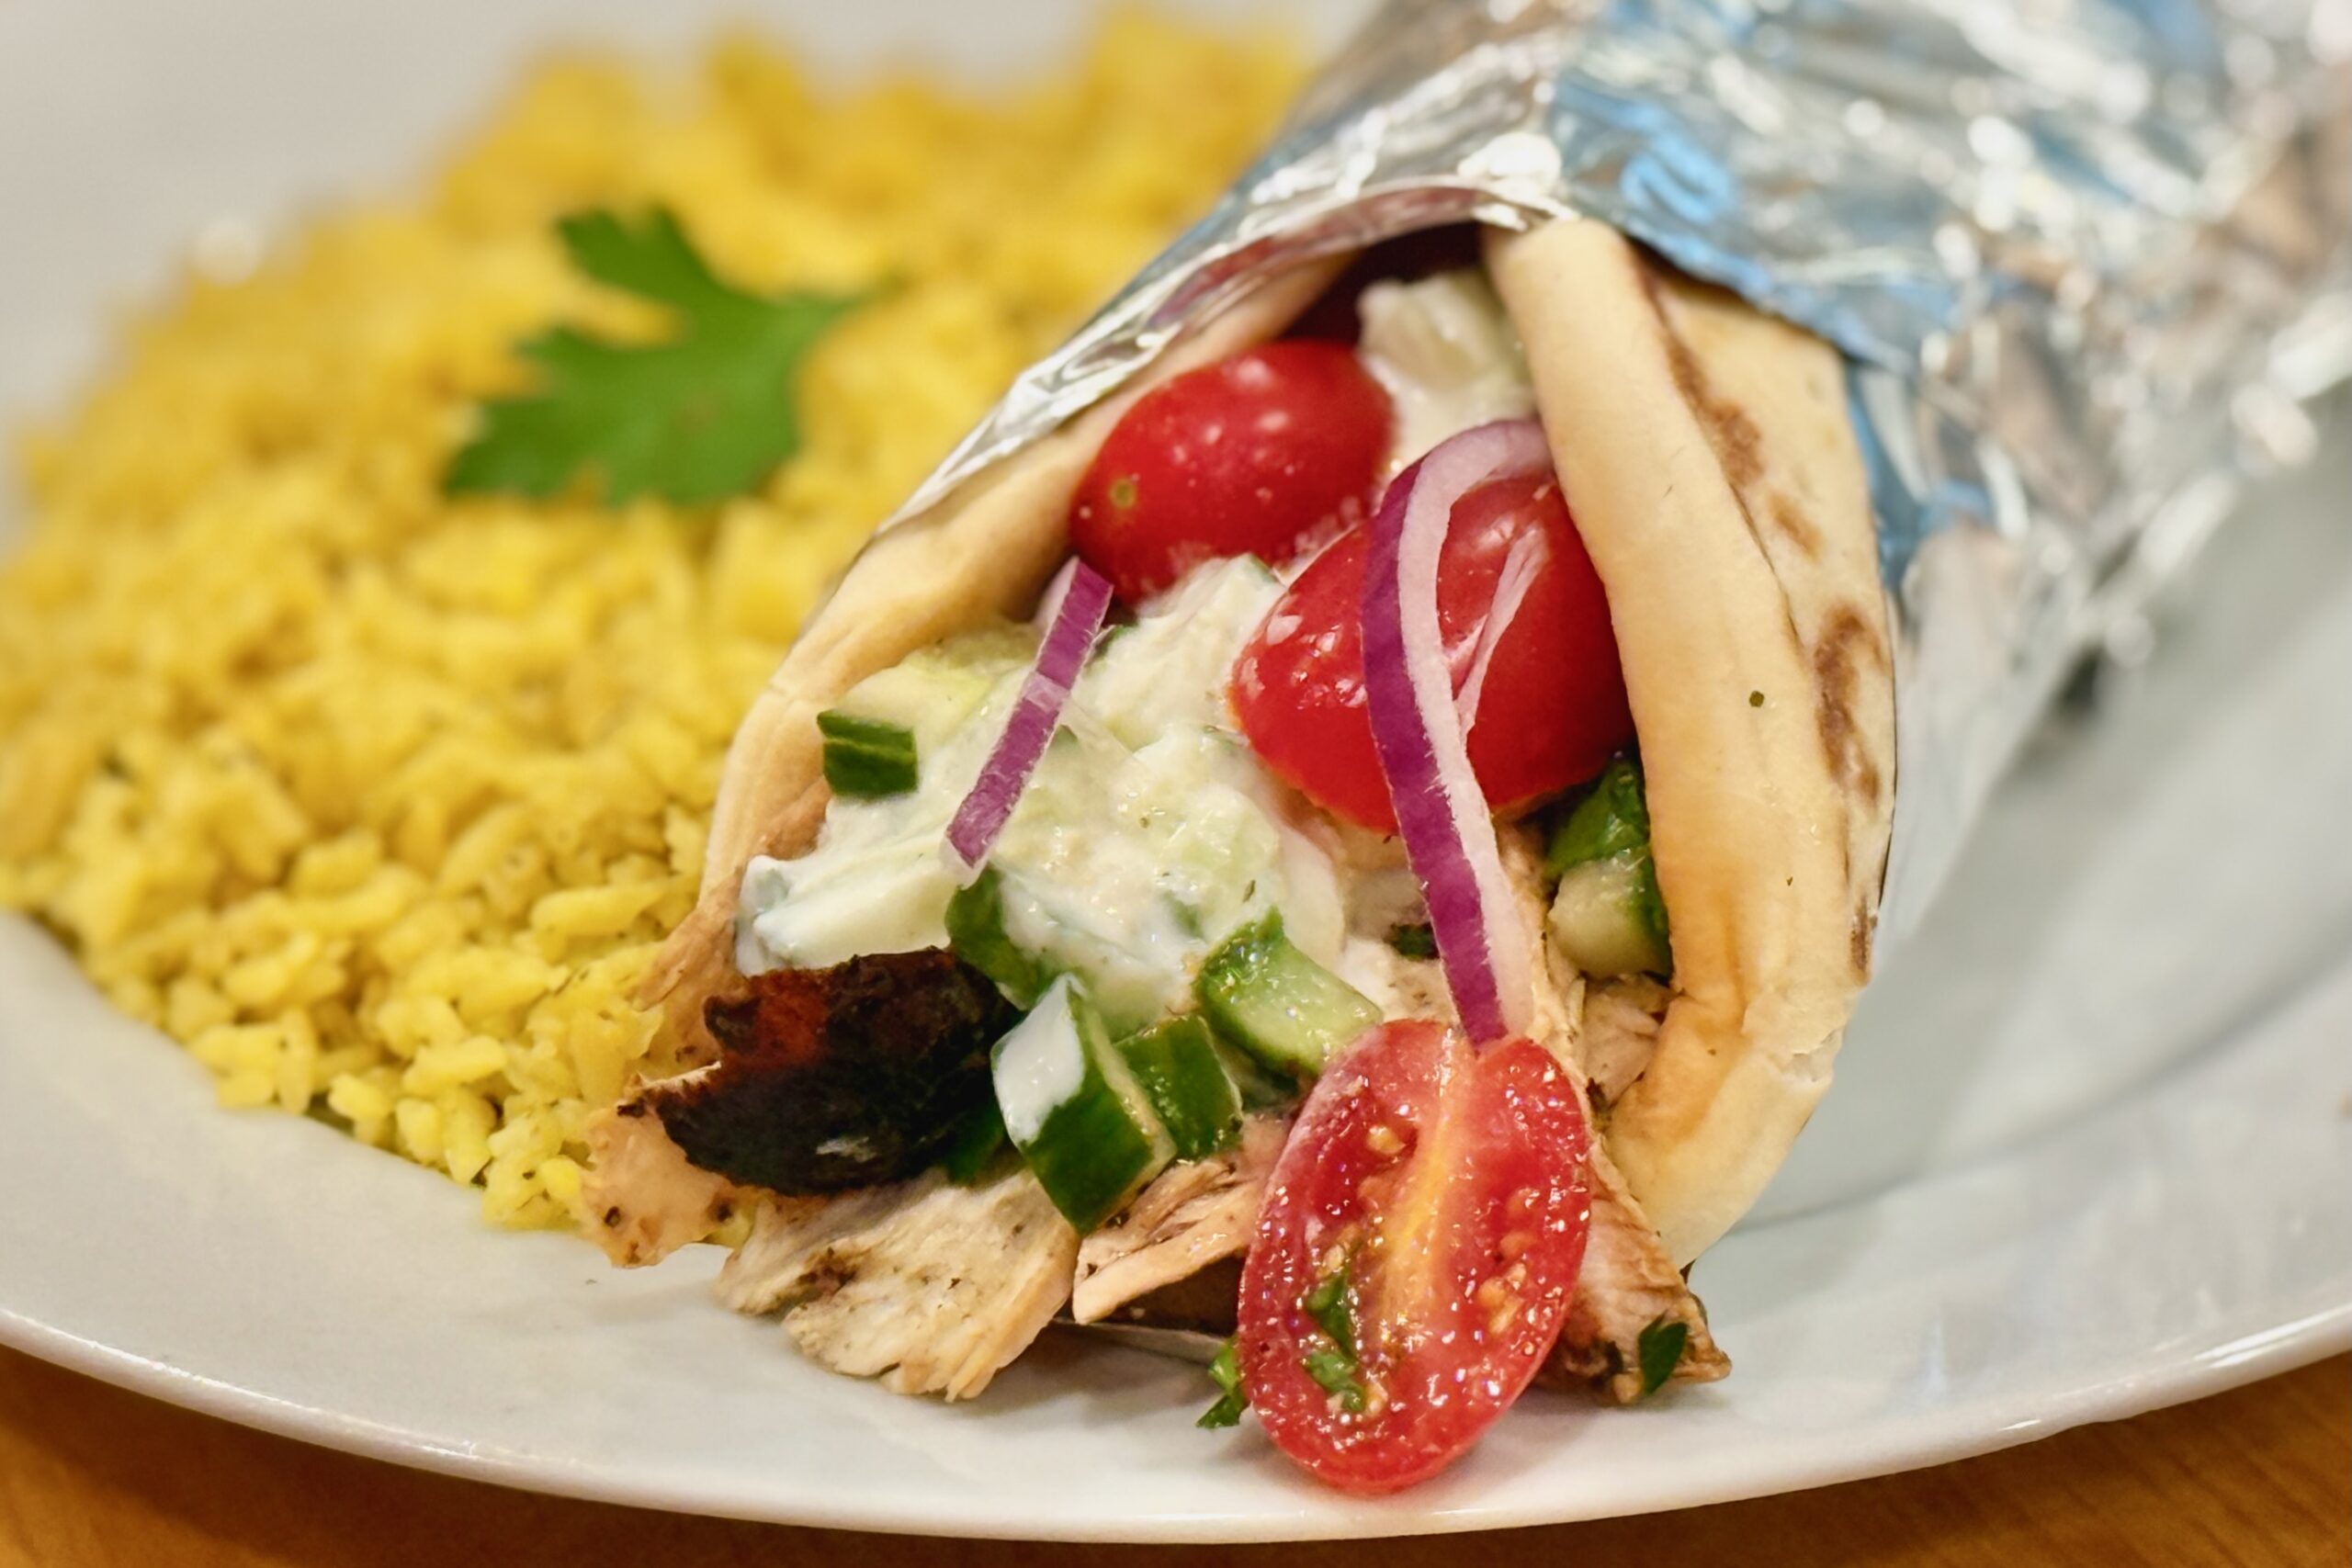
    On a family trip to Corfu, we stopped at a small waterside restaurant and ordered one of the best gyros we had ever tasted. The chicken was deeply seasoned, moist, and tender, with bright lemon, garlic, and oregano and none of the heavy, meatloaf-like texture so common in the United States. This version is our home tribute to that meal—grilled whole for juiciness, sliced and crisped in a hot skillet for authentic gyro-style edges, then wrapped in warm pita with fresh salad and cool tzatziki.


    Ingredients

    Chicken

    • 4 lb boneless, skinless chicken thighs

    Marinade

    • 2 tbsp garlic, minced
    • ⅓ cup lemon juice
    • ⅓ cup plain Greek yogurt
    • 2 tbsp white wine vinegar
    • 2 tbsp extra virgin olive oil
    • 3 tbsp dried oregano, rubbed between your palms before adding
    • 1 tsp paprika
    • ½ tsp ground cumin
    • ½ tsp ground coriander
    • 1 tbsp table salt
    • 1 tsp freshly ground black pepper

    Tzatziki

    • 1 English cucumber, diced or grated
    • 1½ cups plain Greek yogurt
    • 2 tbsp lemon juice
    • 2 tbsp extra virgin olive oil
    • 1 tsp garlic, minced
    • ½ tsp table salt
    • Freshly ground black pepper, to taste

    Salad

    • 2 English cucumbers, diced
    • 4 to 5 tomatoes, seeded and diced
    • ½ large red onion, thinly sliced
    • ¼ cup fresh parsley, chopped
    • 1 to 2 tbsp lemon juice, or to taste
    • 1 to 2 tbsp extra virgin olive oil, or to taste
    • ½ tsp dried oregano, crushed
    • Salt and freshly ground black pepper, to taste

    For Serving

    • Flatbread or pita
    • Olive oil, for warming the pita
    • Lemon wedges, for finishing
    • A small pinch of dried oregano for each gyro, optional but recommended

    Directions

    Marinate the Chicken

    In a large bowl or resealable container, combine the garlic, lemon juice, Greek yogurt, white wine vinegar, olive oil, oregano, paprika, cumin, coriander, salt, and black pepper. Rub the oregano between your palms before adding to help release its aroma.

    Add the chicken thighs and turn well to coat. Cover and refrigerate for 3 to 24 hours. Overnight is ideal.

    Make the Tzatziki

    In a medium bowl, stir together the cucumber, Greek yogurt, lemon juice, olive oil, garlic, salt, and black pepper.

    Refrigerate for at least 30 minutes before serving to let the flavors meld.

    Prepare the Salad

    In a separate bowl, combine the cucumbers, tomatoes, red onion, and parsley.

    Toss with the lemon juice, olive oil, crushed oregano, salt, and black pepper to taste. Refrigerate until ready to serve.

    Grill the Chicken

    Preheat a grill to medium-high heat. Remove the chicken from the marinade and grill the thighs whole until cooked through and nicely marked, about 5 to 7 minutes per side depending on thickness.

    Cook until the thickest part of the chicken reaches an internal temperature of 165°F (74°C).

    Transfer to a cutting board and let rest for 5 to 10 minutes.

    Slice and Crisp

    Slice the rested chicken into thin strips. Heat a large skillet over high heat and add a small amount of oil.

    Add the sliced chicken and cook briefly, tossing for 60 to 90 seconds, until the edges crisp and brown in spots.

    Finish with a small squeeze of lemon juice.

    Warm the Pita and Assemble

    Lightly brush the pita or flatbread with olive oil and warm on a hot skillet, grill, or griddle for 20 to 30 seconds per side, just until soft, hot, and lightly toasted.

    To serve, place chicken on the warm pita, spoon over tzatziki, add the salad, and finish with a small pinch of dried oregano if desired.


    Notes

    Preparation

    • For the best flavor, marinate the chicken overnight.
    • Chicken breast can be substituted for thighs. Grill to an internal temperature of 150°F (65.6°C) and hold at or above that temperature for about 3 minutes to achieve pasteurization. Use an instant-read thermometer to verify the temperature in the thickest part of the meat.
    • If using regular cucumbers for the tzatziki, dice or grate them, salt lightly, let rest 10 to 15 minutes, then squeeze dry in a kitchen towel before mixing into the yogurt.
    • English cucumbers usually contain less moisture, so that draining step is often unnecessary, though a light squeeze is still helpful if they seem especially juicy.
    • You may use diced cucumber, grated cucumber, or a combination in the tzatziki. A 50/50 mix of diced and grated cucumber gives an especially nice texture—creamy, but still fresh and crisp.

    Serving Suggestions

    • Serve with Greek Lemon Rice, fries, roasted potatoes, or a simple Greek-style salad for a full meal.
    • For a traditional Greek gyro-shop feel, wrap the finished gyro loosely in parchment or foil before serving.
    • Extra lemon wedges on the side are excellent for brightening each bite.

    Variations

    • For a traditional herb note in the tzatziki, add 1 to 2 tsp finely chopped fresh dill or mint.
    • Flatbread works well here, but warm pita gives the most classic gyro-style presentation.
    • A few fries tucked into the gyro are a very Greek addition and make it even closer to the style commonly served in Greece.

    Make-Ahead & Storage

    • The chicken can be marinated up to 24 hours ahead.
    • The tzatziki can be made 1 day ahead and kept refrigerated.
    • The salad is best made the day of serving, though the vegetables can be chopped ahead and dressed shortly before assembling.
    • Leftover cooked chicken keeps well in the refrigerator for up to 3 days. Reheat in a hot skillet to restore some of the crisp edges before serving.
  • Bahmi Goreng — Indonesian Fried Noodles

    Bahmi Goreng — Indonesian Fried Noodles

    When Jane and I returned home from our honeymoon, we talked about what to have for dinner that first Sunday back. I said Indonesian sounded great—she had no idea what I meant. That conversation started what has since become one of our favorite family food traditions. The first time I made bahmi goreng for her, the kitchen filled with the aroma of garlic, chilies, and ketjap caramelizing in a hot wok, and she was instantly hooked. Ever since, this dish has represented warmth, comfort, and the sense of adventure we shared from the very beginning. Stir-fried noodles tossed with tender chicken, pork, and shrimp, fragrant with galangal and brightened with lime, bring a taste of Indonesia to our table time and again.


    Ingredients

      Noodles

    • 12 oz (340 g) Chinese egg noodles or lo mein noodles
    • Proteins

    • 4 oz (115 g) small shrimp, peeled and halved lengthwise (optional)
    • 4 oz (115 g) chicken breast, thinly sliced
    • 4 oz (115 g) lean pork or thinly sliced beef
    • Optional Quick Marinades

    • For Shrimp: ½ tsp light soy sauce, ¼ tsp fish sauce, ¼ tsp cornstarch, pinch white pepper
    • For Pork: 1 tsp ketjap manis, ½ tsp light soy sauce, ¼ tsp cornstarch, ¼ tsp minced garlic
    • For Chicken: 1 tsp ketjap manis, ½ tsp light soy sauce, ¼ tsp cornstarch, ¼ tsp minced garlic, pinch white pepper
    • Vegetables

    • 2 cups shredded white cabbage or Chinese cabbage
    • 4 green onions, cut into 1-inch pieces
    • Bumbu (Spice Paste)

    • 3½ oz (100 g) shallots, roughly chopped
    • 4–5 cloves garlic
    • ½ oz (15 g) fresh galangal, sliced (or ½ tsp galangal powder)
    • 1–2 fresh red chilies, seeded if desired
    • 1 tbsp chopped cilantro stems
    • Seasoning Sauce

    • 2 tbsp ketjap manis (Indonesian sweet soy sauce)
    • 1 tbsp light soy sauce
    • ⅓ tsp MSG (optional but recommended)
    • ¼ tsp ground white pepper
    • ⅛ tsp turmeric
    • 1 tsp fish sauce (optional, for added umami)
    • Cooking Oil

    • 3 tbsp peanut oil, divided
    • Optional Flavor Boost

    • 1 tsp tomato paste
    • Finishing & Garnishes

    • Fresh lime juice, to taste
    • Fresh cilantro leaves
    • Fried shallots
    • Reserved chili slivers
    • Omelet shreds (optional)
    • Fried onion flakes (optional)
    • For Serving

    • Lime wedges
    • Sambal oelek or sambal badjak
    • Extra ketjap manis

    Directions

    Prepare the Noodles

    Cook the noodles according to package directions until just tender. Drain well and toss lightly with about 1 tsp of the peanut oil to prevent sticking.

    Spread the noodles out on a tray or colander and let them cool slightly while preparing the remaining ingredients.

    Optional: Marinate the Proteins

    If using the marinades, toss each protein with its respective marinade ingredients and let stand for 10–15 minutes while preparing the vegetables and bumbu.

    Prepare the Bumbu

    In a food processor or mortar and pestle, grind the shallots, garlic, galangal, chilies, and cilantro stems into a coarse aromatic paste.

    Prepare the Vegetables

    Shred the cabbage and cut the green onions into 1-inch lengths.

    Cook the Proteins

    Heat 1 tbsp peanut oil in a wok over high heat until shimmering.

    Add the chicken and pork (or beef) and spread them across the surface of the wok. Let them sear undisturbed for about 30 seconds before stir-frying.

    Continue stir-frying until just cooked through, about 2–3 minutes.

    Add the shrimp and cook briefly until pink. Transfer all proteins to a plate and set aside.

    Cook the Bumbu

    Add the remaining peanut oil to the wok.

    Add the bumbu paste and stir-fry for about 2 minutes until fragrant.

    If using the tomato paste, add it now and cook about 30 seconds until lightly caramelized.

    Build the Stir-Fry

    Add the cabbage and green onions and stir-fry for 1–2 minutes.

    Add the noodles and toss well with the aromatics.

    Return the proteins to the wok.

    Season and Finish

    Add the ketjap manis, soy sauce, MSG, white pepper, turmeric, and fish sauce if using.

    Toss everything over high heat until evenly coated and glossy. If the noodles absorb the sauce too quickly, add 1–2 tbsp hot water to loosen the sauce and help it coat the noodles.

    Finish with a squeeze of fresh lime juice.

    Serve

    Garnish with cilantro leaves, fried shallots, chili slivers, and optional omelet shreds or fried onion flakes. Serve with lime wedges, sambal, and extra ketjap manis.


    Notes

    Preparation

    • Chinese egg noodles or lo mein noodles work best for this dish.
    • If ketjap manis is unavailable, substitute 1 tbsp soy sauce mixed with 2 tsp brown sugar.
    • If using a less sweet ketjap manis, add ½ tsp brown sugar to balance the sauce.
    • A small amount of fish sauce adds savory depth similar to Indonesian shrimp paste.
    • The tomato paste adds deeper color and umami reminiscent of Dutch-Indo restaurant versions.

    Serving Suggestions

    • Serve with krupuk (Indonesian shrimp crackers).
    • A fried egg on top is a popular Indonesian presentation.
    • A side of acar timun adds refreshing contrast.

    Variations

    • Increase the chilies or add sambal badjak for a spicier Javanese-style version.
    • A light drizzle (about ½ tsp) sesame oil over the finished noodles adds subtle aroma.

    Make-Ahead & Storage

    • Best served fresh from the wok.
    • Leftovers keep up to 2 days refrigerated.
    • Reheat in a skillet with a splash of water or oil.
  • Chunky El Pato Salsa

    Chunky El Pato Salsa

    A bright, chunky salsa that combines the bold chile‑tomato base of El Pato salsa de chile fresco with fresh diced tomato, onions, jalapeño, cilantro, and balanced seasonings — perfect with chips or Mexican dishes.


    Ingredients

    • 1 can (7.75 oz) El Pato salsa de chile fresco
    • 1 medium Roma tomato (about 1 cup diced, seeds removed)
    • ½ cup finely diced white or red onion
    • 2 green onions, thinly sliced
    • 1 medium jalapeño, seeded and diced (adjust heat to taste)
    • ½ cup fresh cilantro, chopped
    • Juice of 1 lime (about 2 Tbsp)
    • ½ tsp ground cumin (optional)
    • ⅛–¼ tsp dried Mexican oregano
    • ¼ tsp sugar (balances acidity)
    • ½ tsp kosher salt (adjust to taste)
    • ½ tsp freshly ground black pepper
    • 1 small garlic clove, minced (optional)

    Directions

    Prep the Fresh Ingredients

    Dice the Roma tomato, finely dice the white or red onion, slice the green onions, seed and dice the jalapeño, chop the cilantro, and mince the garlic if using. Removing seeds and excess juice from the tomato helps keep the salsa chunky and prevents it from becoming watery (a common pico de gallo technique).

    This base of fresh ingredients mirrors classic fresh salsa compositions of tomato, onion, jalapeño, lime, and cilantro.

    Combine and Season

    In a medium bowl, combine the diced tomato, onion, green onions, jalapeño, and cilantro. Add the El Pato salsa de chile fresco and gently fold until the fresh ingredients are evenly mixed with the base.

    Add the lime juice, cumin (if using), Mexican oregano, sugar, salt, and black pepper. Stir to combine thoroughly, then taste and adjust salt, lime, or heat as needed — seasoning balance is key in fresh salsa recipes.

    Cover and refrigerate for at least 30–60 minutes so the flavors meld before serving.


    Notes

    Preparation

    • Draining excess tomato juice and removing seeds helps retain a chunky texture rather than a watery salsa — a key fresh salsa practice.
    • Taste for salt and acidity after chilling — chilling can slightly soften perceived seasoning, and fresh salsas often benefit from final adjustment.

    Serving Suggestions

    • Serve with tortilla chips as a classic appetizer or snack.
    • Use as a condiment for tacos, grilled meats, quesadillas, or eggs for brightness and texture.

    Variations

    • Mild: Remove all jalapeño seeds or substitute with mild peppers.
    • Smoky: Lightly char the jalapeño or tomato before dicing for a subtle smoky depth.
    • Extra Heat: Include some jalapeño seeds or add serrano peppers for more spice.

    Make-Ahead & Storage

    • Refrigerate in an airtight container for 3–4 days; flavors continue to develop and often taste even better after resting.
    • If excess liquid collects, drain before serving to maintain chunkiness.
  • Ajitsuke Tamago — Marinated Ramen Eggs

    Ajitsuke Tamago — Marinated Ramen Eggs

    These marinated ramen eggs—ajitsuke tamago—bring that silky, jammy yolk and savory-sweet flavor you expect from a good bowl of ramen. A balanced shoyu-mirin marinade and a precise cook time create restaurant-quality results every time.


    Ingredients

      Eggs

    • 6 large eggs, room temperature
    • Marinade

    • ½ cup soy sauce or tamari
    • ½ cup water
    • ½ cup mirin
    • ¼ cup sake
    • 3 tbsp sugar (or ¼ cup for a sweeter flavor)
    • Optional Aromatics

      • 1 crushed garlic clove
      • 1 thin slice fresh ginger
      • 1 small piece kombu (1×2 in), added off-heat
      • 1 dried shiitake mushroom
      • ⅛ piece star anise

    Directions

    Make the Marinade

    In a saucepan over medium heat, combine soy sauce or tamari, mirin, sake, water, and sugar.

    Stir just until the sugar dissolves; do not boil.

    Remove from heat and add any optional aromatics.

    Cool quickly using an ice bath or refrigerate until fully chilled.

    Cook the Eggs

    Bring a pot of water to a rolling boil. Lower the eggs gently into the boiling water.

    Cook for 6 minutes 30 seconds for a softer, molten-jam yolk, or 7 minutes for a firmer, jammy yolk.

    Transfer immediately to an ice bath and chill completely.

    Peel carefully once cooled.

    Marinate

    Ensure the marinade is fully chilled.

    Place peeled eggs in the marinade and use a folded paper towel to keep them submerged.

    Refrigerate for 4–8 hours for ideal flavor, or up to 12 hours for a stronger cure.

    Serve

    Remove eggs from the marinade and rest at room temperature for 10–15 minutes before serving.

    Slice cleanly using a damp knife (wipe between cuts) or use plain dental floss for perfect halves.


    Notes

    Preparation

    • For the most consistent yolk texture, start with room-temperature eggs.
    • For a richer umami profile, kombu or dried shiitake are the most impactful optional aromatics.
    • Use a slotted spoon or spider skimmer to lower eggs into the water to prevent cracking.

    Serving Suggestions

    • Serve atop shoyu, shio, or Ramen.
    • Delicious with rice bowls, soba, or cold noodle dishes.
    • Can be served whole or halved depending on presentation preference.

    Variations

    • For sweeter eggs (common in tsukemen), use the full ¼ cup sugar.
    • Add a few drops of toasted sesame oil to the marinade for a nutty aroma.
    • For a soy-forward, darker exterior, increase soy sauce by 2–3 tbsp and reduce water accordingly.

    Make-Ahead & Storage

    • Marinated eggs keep well for 3–4 days in the refrigerator.
    • The flavor deepens with time; if storing longer, taste intermittently to avoid over-salting.
    • Store eggs fully submerged in marinade for best results.
  • Carne Asada Tacos

    Carne Asada Tacos

    Carne asada tacos are all about bold, bright flavors—citrus, chiles, and fire meeting the smoky heat of the grill. This version brings together a vibrant, well-balanced marinade, a hot charcoal sear, and classic taquería toppings for tacos that taste like they came straight from a late-night stand in Mexico. Served with warm corn tortillas, diced onion, fresh cilantro, and your choice of salsa verde or chile de árbol salsa, these tacos are simple, deeply flavorful, and perfect for any cookout.


    Ingredients

      Marinade

    • ½ cup cilantro, roughly chopped
    • ⅓ cup avocado oil
    • ¼ cup soy sauce
    • ¼ cup orange juice
    • 2 tbsp lime juice (see note for overnight marinade)
    • 1 jalapeño, minced
    • 3–4 garlic cloves, crushed
    • 2–3 tbsp grated white onion
    • 1 tsp cumin
    • 1 tsp chipotle chili powder
    • 1 tsp ancho chili powder
    • ½ tsp mexican oregano
    • ¼ tsp cinnamon
    • 1–2 tbsp Mexican Coke (optional, enhances caramelization)
    • 1 tsp Worcestershire sauce
    • Optional Dry Substitutions (If Fresh Aromatics Are Unavailable)

    • ½ tsp garlic powder (instead of fresh garlic)
    • ½ tsp onion powder (instead of fresh onion)
    • Meat

    • 1–2 lbs flank or skirt steak
    • ½–1 tsp kosher salt, for seasoning before grilling
    • Finishings

    • Corn tortillas
    • 1 white onion, diced
    • 1 bunch cilantro, stemmed and chopped
    • Salsa Verde or Chile de Árbol Salsa
    • Limes, cut into wedges

    Directions

    Prepare the Marinade

    In a bowl, combine cilantro, avocado oil, soy sauce, orange juice, lime juice, jalapeño, garlic, grated onion, cumin, chipotle chili powder, ancho chili powder, oregano, cinnamon, Mexican Coke (if using), and Worcestershire sauce.

    Mix well to blend.

    Marinate the Steak

    Place steak in a resealable plastic bag or shallow dish and pour the marinade over the top. Seal or cover tightly, pressing out excess air.

    Marinate for 2–4 hours.

    For overnight marinating, reduce lime juice to 1 tbsp to avoid surface mushiness.

    Preheat the Grill

    Heat a charcoal grill to very high heat (550–650°F) for proper searing.

    Grill the Steak

    Remove the steak from the marinade and pat completely dry with paper towels for better browning. Season both sides with ½–1 tsp kosher salt.

    Place the steak on the grill and flip every minute for even charring and tenderness, grilling 3–4 minutes per side or until medium-rare (130–135°F).

    Optional:

    • Boil ¼ cup reserved marinade for 1 minute and lightly baste the steak during the final minute of cooking for deeper color and flavor.

    Rest and Slice

    Let the steak rest for 5–10 minutes to allow juices to redistribute.

    Slice thinly on the bias, making sure to cut against the grain for maximum tenderness.

    Assemble the Tacos

    Warm corn tortillas until soft and pliable.

    Fill with sliced steak and top with diced onion, chopped cilantro, your choice of salsa verde or chile de árbol salsa, and a squeeze of lime.


    Notes

    Preparation

    • Skirt steak is more traditional for carne asada and tends to grill quickly with excellent flavor, though flank steak also works beautifully. Cutting on the bias gives each slice more surface area, enhancing tenderness and making the meat easier to layer into tacos.
    • If using the optional Mexican Coke, it adds caramelization and depth without making the marinade taste sweet.

    Serving Suggestions

    • Great with Mexican Rice, Refried Beans, or Lime-Pickled Red Onions.
    • Offer both salsas—verde for brightness, chile de árbol for heat.

    Variations

    • Add a pinch of smoked paprika for a subtle smoky note without overpowering the grill flavor.
    • Swap jalapeño for serrano for more heat.

    Make-Ahead & Storage

    • Marinade can be made 2–3 days in advance.
    • Leftover carne asada keeps 3 days refrigerated.
    • Reheat sliced steak briefly in a hot skillet to avoid drying out.
  • Birria de Res

    Birria de Res

    Rich, smoky, and deeply spiced, this family favorite Birria de Res captures the essence of traditional Jalisco-style beef birria. Slow-simmered with a blend of toasted chiles and warm spices, it can be served as a hearty stew or transformed into crispy, cheesy Quesabirria tacos with plenty of the rich consommé for dipping. A perfect centerpiece for any gathering.


    Ingredients

      Birria Base

    • 7 dried guajillo chiles
    • 7 dried morita chiles
    • 4 dried ancho chiles
    • 3 dried chiles de árbol (optional for heat)
    • 1 liter boiling water
    • 5 lb beef chuck, cut into 4-inch chunks
    • 2 lb beef short ribs
    • Salt and freshly ground black pepper
    • 2 tbsp neutral oil
    • 2 tsp Mexican oregano
    • 2 tsp cumin seeds
    • 1 tsp black peppercorns
    • 1 tsp whole cloves
    • 1 tsp allspice berries
    • 3 bay leaves
    • 1 tbsp onion powder
    • 1 tsp paprika
    • 1 tsp ground cinnamon
    • 1 can (28 oz) whole tomatoes with juice
    • 1 tbsp minced garlic (about 3 cloves)
    • 2 tbsp table salt
    • 2 tbsp vinegar (white or apple cider)
    • ½ cup vegetable oil
    • For Quesabirria Tacos

    • Corn tortillas
    • Oaxaca, mozzarella, or jack cheese (shredded)
    • Diced onion
    • Chopped cilantro
    • Lime wedges, for serving

    Directions

    Prepare the Chiles

    Remove stems and seeds from the dried chiles. Toast lightly in a dry skillet over medium heat, pressing gently until fragrant (about 15–20 seconds per side). Transfer to a bowl and cover with boiling water. Soak for 30 minutes until softened.

    Toast and Grind Spices

    In a spice grinder or mortar and pestle, grind Mexican oregano, cumin seeds, peppercorns, cloves, allspice, and bay leaves into a coarse powder. Stir in onion powder, paprika, and cinnamon; set aside.

    Brown the Meat

    Pat beef dry and season generously with salt and pepper. In a large Dutch oven, heat 2 tbsp oil over medium-high heat until shimmering. Brown the meat in batches on all sides until deeply golden; transfer to a bowl and set aside.

    Build the Chile Base

    In the same Dutch oven, add the spice mixture and toast briefly (15–30 seconds) until aromatic. Add tomatoes with their juice, crushing them with the back of a wooden spoon. Stir in garlic, salt, and vinegar. Blend the softened chiles with their soaking liquid until smooth and add to the pot. Let the mixture simmer over medium heat for 2–3 minutes to bloom the chile flavors before adding the browned meat back. Scrape up any browned bits from the bottom as you stir.

    Simmer Low and Slow

    Add ½ cup oil, stir, and reduce heat to low. Cover partially and simmer gently for 3–4 hours, or until meat is tender enough to shred easily. If the liquid reduces too much, add a splash of hot water or beef broth as needed.

    Adjust and Strain (Optional)

    Remove the meat and shred. Skim off the red chile oil that rises to the top and reserve for frying tortillas. For a more refined consommé, strain the sauce through a fine sieve. For a more rustic texture (as our family prefers), leave it unstrained.

    Serve as Stew or Tacos

    For stew service, return shredded meat to the sauce and serve in bowls with diced onion, cilantro, and lime wedges. For Quesabirria tacos, continue below.

    Quesabirria Tacos

    Shred the beef and moisten with a few tablespoons of birria sauce. Reserve the skimmed chile oil for frying. Dip a corn tortilla into the red oil and lay it on a hot skillet or griddle. Spoon shredded meat and cheese onto one side; fold and press lightly. Cook until crisp and golden on both sides, about 1–2 minutes per side.

    Serve tacos with diced onion, chopped cilantro, and lime wedges. Include a small bowl of the birria sauce for dipping (consommé).


    Notes

    Preparation

    • Toasting the chiles deepens their smoky flavor and prevents bitterness — avoid burning them.
    • Blooming the chile-tomato base briefly enhances color and richness before simmering.
    • Use beef chuck and short ribs for the perfect balance of tenderness and flavor.
    • For a richer taco crust, mix the reserved chile oil with a bit of ghee or butter before frying.
    • Birria tastes even better the next day as the flavors meld and intensify.

    Serving Suggestions

    • Serve the birria as a stew with warm corn tortillas, onion, cilantro, and lime wedges.
    • Use the same base for Quesabirria tacos — crisp, cheesy tacos dipped in the rich chile consommé.
    • Offer lime wedges on the table for brightness and balance.

    Variations

    • For milder heat, reduce or omit chiles de árbol.
    • Add a touch of smoked paprika for a subtle, smoky accent if morita chiles are unavailable.
    • Try goat or lamb shoulder for traditional birria de chivo or birria de borrego.
  • Babi Panggang — Indonesian Roasted Pork

    Babi Panggang — Indonesian Roasted Pork

    Working in the office in the city of Bussum in The Netherlands, we’d often order take-out from our favorite Chinese-Indonesian restaurant, Tong Fong, in the neighboring city of Hilversum. One stand-out item was their delicious Babi Panggang, which was always a part of our order. I later learned that Babi Panggang is the most ordered main dish at Indonesian restaurants throughout the Netherlands. This is my attempt to recreate the vibrant flavors and textures of this delicious dish.


    Ingredients

    • 2 lb pork shoulder or belly
    • Marinade

    • ¼ cup ketjap manis
    • 2 tbsp hoisin sauce
    • 2 tbsp rice cooking wine
    • 1 tbsp brown sugar
    • 1 tbsp fresh ginger, grated
    • 1 tbsp fish sauce
    • ½ tbsp sambal oelek
    • ½ tbsp sambal badjak
    • ½ tsp toasted sesame oil (optional)
    • ¼ tsp Chinese five spice (optional)
    • 2 cloves garlic, minced
    • Juice and zest of 1 lime
    • Sweet & Sour Red Sauce

    • 1 tbsp vegetable oil
    • 1 small onion, finely chopped
    • 2–3 cloves garlic, minced
    • 2 tsp grated ginger
    • ½ tsp sambal oelek
    • 3 tbsp tomato paste
    • ¼ tsp chicken powder
    • ¼ cup sweet chili sauce
    • 3 tbsp ketchup
    • 2 tbsp lime juice
    • 2 tbsp seasoned rice vinegar
    • 1 tbsp Tamarind Paste
    • 1 tbsp ketjap manis
    • 1 tsp fish sauce
    • ¾ cup chicken stock or water
    • ¼ cup brown sugar (adjust to taste)
    • 1 tbsp cornstarch mixed with 1 tbsp water

    Directions

    Marinate the Pork

    Combine all marinade ingredients, stirring until the sugar has completely dissolved. Pour into a resealable container or vacuum-seal bag. Add the pork, coating thoroughly. Seal and marinate in the refrigerator for 4–12 hours.

    Sweet & Sour Red Sauce

    Heat oil in a saucepan over medium heat. Sauté onion until lightly browned; add garlic, ginger, and sambal, and cook until fragrant. Add tomato paste and chicken powder; cook 1 minute to develop sweetness.

    Stir in sweet chili sauce, ketchup, lime juice, vinegar, tamarind, ketjap manis, fish sauce, stock or water, and brown sugar. Simmer 10 minutes to allow flavors to meld. Add the cornstarch slurry and simmer until glossy and thickened. Blend with an immersion blender and adjust thickness with additional stock, if needed.

    Preparation #1: Sous Vide

    Preheat sous vide bath to 170°F / 77°C for pork shoulder (130°F / 55°C for pork loin or tenderloin; 150°F / 65°C for pork belly). Submerge vacuum-sealed pork and marinade in the water bath and heat for 12–24 hours (2–8 hours for pork loin or tenderloin).

    Remove from the bag and pat dry. Brush with oil and finish under a broiler set to high for 4–5 minutes to crisp the top. Brush with red sauce during broiling and allow it to develop a few bits of char.

    Slice and serve over rice with a generous amount of sauce. Serve with acar ketimun (pickled vegetables), cucumber salad, fried cabbage, and/or blanched green beans tossed with garlic and sesame oil.

    Preparation #2: Oven

    Preheat oven to 350°F / 177°C. Place pork on a rack in a baking tray. Reserve marinade and boil in a saucepan for 5 minutes. Roast pork for 30–40 minutes per pound, or until internal temperature reaches 190°F / 88°C, basting with the boiled marinade halfway through.

    Rest pork for 20 minutes. Pat dry, brush with oil, and finish under a broiler set to high for 4–5 minutes to crisp the top. Optionally, baste with the red sauce while broiling and allow it to develop slight char.

    Slice and serve over rice with a generous amount of sauce. Serve with acar ketimun, cucumber salad, fried cabbage, and/or blanched green beans tossed with garlic and sesame oil.

    Preparation #3: Pellet Grill

    Preheat pellet grill to 250°F / 120°C. Smoke until internal temperature reaches 187°F / 86°C, basting halfway through. Rest pork for 30 minutes.

    Pat dry, brush with oil, and finish under a broiler set to high for 4–5 minutes to crisp the top. Optionally, baste with the red sauce while broiling and allow it to develop light char.

    Slice and serve over rice with a generous amount of sauce. Serve with acar ketimun, cucumber salad, fried cabbage, and/or blanched green beans tossed with garlic and sesame oil.


    Notes

    Preparation

    • Fattier cuts such as pork shoulder or belly are preferred, but pork loin or tenderloin (especially when using the sous vide method, with times and temperatures adjusted accordingly) can also be used. Take care not to overcook leaner cuts.
    • Preparation #1, Sous Vide, is the preferred method for the most tender and flavorful result.

    Serving Suggestions

    • Serve sliced Babi Panggang over rice with plenty of red sauce spooned on top.
    • Pair with acar ketimun, fried cabbage, cucumber salad, or blanched green beans with garlic and sesame oil.
  • Browned Butter Sage Sauce

    Browned Butter Sage Sauce

    A quick, elegant sauce that pairs beautifully with ricotta or potato gnocchi. Simple to prepare, it highlights the nutty aroma of browned butter and the earthy perfume of fresh sage. When served with gnocchi, a pinch of nutmeg in the dough adds warm, slightly sweet notes that complement the savory depth of the sage. This classic combination appears throughout Italian cooking—in pasta, meatballs, gnocchi, and creamy soups—where sage contributes its herbaceous edge and nutmeg lends a subtle, cozy warmth.


    Ingredients

    • 6 tbsp unsalted butter (85 g)
    • 8–10 fresh sage leaves
    • ⅛ tsp table salt (or to taste)
    • freshly ground black pepper (to taste)
    • 2 tbsp grated parmesan (optional, for finishing)
    • ½ tsp lemon juice (optional, brightens flavor)

    Directions

    Brown the Butter

    In a medium skillet or saucepan, melt the butter over medium heat. Add the sage leaves and cook, swirling occasionally, until the butter turns deep golden and smells nutty, about 4–5 minutes. The sage will crisp slightly as it fries.


    Finish the Sauce

    Remove from heat and stir in salt, black pepper, and lemon juice if using. Serve the sage leaves whole or remove them depending on preference.


    Serve

    Toss hot, drained gnocchi directly in the pan with the brown butter sauce until evenly coated. Serve immediately with freshly grated parmesan.


    Notes

    Preparation

    • Watch closely—brown butter goes from nutty to burnt quickly. Remove from heat as soon as the milk solids turn golden.
    • Create a silkier sauce by swirling in 1–2 tbsp pasta or gnocchi cooking water to form a light emulsion.
    • For deeper sage flavor, crisp the leaves for an extra 30 seconds before removing the pan from heat.

    Serving Suggestions

    • Drizzle over ricotta gnocchi, potato gnocchi, or sweet potato gnocchi.
    • Excellent on cheese ravioli, butternut squash ravioli, or spinach ravioli.
    • Also delicious over roasted vegetables, grilled chicken, or sautéed mushrooms.

    Variations

    • Garlic Brown Butter: Add one lightly crushed garlic clove to the skillet during browning; remove before serving.
    • Brown Butter & Walnut: Stir in ¼ cup toasted chopped walnuts for added crunch.
    • Lemon-Sage Butter: Increase lemon juice to 1 tsp and add ½ tsp lemon zest for brightness.

    Make-Ahead & Storage

    • Best served immediately after browning.
    • Refrigerate leftover sauce up to 3 days; rewarm gently over low heat before serving.
    • Sage leaves soften in storage—crisp fresh leaves separately if reheating.