Bags of Spices

Favorite Recipes

Sweet

  • Anijsmelk — Dutch Star-Anise Steamer

    Anijsmelk — Dutch Star-Anise Steamer

    Anijsmelk, the classic star-anise–flavored steamer of the Netherlands, is one of my favorite Dutch treats—simple, soothing, and steeped in nostalgia. Traditionally made by stirring anise-flavored sugar cubes (Anijsblokjes) into warm milk, it’s a comforting drink to warm your soul on a cold winter’s night. This homemade version captures that flavor with whole star anise and a touch of sweetness.


    Ingredients

    • 1 qt milk
    • 5–10 whole star anise
    • ⅛ tsp ground anise seed (optional, for rounder flavor)
    • 1–4 tbsp sugar, to taste (about 1 tsp per cup)
    • Small knob of butter or splash of cream (optional, for richness)

    Directions

    Infuse the Milk

    In a medium saucepan, warm the milk with the star anise over medium-low heat until steaming but not boiling. Reduce heat to low and let steep gently for 5–10 minutes, tasting occasionally to check flavor strength.

    Finish the Drink

    When the milk reaches your desired anise intensity, remove from heat and discard the star anise pods. Stir in sugar to taste and, if desired, add a small knob of butter or splash of cream for extra richness. Whisk briefly to create a light froth.

    Serve

    Pour hot into a teacup or mug and enjoy immediately. Optionally dust with a pinch of ground anise or cinnamon. Serve alongside a small Dutch biscuit or slice of buttered bread for an authentic touch.


    Notes

    Preparation

    • For the most authentic flavor, use a mix of whole star anise and a small pinch of ground anise seed.
    • Warm gently—avoid boiling, which can cause the milk to curdle or the flavor to become harsh.
    • Steep covered to preserve the delicate aroma of the anise.

    Serving Suggestions

    • Traditionally enjoyed as a bedtime drink or on cold evenings.
    • Serve in a warm ceramic cup with a dusting of ground anise, cinnamon, or nutmeg.
    • Pair with speculaas cookies or buttered toast for a cozy Dutch treat.

    Variations

    • Substitute honey or vanilla sugar for a more nuanced sweetness.
    • Add a drop of almond or vanilla extract for a gentle twist.
    • For a creamier version, replace 1 cup of milk with light cream.
  • Boterkoek

    Boterkoek

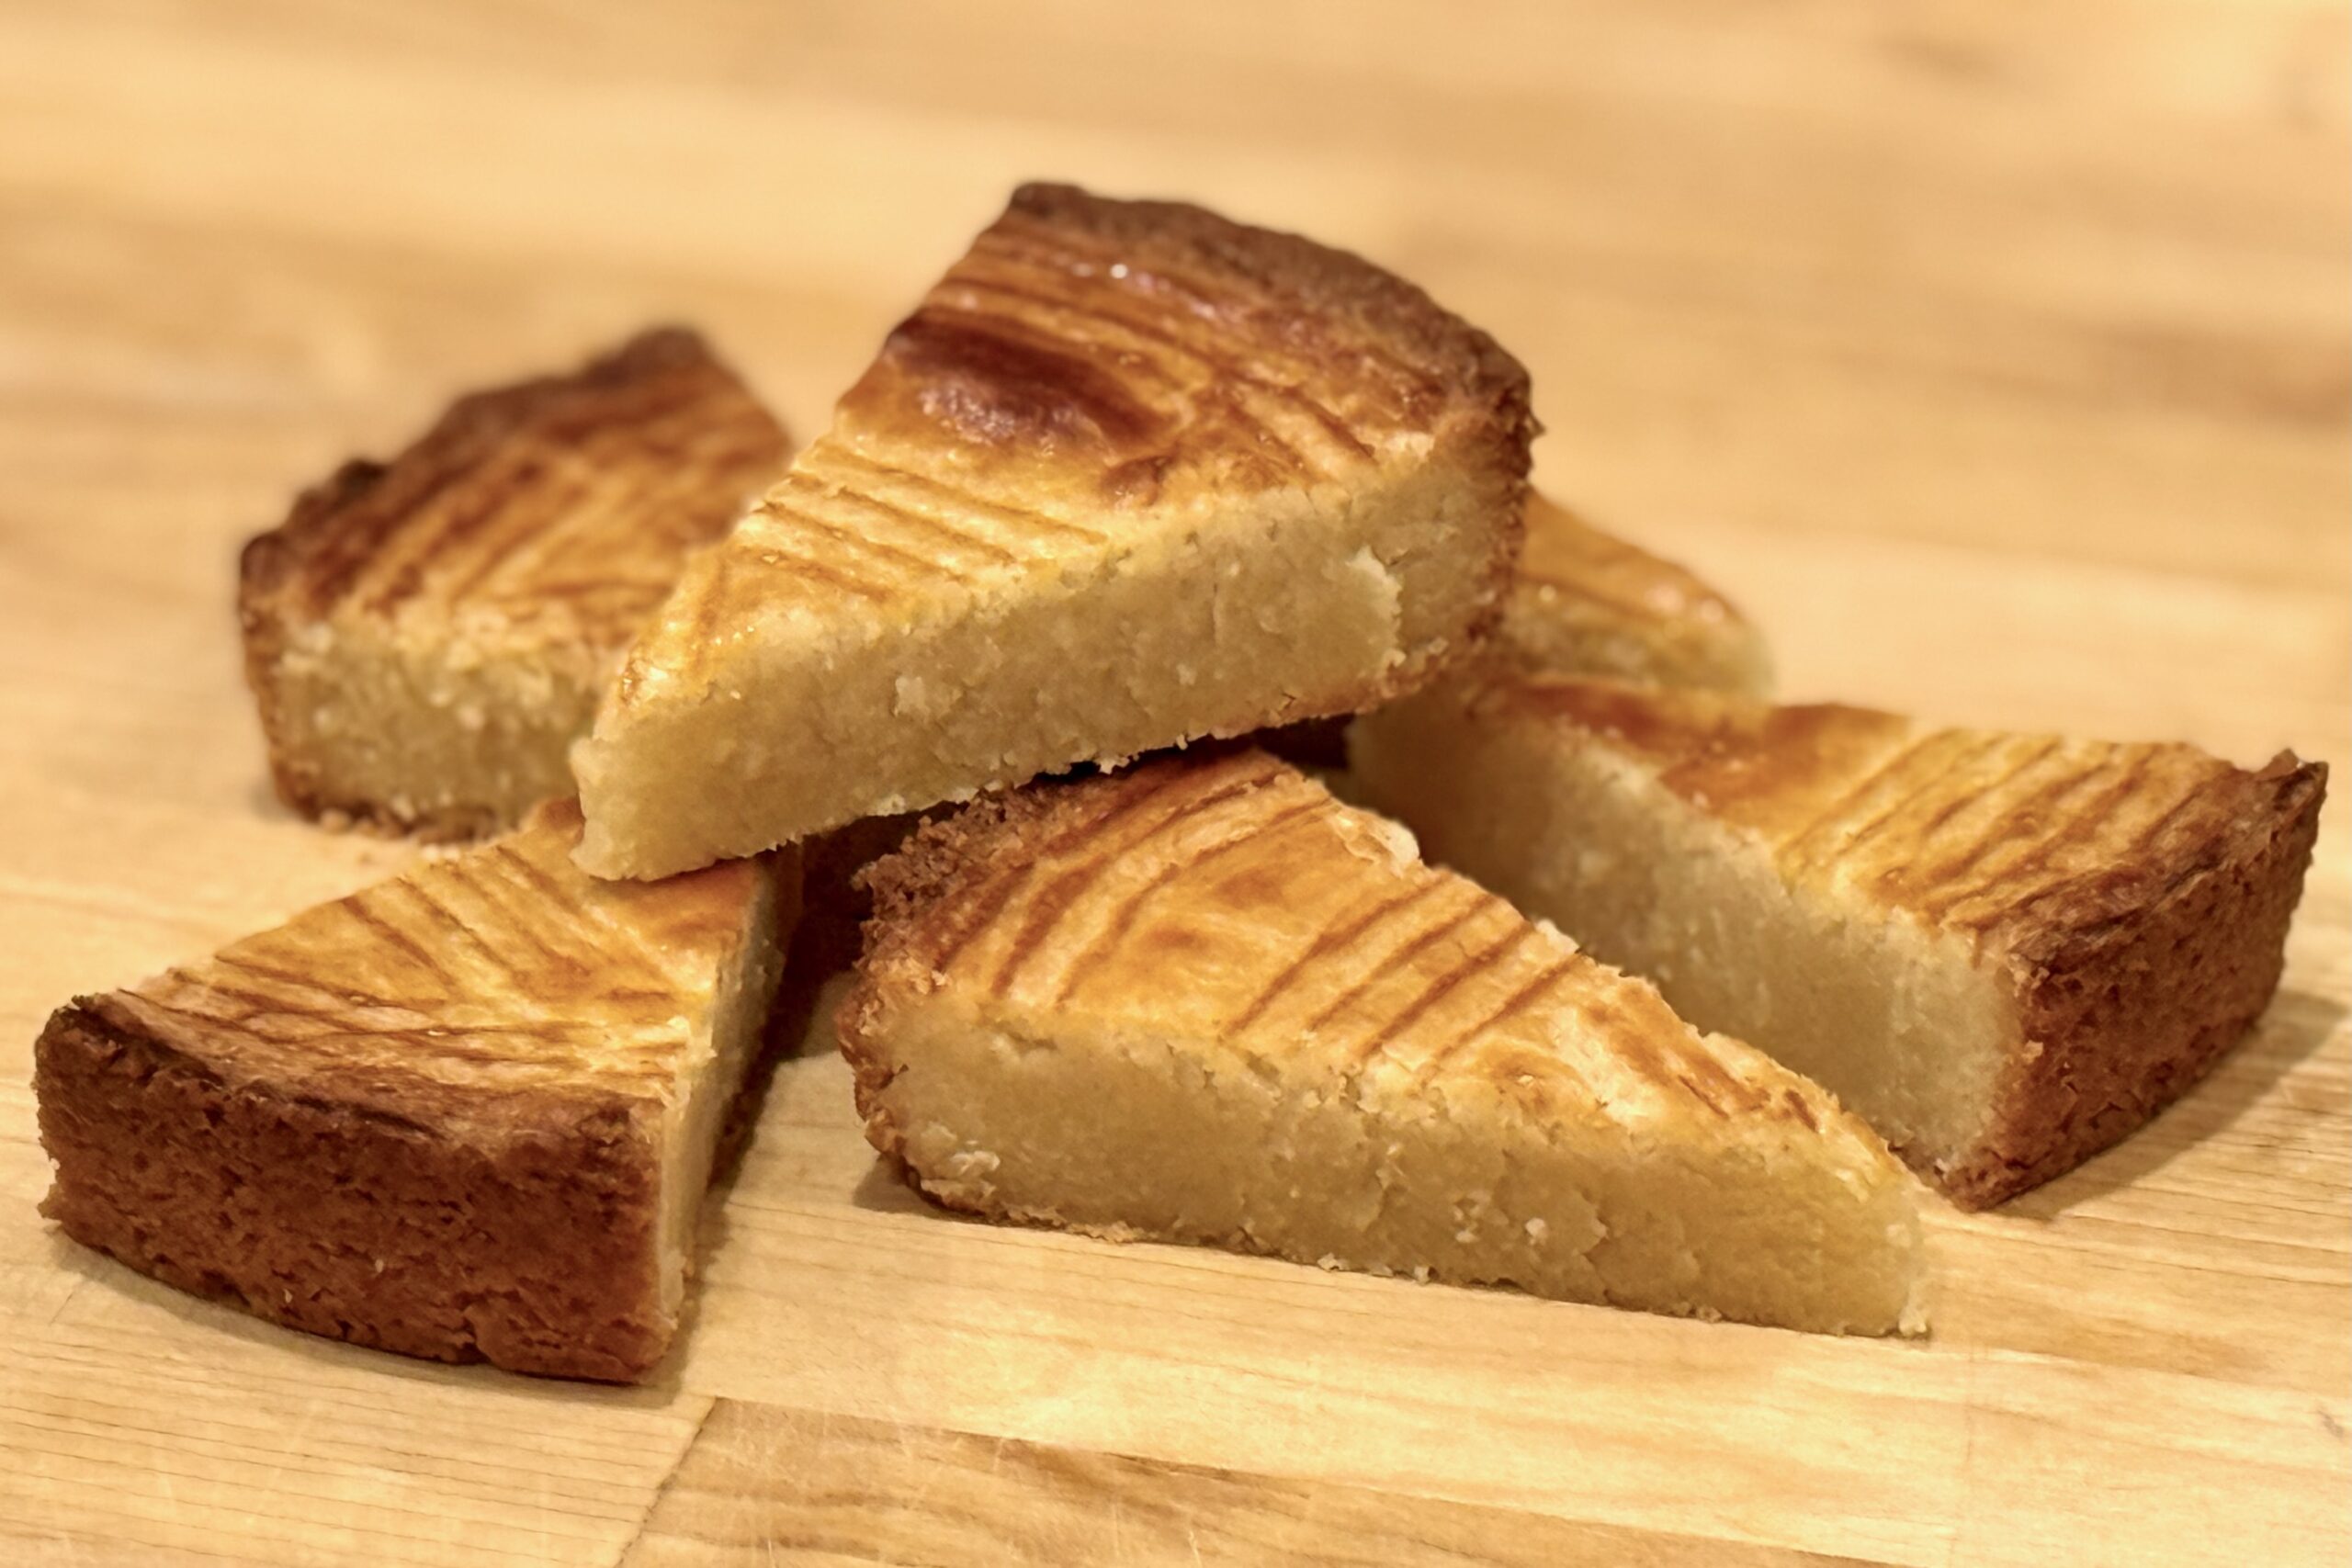
    Oma Rasch was a spunky little lady, full of equal parts sugar and spice. I fondly remember the fun we had while I lived in her second-story row house on Krugerstraat in Den Helder, at the northernmost point of North Holland. Even in her 80s, she climbed the steep, treacherous staircase each day and set off on her bicycle to run errands. She was always willing to help as I worked to learn Dutch, once telling me, after I repeated a particularly colorful word, “There are no bad words, just words you shouldn’t use around nette mensen (respectable people).” A common treat in her home was homemade boterkoek—rich, golden, and fragrant. Whenever we walked in and smelled that buttery aroma, we knew we were in for ‘een lekker toetje’, a truly ‘heerlijk’ dessert.


    Ingredients

    • 1 cup (2 sticks) unsalted butter, at room temperature
    • 1 cup sugar
    • 2 cups all-purpose flour
    • ¼ tsp table salt
    • 1 large egg, lightly beaten, divided
    • ½ tbsp milk or buttermilk (for egg wash)
    • Optional Flavor Variations:

      • Citrus: Zest of ½ a lemon, lime, or orange, plus a small splash of juice
      • Almond: ½–1 tsp almond extract, topped with almond halves before baking
      • Speculaas: 1–1½ tsp speculaaskruiden (Dutch speculaas spice blend)
      • Ginger: 1–2 tbsp finely chopped crystallized ginger folded into the dough
      • Vanilla Sugar: 1–2 tbsp vanilla sugar mixed into the dough or sprinkled lightly on top

    Directions

    Prepare the Pan and Oven:

    Preheat the oven to 350°F (175°C). Butter an 8- or 9-inch round cake pan, then line the bottom with a circle of parchment paper. Lightly dust the sides with flour and tap out any excess. A springform or removable-bottom pan makes unmolding and slicing easier, but a standard pan works as well.

    Mix the Dough:

    In a small bowl, lightly beat the egg with a fork. Transfer about 1 tbsp of the beaten egg to a separate small bowl, add the milk or buttermilk, and whisk to combine for the egg wash. Set aside.

    In a medium mixing bowl, combine the butter and sugar. Beat just until smooth, creamy, and well combined (do not whip until light and fluffy—you want a dense boterkoek, not a cake). Add the remaining beaten egg (from the larger portion) and mix only until incorporated. If using any flavorings (citrus zest, almond extract, speculaaskruiden, crystallized ginger, or vanilla sugar), mix them in at this stage.

    Add the flour and salt. Using a spatula or wooden spoon, fold and stir just until no dry flour remains and the dough comes together. The dough will be stiff but cohesive; avoid overmixing.

    Chill the Dough:

    Scrape the dough onto a sheet of plastic wrap and pat it into a thick disk. Wrap tightly and refrigerate for 20–30 minutes, until firm but still pliable. Overchilling will make the dough harder to press evenly into the pan.

    Press, Crosshatch, and Glaze:

    Transfer the chilled dough to the prepared pan. Using your fingertips or the back of a spoon, press it evenly into the pan, smoothing the surface and making sure it reaches all the way to the edges.

    Using the tines of a fork, lightly score a crosshatch pattern across the top of the dough. For the cleanest lines, wipe the fork between strokes as needed.

    Gently brush the surface with a thin, even layer of the egg wash. Avoid pooling, especially around the edges, which can create hard spots as it bakes.

    Bake:

    Bake at 350°F (175°C) for 25–35 minutes, until the edges are deep golden brown and the center is just set and a lighter golden color. The top should not puff dramatically. Begin checking around 25 minutes, rotating the pan if needed for even browning. The boterkoek will continue to firm as it cools.

    Cool, Rest, and Serve:

    Remove the pan from the oven and place it on a wire rack. Let the boterkoek cool completely in the pan. Once cool, run a thin knife around the edge to loosen, then invert or release from the pan and remove the parchment.

    For the best flavor and texture, allow the boterkoek to rest for several hours or overnight before slicing. Cut into small wedges (it is rich) and serve at room temperature.


    Notes

    Preparation

    • Use unsalted butter for the cleanest flavor and better control over salt. The butter should be cool room temperature—soft enough to press a finger into, but not greasy or melting.
    • Be careful not to over-aerate the butter and sugar; mixing just until smooth (rather than light and fluffy) keeps the boterkoek dense and tender, as it should be.
    • For easy release and clean slices, butter the pan and line the bottom with parchment. A springform or removable-bottom pan is especially handy if you plan to unmold it for serving on a platter.
    • Approximately equal amounts of butter, sugar, and flour by weight are used in this recipe, which is traditional for Dutch boterkoek and gives it its rich, close-crumb texture.
    • Altitude adjustments (high altitude ~4,750 ft / 1,450 m): Because this is a dense, non-leavened cake, ingredient changes are usually unnecessary. Begin checking for doneness a few minutes early and remove from the oven once the edges are deep golden and the center is just set. At sea level, follow the base recipe and bake until the center is just set and no longer looks wet.

    Serving Suggestions

    • Cut into small wedges or narrow bars—boterkoek is rich and meant to be enjoyed in modest slices.
    • Serve alongside afternoon coffee, as is common in Dutch homes.
    • For a simple dessert, pair with lightly sweetened whipped cream and fresh berries or stone fruit.
    • Include on a cookie or dessert tray with other Dutch favorites such as speculaas or stroopwafels.

    Variations

    • Citrus Boterkoek: Add the finely grated zest of ½ a lemon, lime, or orange, plus a small splash of juice, to the dough along with the egg. This adds a bright, fragrant edge that balances the richness.
    • Almond Boterkoek: Add ½–1 tsp almond extract to the dough, then press blanched or sliced almonds gently into the top before baking. Almond is a very traditional flavor; start with the smaller amount of extract and increase to taste.
    • Speculaas Boterkoek: Add 1–1½ tsp speculaaskruiden (Dutch speculaas spice blend) with the flour for a warm, spiced version that’s especially nice around the holidays.
    • Ginger Boterkoek: Fold 1–2 tbsp finely chopped crystallized ginger into the dough before pressing it into the pan for pockets of sweet, spicy heat.
    • Vanilla Sugar Boterkoek: Replace 1–2 tbsp of the sugar with vanilla sugar, or sprinkle a light dusting of vanilla sugar over the top right after baking for extra aroma.

    Make-Ahead & Storage

    • Boterkoek is an excellent make-ahead dessert. The flavor and texture actually improve after resting for several hours or overnight.
    • Once completely cool, wrap tightly or store in an airtight container at room temperature for up to 3–4 days.
    • For longer storage, wrap wedges or the whole boterkoek well and freeze for up to 2 months. Thaw at room temperature in the wrapping to preserve moisture.
    • If the surface softens slightly after storage, a brief rest uncovered at room temperature will help the top regain a gentle firmness.
  • Bananas Foster

    Bananas Foster

    Rich, buttery, and unmistakably indulgent, this Bananas Foster brings a taste of New Orleans to your table. Created in 1951 at Brennan’s in the French Quarter—at the height of the city’s banana-import boom and named for civic leader Richard Foster—it’s crafted from ripe bananas, rich caramel, rum, and banana liqueur. The flambéed presentation still thrills diners today, while the warm bananas and syrupy sauce spooned over creamy vanilla ice cream evoke both drama and comfort. In our family, it’s a go-to when we want something classic, bold, and effortlessly shared—every bite layered with caramel sweetness, a hint of cinnamon, and the smooth warmth of rum, all wrapped up in an experience that can make a simple dinner feel like a celebration.


    Ingredients

    • 2 tbsp butter
    • ¼ cup packed brown sugar
    • ⅛ tsp ground cinnamon
    • 1 banana, firm-ripe, sliced lengthwise or into thick rounds
    • ¼ cup crème de banane (banana liqueur)
    • 3 tbsp Grand Marnier (or other orange liqueur)
    • 3 tbsp dark or amber rum
    • vanilla ice cream, for serving

    Directions

    Prepare the Sauce:

    In a large sauté pan over medium heat, melt butter. Stir in brown sugar and cinnamon, cooking until the sugar dissolves and the mixture bubbles into a smooth caramel (1–2 minutes).

    Add the Liqueurs and Bananas:

    Stir in crème de banane and Grand Marnier. Bring just to a gentle boil, then add sliced banana. Cook for about 2–3 minutes, turning occasionally until the bananas are lightly caramelized but still hold their shape.

    Flambé the Rum:

    Remove the pan from the flame before adding rum. Carefully ignite using a long lighter or match, allowing the flames to subside naturally. Return to the stovetop and simmer for 30–60 seconds until the raw alcohol flavor cooks off and the sauce slightly thickens.

    Serve:

    Spoon the warm bananas and caramel sauce over vanilla ice cream. Serve immediately.


    Notes

    Preparation

    • Use firm, ripe bananas so they hold their shape during cooking.
    • For a deeper caramel flavor, cook the sugar mixture an extra minute before adding the liqueurs.
    • If you prefer not to flambé, simmer the rum gently for a few minutes to cook off the alcohol instead.

    Serving Suggestions

    • Serve over classic vanilla ice cream, or try butter pecan for extra richness.
    • For a brunch twist, serve over pancakes, waffles, or French toast.
    • Top with toasted pecans or a light sprinkle of sea salt for added texture and contrast.

    Variations

    • For a tropical version, substitute some or all of the rum with coconut rum.
    • Add a splash of pineapple juice for a lighter, fruitier finish.
    • Use plantains instead of bananas for a heartier, more caramel-forward dessert.

    Make-Ahead & Storage

    • This dessert is best prepared and served immediately for optimal texture and presentation.
    • If you need to make ahead, prepare the sauce up to the flambé step, cool, and refrigerate up to 1 day; rewarm gently, add fresh bananas, and finish before serving.
  • Chocolate Hazelnut Ice Cream

    Chocolate Hazelnut Ice Cream

    Creamy and decadent, this chocolate hazelnut ice cream blends the richness of dark chocolate and toasted hazelnuts with the smooth sweetness of Nutella. A silky custard base creates luxurious texture, while cocoa deepens the chocolate flavor and balances the sweetness beautifully. It’s a family favorite—one that every member agrees on without debate—its velvety texture and nutty aroma reminding us of fine Belgian chocolates. Whether shared after Sunday dinner or enjoyed quietly by the fire, this ice cream captures both indulgence and comfort in every scoop.


    Ingredients

    Chocolate Custard Base:

    • 2 cups heavy cream
    • 1 cup whole milk
    • ½ cup sugar, divided
    • 5 egg yolks
    • ½ tsp vanilla extract
    • ½ cup Nutella (or other chocolate-hazelnut spread)
    • 2 tbsp unsweetened cocoa powder
    • pinch table salt
    • ½ cup toasted hazelnuts, coarsely chopped (for folding in or topping; optional)

    Directions

    Warm the Chocolate Base

    In a saucepan, whisk together the milk, cream, ¼ cup sugar, cocoa powder, and salt. Warm over medium heat until steaming and the sugar dissolves.

    Make the Custard

    In a medium bowl, whisk the egg yolks with the remaining ¼ cup sugar until pale and thick. Slowly temper with ½ cup of the warm chocolate mixture while whisking constantly, then return everything to the saucepan.

    Cook over low heat, stirring constantly, until the custard coats the back of a spoon (170–175°F / 77–80°C). Do not boil.

    Finish & Chill

    Strain through a fine mesh sieve into a clean bowl. Whisk in vanilla and Nutella until smooth and fully blended. Chill thoroughly, preferably overnight.

    Churn & Add Hazelnuts

    Churn the chilled base in an ice cream maker according to manufacturer’s instructions. Fold in toasted hazelnuts or use them as a topping when serving.


    Notes

    Preparation

    • For richer chocolate flavor, replace ¼ cup of the Nutella with 2 oz melted dark chocolate (60–70% cacao).
    • For a smoother texture, add ⅛ tsp xanthan gum to the warm base before chilling.
    • Straining ensures a velvety custard and removes any curdled bits.

    Serving Suggestions

    • Top with toasted hazelnuts or shaved dark chocolate.
    • Pair with mocha brownies, vanilla shortbread, or salted caramel sauce.
    • Serve with fresh berries for a bright contrast.

    Make-Ahead & Storage

    • Refrigerate the custard base up to 2 days before churning.
    • Store churned ice cream for up to 1 week for best texture.
    • Let soften 5–10 minutes at room temperature before serving.
  • Bua Loy Nam Khing

    Bua Loy Nam Khing

    This comforting Thai dessert pairs soft, chewy sesame glutinous balls with a fragrant, mildly spicy ginger syrup. Served warm, it is soothing, aromatic, and especially welcome on cool evenings or after a rich meal. The ginger broth is simple but deeply flavorful, highlighting the contrast between the syrup’s warmth and the tender, nutty rice balls.


    Ingredients

      Sesame Glutinous Balls:

    • 1 recipe Sesame Glutinous Balls, prepared (or one 15-count package frozen sesame glutinous balls)
    • Ginger Syrup:

    • 7 cups (1650 ml) water
    • 2 cups (400 g) packed brown sugar (or use half brown sugar, half palm sugar for a more traditional flavor)
    • ¼ tsp table salt
    • 4 inches (10 cm) fresh ginger, peeled, sliced into coins, and lightly bruised
    • Garnish:

    • 1–2 tsp toasted sesame seeds

    Directions

    Make the Ginger Syrup

    In a medium pot, bring the water to a boil. Add the sugars and salt, stirring until dissolved. Reduce heat to a gentle simmer, then add the bruised ginger slices. Simmer 15–25 minutes until the syrup becomes fragrant, slightly spicy, and a deep amber color. Taste and adjust for strength; simmer longer for stronger ginger flavor.

    Finish the Dessert

    Remove from heat and strain out the ginger slices. Add the prepared sesame glutinous balls to the warm syrup and allow them to heat through for 2–3 minutes.

    Serve

    Ladle the warm syrup and glutinous balls into small bowls. Sprinkle with toasted sesame seeds and serve immediately.


    Notes

    Preparation

    • Palm sugar deepens the flavor and gives the syrup a more traditional Thai character.
    • Lightly bruising the ginger releases more flavor without overpowering the syrup.
    • If using frozen sesame balls, boil them until they float before adding to the syrup.

    Serving Suggestions

    • Add a splash of coconut milk for a creamy variation.
    • Serve with extra toasted sesame seeds for added aroma.
    • Pair with fresh fruit like sliced pear or steamed pumpkin for contrast.

    Make-Ahead & Storage

    • Ginger syrup keeps up to 5 days refrigerated.
    • Store glutinous balls separately to maintain texture.
    • Rewarm syrup gently; add balls immediately before serving.