Bags of Spices

Favorite Recipes

Mains

Hearty, flavorful main dishes — meats, poultry, seafood, vegetarian favorites, and global comfort food served at the center of the table.

  • Beef & Asparagus / Beef & Green Beans

    Beef & Asparagus / Beef & Green Beans

    This family-favorite stir-fry pairs velvet-tender slices of beef with crisp-tender asparagus or green beans in a glossy, savory sauce layered with soy, mushroom soy, oyster sauce, and a hint of Shaoxing. Ginger, garlic, and scallions add restaurant-style aroma, while the velveting technique keeps the beef incredibly juicy—perfect over a bowl of hot white rice.


    Ingredients

      Beef:

    • 3 lbs sirloin, flank, or other tender steak, sliced thin against the grain
    • Velveting Marinade:

    • 2 cups water
    • 1 tsp baking soda
    • ⅔ cup soy sauce
    • 1 egg white
    • ½ tsp white pepper
    • 2 tbsp corn or potato starch
    • 2 tsp neutral oil (such as canola or vegetable oil), to coat the beef
    • Neutral oil, for frying the beef (enough for about 1–2 in / 2.5–5 cm depth in the wok or pan)
    • Sauce:

    • ¼ cup water
    • 3 tbsp sugar
    • ½ tsp chicken powder
    • ⅓ cup soy sauce
    • 1 tbsp mushroom soy sauce
    • 1 tbsp oyster sauce
    • 1 tbsp dark soy sauce
    • 3 tbsp michiu or Shaoxing cooking wine
    • 1–2 tsp cornstarch mixed with an equal amount of water (slurry)
    • ¼–½ tsp MSG (optional)
    • Vegetables & Aromatics:

    • 1–2 tbsp neutral oil, for stir-frying the vegetables
    • 1 medium onion, thinly sliced from root to tip
    • Vegetables (Use Either):

      • 1–1½ lbs asparagus, trimmed and cut into 2 in (5 cm) pieces
      • 1–1½ lbs fresh green beans, trimmed (see Directions for blanching)

      Stir-Fry & Finish:

    • 2–3 tbsp neutral oil, for stir-frying the sauce and aromatics
    • 2 tbsp minced garlic
    • 1–2 tsp minced fresh ginger
    • 2 scallions, white parts thinly sliced, green parts thinly sliced for garnish
    • 1–2 tsp toasted sesame oil, to finish
    • Cooked white rice, for serving

    Directions

    Velvet the Beef:

    In a large bowl, whisk together the water, baking soda, and soy sauce. Add the sliced beef, separating the pieces so they are fully coated in the mixture. Cover and refrigerate for at least 1 hour and up to 24 hours (2 hours is ideal for thinly sliced beef).

    Drain the beef well and pat it dry with paper towels. Return the beef to a clean bowl. Add the egg white, white pepper, and starch, and mix thoroughly with your hands until every piece is evenly coated. Add 2 tsp neutral oil and mix again to distribute. Cover and refrigerate for at least 30 minutes, or up to overnight.

    Heat enough neutral oil in a wok or deep, heavy skillet to a depth of about 1–2 in (2.5–5 cm) to 350ºF (175ºC). Fry the beef in batches for 30–60 seconds, just until the color changes and the pieces are opaque but not browned. Remove with a spider or slotted spoon and drain on a rack or paper towels. Repeat with remaining beef. Set aside.

    Make the Sauce:

    In a small saucepan, combine the ¼ cup water, sugar, and chicken powder. Bring just to a simmer over medium heat, stirring to dissolve the sugar and chicken powder.

    Remove from heat and stir in the soy sauce, mushroom soy sauce, oyster sauce, dark soy sauce, and cooking wine until well combined. If using MSG, stir it in now.

    Just before you are ready to add the sauce to the wok, stir the cornstarch slurry to recombine and whisk 1–2 tsp of it into the sauce. Set the sauce near the stove so it’s ready to use.

    Prepare the Vegetables:

    If using green beans, bring a large pot of salted water to a boil. Add the trimmed beans and blanch for 60–90 seconds, just until bright green and crisp-tender. Immediately transfer to a bowl of ice water to stop the cooking. Drain very well and pat dry before stir-frying.

    If using asparagus, trim and cut into 2 in (5 cm) pieces. Very thick stalks can be blanched for 30 seconds if desired, then shocked in ice water and dried well, but this is optional.

    Heat 1–2 tbsp neutral oil in a wok over high heat. Add the sliced onion and stir-fry until slightly softened and just starting to turn translucent, 1–2 minutes. Transfer the onion to a large bowl. Add the asparagus or blanched green beans to the wok and stir-fry until crisp-tender and lightly charred in spots, 2–3 minutes. Transfer to the bowl with the onion and set aside.

    Stir-Fry and Finish:

    Carefully wipe out the wok if needed. Add 2–3 tbsp neutral oil and heat over medium-high until shimmering. Add the minced garlic and ginger and stir-fry for 10–15 seconds, just until fragrant—do not let them brown. Add the scallion whites and stir-fry for about 10 seconds more.

    Give the sauce a quick stir, then pour it into the wok. Bring to a boil and cook for 30–45 seconds, stirring constantly, until slightly thickened and glossy.

    Add the velveted beef to the wok and toss to coat in the sauce. Stir-fry for about 1 minute, just until the beef is heated through. Return the onion and asparagus or green beans to the wok and toss everything together until hot and evenly coated with sauce, 1–2 minutes more.

    Remove the wok from the heat and drizzle in the toasted sesame oil. Toss once more, then garnish with the scallion greens. Serve immediately over hot white rice.


    Notes

    Preparation:

    • For best texture, slice the beef thinly against the grain; partially freezing the meat for 20–30 minutes makes it easier to slice evenly.
    • The velveting steps (marinating, coating, and frying) can be done several hours ahead; keep the fried beef covered in the refrigerator and bring to room temperature before the final stir-fry.
    • Use a neutral, high-smoke-point oil (such as canola, peanut, or vegetable oil) for both frying the beef and stir-frying.
    • Start with 1 tsp of the cornstarch slurry in the sauce and increase up to 2 tsp if you prefer a thicker, more clingy sauce.
    • Dark soy sauce adds color and a light molasses note; a little goes a long way, so keep to the recommended amount.
    • MSG is optional but gives the dish a distinct “restaurant” savoriness; if you prefer not to use it, simply omit it.

    Serving Suggestions:

    • Serve over steamed white rice, jasmine rice, or medium-grain rice to soak up the sauce.
    • Add a simple cucumber salad or lightly pickled vegetables on the side to balance the richness of the beef.
    • Garnish with additional scallion greens or a sprinkle of toasted sesame seeds for texture and color.
    • For a fuller meal, pair with stir-fried bok choy, Chinese broccoli (gai lan), or a quick egg-drop soup.

    Variations:

    • Spicier Version – Add a pinch of crushed red pepper flakes or 1–2 dried chilies to the oil when stir-frying the garlic and ginger.
    • Mushroom Add-In – Stir-fry sliced shiitake or cremini mushrooms after the onions, then combine them with the vegetables before adding back to the wok.
    • Extra Saucy – Increase the water in the sauce to ⅓–½ cup and adjust the cornstarch slurry to maintain a light, glossy consistency.
    • All-Green Bean or All-Asparagus – Use only one vegetable if preferred; keep the total weight around 1–1½ lbs for the best meat-to-vegetable balance.

    Make-Ahead & Storage:

    • The beef can be velveted and fried up to 1 day in advance; cool, cover, and refrigerate until ready to use.
    • The sauce can be mixed (without the cornstarch slurry) up to 2 days ahead and refrigerated; rewarm gently and whisk in the slurry just before cooking.
    • Leftover stir-fry keeps well in an airtight container in the refrigerator for up to 3 days; reheat gently in a skillet or wok with a splash of water to loosen the sauce.
    • This dish is best fresh, as the vegetables will lose some of their crisp-tender texture upon reheating.
  • Carne Asada Tacos

    Carne Asada Tacos

    Carne asada tacos are all about bold, bright flavors—citrus, chiles, and fire meeting the smoky heat of the grill. This version brings together a vibrant, well-balanced marinade, a hot charcoal sear, and classic taquería toppings for tacos that taste like they came straight from a late-night stand in Mexico. Served with warm corn tortillas, diced onion, fresh cilantro, and your choice of salsa verde or chile de árbol salsa, these tacos are simple, deeply flavorful, and perfect for any cookout.


    Ingredients

      Marinade

    • ½ cup cilantro, roughly chopped
    • ⅓ cup avocado oil
    • ¼ cup soy sauce
    • ¼ cup orange juice
    • 2 tbsp lime juice (see note for overnight marinade)
    • 1 jalapeño, minced
    • 3–4 garlic cloves, crushed
    • 2–3 tbsp grated white onion
    • 1 tsp cumin
    • 1 tsp chipotle chili powder
    • 1 tsp ancho chili powder
    • ½ tsp mexican oregano
    • ¼ tsp cinnamon
    • 1–2 tbsp Mexican Coke (optional, enhances caramelization)
    • 1 tsp Worcestershire sauce
    • Optional Dry Substitutions (If Fresh Aromatics Are Unavailable)

    • ½ tsp garlic powder (instead of fresh garlic)
    • ½ tsp onion powder (instead of fresh onion)
    • Meat

    • 1–2 lbs flank or skirt steak
    • ½–1 tsp kosher salt, for seasoning before grilling
    • Finishings

    • Corn tortillas
    • 1 white onion, diced
    • 1 bunch cilantro, stemmed and chopped
    • Salsa Verde or Chile de Árbol Salsa
    • Limes, cut into wedges

    Directions

    Prepare the Marinade

    In a bowl, combine cilantro, avocado oil, soy sauce, orange juice, lime juice, jalapeño, garlic, grated onion, cumin, chipotle chili powder, ancho chili powder, oregano, cinnamon, Mexican Coke (if using), and Worcestershire sauce.

    Mix well to blend.

    Marinate the Steak

    Place steak in a resealable plastic bag or shallow dish and pour the marinade over the top. Seal or cover tightly, pressing out excess air.

    Marinate for 2–4 hours.

    For overnight marinating, reduce lime juice to 1 tbsp to avoid surface mushiness.

    Preheat the Grill

    Heat a charcoal grill to very high heat (550–650°F) for proper searing.

    Grill the Steak

    Remove the steak from the marinade and pat completely dry with paper towels for better browning. Season both sides with ½–1 tsp kosher salt.

    Place the steak on the grill and flip every minute for even charring and tenderness, grilling 3–4 minutes per side or until medium-rare (130–135°F).

    Optional:

    • Boil ¼ cup reserved marinade for 1 minute and lightly baste the steak during the final minute of cooking for deeper color and flavor.

    Rest and Slice

    Let the steak rest for 5–10 minutes to allow juices to redistribute.

    Slice thinly on the bias, making sure to cut against the grain for maximum tenderness.

    Assemble the Tacos

    Warm corn tortillas until soft and pliable.

    Fill with sliced steak and top with diced onion, chopped cilantro, your choice of salsa verde or chile de árbol salsa, and a squeeze of lime.


    Notes

    Preparation

    Skirt steak is more traditional for carne asada and tends to grill quickly with excellent flavor, though flank steak also works beautifully. Cutting on the bias gives each slice more surface area, enhancing tenderness and making the meat easier to layer into tacos.

    If using the optional Mexican Coke, it adds caramelization and depth without making the marinade taste sweet.

    Serving Suggestions

    • Great with Mexican Rice, Refried Beans, or Lime-Pickled Red Onions.
    • Offer both salsas—verde for brightness, chile de árbol for heat.

    Variations

    • Add a pinch of smoked paprika for a subtle smoky note without overpowering the grill flavor.
    • Swap jalapeño for serrano for more heat.

    Make-Ahead & Storage

    • Marinade can be made 2–3 days in advance.
    • Leftover carne asada keeps 3 days refrigerated.
    • Reheat sliced steak briefly in a hot skillet to avoid drying out.
  • Chile Verde Burritos

    Chile Verde Burritos

    The 9th of 11, Grandma grew up in a large family that loved to sing together while washing dishes after a delicious meal. Nobody ever walked away hungry–a tradition that continues to this day. Every year Grandma’s family would meet for a week-long family reunion. Our family and Uncle Jay’s (#10 of 11) would never miss. We’d always extend the reunion by a week, spending extra time with Uncle Jay, Aunt Barbara, and their four kids. Our adventures were so memorable that many of my favorite childhood memories include Uncle Jay’s family. The first time I remember eating these burritos was at a dinner in their home in San Jose. I still drool a little every time I think about it! This recipe is a variation of Uncle Jay’s, specifically designed around cooking the pork in an Instant Pot. Also, in his the meat is not marinated and he uses red Los Palmas sauce. I’ve added the marinade, along with the Instant Pot preparation to make this recipe faster and easier to prepare for a larger group. The marinade is completely optional—and highly recommended!


    Ingredients

    • 3–4 lbs pork shoulder (½ of a boneless shoulder)
    • 1 tbsp lard plus 2 tbsp avocado oil, divided
    • 2 lg onions, chopped
    • 1 recipe refried beans
    • 1 can (7 oz) Ortega diced green chiles, undrained
    • 1–2 cups homemade green enchilada sauce (or Los Palmas), to taste
    • jack cheese, grated
    • flour tortillas
    • Brazing Liquid

    • 1½ cups chicken broth
    • ½ cup cilantro
    • ⅓ cup avocado oil
    • ¼ cup soy sauce
    • ¼ cup orange juice
    • 2 tbsp lime juice
    • 2 tsp salt
    • 1 jalapeño, minced
    • 1 tsp cumin
    • 1 tsp chipotle chili powder
    • 1 tsp ancho chili powder
    • ½ tsp garlic powder
    • ½ tsp onion powder
    • ½ tsp mexican oregano
    • ¼ tsp cinnamon

    Directions

    Braze

    Slice pork shoulder into chunks (about 1 lb each). In an Instant Pot, combine all brazing liquid ingredients.

    In a skillet, heat 1 tbsp avocado oil and 1 tbsp lard; brown pork chunks on all sides and place in brazing liquid.

    Place lid on Instant Pot and close steam vent. Process on high pressure for 45 minutes.

    Allow pressure to release naturally for 30 minutes.

    Combine Ingredients

    Add an additional tbsp avocado oil to skillet and heat until shimmering. Add onion and sauté until softened and slightly browned.

    Place refried beans in a large mixing bowl; stir in sautéed onions, green chiles, and enchilada sauce.

    Remove meat from brazing liquid and cut into chunks or shred; stir into refried bean mixture.

    Serve

    Serve rolled in a warm tortilla with grated jack cheese, diced white onion, and chopped cilantro.

    Serve with salsa verde, a side of Mexican rice, and a tomato-cucumber salad with Espiau’s vinaigrette.

    For smothered burritos, heat 1 can (28 oz) Los Palmas green enchilada sauce. Add 1 tbsp sugar and ⅓ cup of the remaining brazing liquid; heat to boiling. Whisk in ¼–½ tsp xanthan gum to thicken slightly. Spoon some into the burrito, then smother with sauce and cheese; broil to melt.


    Notes

    Preparation

    • The marinade-style brazing liquid gives the pork deep flavor quickly, making this ideal for serving large groups.
    • For a milder filling, use only 1 cup enchilada sauce; for richer sauciness, use the full 2 cups.
    • Be sure to sauté the onions until lightly browned—this adds sweetness and depth to the bean mixture.
    • The original version of this family recipe can be found here: Original Chile Verde Burritos.

    Serving Suggestions

    • Great served with Mexican rice, salsa verde, and plenty of fresh cilantro.
    • For a crowd, keep tortillas warm in a low oven and serve burrito fillings buffet-style.

    Variations

    • Substitute half the pork with chicken thighs for a lighter filling.
    • Use Hatch green chiles in place of Ortega for a smokier, more robust flavor.
    • To make it spicier, add an extra minced jalapeño to the bean mixture.

    Make-Ahead & Storage

    • Filling can be prepared 1–2 days in advance; flavor improves as it rests.
    • Store filling separately from tortillas to prevent sogginess.
    • Leftovers freeze well for up to 3 months—thaw and reheat gently before serving.
  • Birria de Res

    Birria de Res

    Rich, smoky, and deeply spiced, this family favorite Birria de Res captures the essence of traditional Jalisco-style beef birria. Slow-simmered with a blend of toasted chiles and warm spices, it can be served as a hearty stew or transformed into crispy, cheesy Quesabirria tacos with plenty of the rich consommé for dipping. A perfect centerpiece for any gathering.


    Ingredients

      Birria Base

    • 7 dried guajillo chiles
    • 7 dried morita chiles
    • 4 dried ancho chiles
    • 3 dried chiles de árbol (optional for heat)
    • 1 liter boiling water
    • 5 lb beef chuck, cut into 4-inch chunks
    • 2 lb beef short ribs
    • Salt and freshly ground black pepper
    • 2 tbsp neutral oil
    • 2 tsp Mexican oregano
    • 2 tsp cumin seeds
    • 1 tsp black peppercorns
    • 1 tsp whole cloves
    • 1 tsp allspice berries
    • 3 bay leaves
    • 1 tbsp onion powder
    • 1 tsp paprika
    • 1 tsp ground cinnamon
    • 1 can (28 oz) whole tomatoes with juice
    • 1 tbsp minced garlic (about 3 cloves)
    • 2 tbsp table salt
    • 2 tbsp vinegar (white or apple cider)
    • ½ cup vegetable oil
    • For Quesabirria Tacos

    • Corn tortillas
    • Oaxaca, mozzarella, or jack cheese (shredded)
    • Diced onion
    • Chopped cilantro
    • Lime wedges, for serving

    Directions

    Prepare the Chiles

    Remove stems and seeds from the dried chiles. Toast lightly in a dry skillet over medium heat, pressing gently until fragrant (about 15–20 seconds per side). Transfer to a bowl and cover with boiling water. Soak for 30 minutes until softened.

    Toast and Grind Spices

    In a spice grinder or mortar and pestle, grind Mexican oregano, cumin seeds, peppercorns, cloves, allspice, and bay leaves into a coarse powder. Stir in onion powder, paprika, and cinnamon; set aside.

    Brown the Meat

    Pat beef dry and season generously with salt and pepper. In a large Dutch oven, heat 2 tbsp oil over medium-high heat until shimmering. Brown the meat in batches on all sides until deeply golden; transfer to a bowl and set aside.

    Build the Chile Base

    In the same Dutch oven, add the spice mixture and toast briefly (15–30 seconds) until aromatic. Add tomatoes with their juice, crushing them with the back of a wooden spoon. Stir in garlic, salt, and vinegar. Blend the softened chiles with their soaking liquid until smooth and add to the pot. Let the mixture simmer over medium heat for 2–3 minutes to bloom the chile flavors before adding the browned meat back. Scrape up any browned bits from the bottom as you stir.

    Simmer Low and Slow

    Add ½ cup oil, stir, and reduce heat to low. Cover partially and simmer gently for 3–4 hours, or until meat is tender enough to shred easily. If the liquid reduces too much, add a splash of hot water or beef broth as needed.

    Adjust and Strain (Optional)

    Remove the meat and shred. Skim off the red chile oil that rises to the top and reserve for frying tortillas. For a more refined consommé, strain the sauce through a fine sieve. For a more rustic texture (as our family prefers), leave it unstrained.

    Serve as Stew or Tacos

    For stew service, return shredded meat to the sauce and serve in bowls with diced onion, cilantro, and lime wedges. For Quesabirria tacos, continue below.

    Quesabirria Tacos

    Shred the beef and moisten with a few tablespoons of birria sauce. Reserve the skimmed chile oil for frying. Dip a corn tortilla into the red oil and lay it on a hot skillet or griddle. Spoon shredded meat and cheese onto one side; fold and press lightly. Cook until crisp and golden on both sides, about 1–2 minutes per side.

    Serve tacos with diced onion, chopped cilantro, and lime wedges. Include a small bowl of the birria sauce for dipping (consommé).


    Notes

    Preparation

    • Toasting the chiles deepens their smoky flavor and prevents bitterness — avoid burning them.
    • Blooming the chile-tomato base briefly enhances color and richness before simmering.
    • Use beef chuck and short ribs for the perfect balance of tenderness and flavor.
    • For a richer taco crust, mix the reserved chile oil with a bit of ghee or butter before frying.
    • Birria tastes even better the next day as the flavors meld and intensify.

    Serving Suggestions

    • Serve the birria as a stew with warm corn tortillas, onion, cilantro, and lime wedges.
    • Use the same base for Quesabirria tacos — crisp, cheesy tacos dipped in the rich chile consommé.
    • Offer lime wedges on the table for brightness and balance.

    Variations

    • For milder heat, reduce or omit chiles de árbol.
    • Add a touch of smoked paprika for a subtle, smoky accent if morita chiles are unavailable.
    • Try goat or lamb shoulder for traditional birria de chivo or birria de borrego.
  • Neapolitan Pizza Dough

    Neapolitan Pizza Dough

    Pizza has always been a go-to meal for our family. Who can resist the combination of chewy dough, flavorful sauce, tasty toppings, and gooey cheese? Our first taste of true Neapolitan-style pizza was on our family trip to Italy—staying across the square from the Pantheon, exploring the Colosseum and Vatican museums, and often ending the day with perfectly blistered pizza from a tiny Roman restaurant. This recipe recreates that chewy, flavorful crust at home, whether you choose the cold-ferment version for deep flavor, the quick version for same-day pizza, or the freezer version for easy make-ahead dough.


    Ingredients

    • 1360 g (~3 lb) 00 flour (100%)
    • 952 g cold water (70%)
    • 27 g table salt (2%)
    • Active Dry Yeast

    • Cold Ferment: 0.41 g for 72 hours (0.03%) or 0.82 g for 48 hours (0.06%)
    • Quick Version: 2.72 g for same-day use (0.2%)
    • Freezer Version: 3.54 g for use the same day as thawed (0.26%)

    Note: Use a digital scale accurate to 0.01 g for yeast precision, or approximate to the nearest small pinch if unavailable.

    Directions

    Select Fermentation Version

    Cold Ferment (48–72 hours)

    In a large bowl, combine flour, yeast, and cold water. Mix until no dry bits remain (shaggy dough). Cover and rest 20–30 minutes.

    After resting, sprinkle salt over dough and gently pinch and squeeze to incorporate. Every 30 minutes for 2 hours, perform a set of stretch and folds (see Notes).

    After the final folds, place dough in a clean bowl, cover, and rest at room temperature (75–80°F / 23–27°C) for 1–2 hours. Divide into 8 oz (225 g) balls, lightly oil, and place in individual containers or on a floured tray covered tightly. Refrigerate 48–72 hours. Remove from refrigerator 2–3 hours before baking to come to room temperature.

    Quick Version (Same-Day)

    In a large bowl, combine flour and cold water. Mix until no dry bits remain; cover and rest 20–30 minutes.

    In a small cup, dissolve yeast in 2 tbsp warm water (105°F / 40°C) and let stand 5–10 minutes until foamy.

    Sprinkle salt over dough, then add yeast mixture. Gently pinch and squeeze to incorporate. Every 30 minutes for 2 hours, perform a set of stretch and folds (see Notes).

    After the final folds, cover and rest at warm room temperature (75–80°F / 23–27°C) for 2–3 hours, until nearly doubled. Divide into 8 oz (225 g) balls, lightly oil, and place in proofing containers or on a floured tray. Cover and proof 1–2 hours, until puffy and relaxed.

    Freezer Version (Make-Ahead)

    In a large bowl, combine flour and cold water. Mix until no dry bits remain; cover and rest 20–30 minutes.

    In a small cup, dissolve yeast in 2 tbsp warm water (105°F / 40°C) and let stand 5–10 minutes until foamy.

    Sprinkle salt over dough, then add yeast mixture. Gently pinch and squeeze to incorporate. Every 30 minutes for 2 hours, perform a set of stretch and folds (see Notes).

    After the final folds, cover and rest at warm room temperature (75–80°F / 23–27°C) for 2–3 hours, until nearly doubled. Divide into 8 oz (225 g) balls. Lightly oil, wrap tightly in plastic wrap, and place in freezer-safe bags or airtight containers. Freeze up to 3 months.

    To thaw, transfer to refrigerator for 24 hours. Then allow 1–3 hours at room temperature before stretching and baking.

    Bake the Pizzas

    Place a pizza steel on the top rack of the oven and preheat to 500–550°F (260–290°C) for at least 45 minutes. Just before baking, switch to broil for 5–10 minutes to superheat the surface.

    Stretch a dough ball gently by hand (don’t roll), top lightly with sauce, cheese, and desired toppings, and slide onto the steel. Bake 4–5 minutes, rotating halfway through. For extra char, broil the final 30–60 seconds.

    For an even closer match to wood-fired results, bake in an outdoor pizza oven at 750–850°F (400–455°C) for 60–90 seconds.


    Notes

    Preparation

    • Hydration note: The 70% hydration gives the dough an open crumb and extensible texture typical of Neapolitan-style pizza. Adjust slightly based on flour absorbency.
    • Stretch & Folds: With wet hands, grab one edge, stretch it up, and fold it over. Rotate 90°, repeat until all four sides are folded. After 3–4 rounds, the dough will feel smoother and more elastic.
    • Use minimal toppings and well-drained mozzarella to prevent sogginess during high-heat baking.
    • This dough also works for homemade pita: reduce hydration to 65%, roll ⅛–¼ inch thick, and bake 1½–2 minutes at 475–500°F (245–260°C).

    Serving Suggestions

    • Top with traditional Neapolitan tomato sauce, fresh mozzarella, and basil for a Pizza Margherita.
    • Drizzle with extra virgin olive oil after baking to enhance flavor and aroma.
    • Pair with a simple arugula salad or Italian antipasti for a complete meal.

    Variations

    • Pizza MargheritaNeapolitan tomato sauce, mozzarella, parmesan, basil; after baking add a drizzle of extra virgin olive oil.
    • Pizza MarinaraNeapolitan tomato sauce, garlic, oregano, salt; after baking add a drizzle of extra virgin olive oil.
    • Pizza CapricciosaNeapolitan tomato sauce, mozzarella, ham, artichokes, mushrooms, olives; after baking add a drizzle of extra virgin olive oil.
    • Pizza BoscaiolaNeapolitan tomato sauce, mozzarella, mushrooms, Italian sausage, and parmesan; after baking add a drizzle of extra virgin olive oil.
    • Pizza Quattro FormaggiNeapolitan tomato sauce (optional), mozzarella, ricotta, gorgonzola, parmesan, garlic, oregano (or, more traditionally, mozzarella, gorgonzola, parmigiano-reggiano, fontina; and after baking add a drizzle of extra virgin olive oil).
    • Pizza alla NapoletanaNeapolitan tomato sauce (optional), mozzarella, anchovies, capers, oregano; and after baking add a drizzle of extra virgin olive oil.
    • Pizza Prosciutto e FunghiNeapolitan tomato sauce, mozzarella, prosciutto, mushrooms; and after baking add a drizzle of extra virgin olive oil.
    • Spicy SausageNeapolitan tomato sauce, mozzarella, spicy Italian sausage, pickled jalapeños.
    • Sweet & SpicyNeapolitan tomato sauce, mozzarella, spicy Italian sausage, pickled jalapeños; after baking add a drizzle of honey.
    • Spinach & Sun-dried TomatoNeapolitan tomato sauce, mozzarella, provolone, ricotta, Parmesan, spinach, sun-dried tomatoes; after baking add fresh basil and a drizzle of extra virgin olive oil.
    • Loaded HawiianNeapolitan tomato sauce, mozzarella, ham, rotisseri chicken, bacon, pineapple, red onion, pickled jalapeños.
    • Shoarma PizzaNeapolitan tomato sauce, mozzarella, chicken shoarma; after baking add a drizzle of knoflooksaus (Dutch Garlic Sauce) and poestasaus.
    • Barbecue ChickenDr Pepper barbecue sauce, mozzarella, rotisseri chicken, bacon, pickled jalapeños.
    • Fig & PigNeapolitan tomato sauce, mozzarella, fresh sliced figs, fig jam, prosciutto, honey.
    • Fig, Pig, & GoatNeapolitan tomato sauce, goat cheese, fresh sliced figs, caramelized onions, prosciutto; after baking add arugula and a drizzle of honey.
    • Chicken Pestopesto sauce, mozzarella, rotisseri chicken, ricotta, thinly sliced tomatoes.
    • Mushroom & OliveNeapolitan tomato sauce, mozzarella, ham, mushroom, olives, pickled jalapeños.
    • Pear & Gorgonzolagarlic oil pizza base, thinly sliced pear, gorgonzola, mozzarella, walnuts or pecans; after baking add arugula and balsamic glaze.
    • Prosciutto & BurrataNeapolitan tomato sauce, mozzarella; after baking add torn burrata, prosciutto, arugula, and olive oil.
    • The MeatsNeapolitan tomato sauce, mozzarella, pepperoni, Italian sausage, ham, bacon.
    • Chicken, Spinach, & Fetagarlic oil pizza base , rotisserie chicken, spinach, feta, Parmesan, mozzarella.
    • Indo Satépeanut sauce thinned with coconut milk, saté ayam, mozzarella, blanched vegetables (thinly sliced carrots, small pieces of green beans, thin shavings of cabbage); after baking add bean sprouts tossed in lime juice and roasted sesame oil, thin cucumber slices, sambal, fresh cilantro, and a drizzle of ketjap manis.
    • Chicken FajitaNeapolitan tomato sauce with a sprinkle of cumin & paprika, mozzarella, Jack cheese, fajita chicken, red onion, roasted bell pepper strips, and pickled jalapeños; after baking add a drizzle of salsa verde and crema, with a squeeze of lime juice.
    • Saag Paneer—Pureed spinach “saag” base (spinach, blanched & puréed, sautéed onion, garlic, ginger, garam masala, cumin, coriander, a little chili, finished with cream or yogurt for silkiness) spread in a thin, even layer topped with paneer cubes, red onion, serrano chile slices; after baking add fresh cilantro, a light dusting of crumbled kasoori methi, and a drizzle of yogurt.
    • Carnitasgarlic oil pizza base, carnitas, mozzarella, red onion, roasted poblano chile strips, pickled jalapeños; after baking add fresh cilantro, diced white onion, crumbled cotija cheese or queso fresco, and a drizzle of salsa verde and crema.
  • Saag Paneer

    Saag Paneer

    This Saag Paneer brings together tender spinach, fragrant spices, and creamy homemade paneer for a comforting and authentic Indian dish. The rich, spiced sauce is balanced by yogurt, cream, and cashews, creating a luxurious texture and deep flavor. It’s perfect with warm basmati rice or naan, and can also be made with chicken, lamb, or beef for a hearty variation.


    Ingredients

    • 1 recipe homemade paneer (or 1 pkg 10–16 oz pre-made paneer)
    • 1 pkg (10 oz) fresh baby spinach, rinsed
    • 1 lb frozen spinach, thawed and squeezed dry
    • 3 tbsp butter
    • 1 tsp cumin seeds
    • 1 medium onion, finely chopped
    • 3–4 garlic cloves, minced
    • 1½ tsp grated fresh ginger
    • 1 serrano chile, stemmed, seeded, and minced
    • 1 tsp ground coriander
    • 1 tsp paprika
    • ½ tsp turmeric
    • ½ tsp ground cardamom
    • ¼ tsp ground cinnamon
    • 1 can (14.5 oz) diced tomatoes, drained
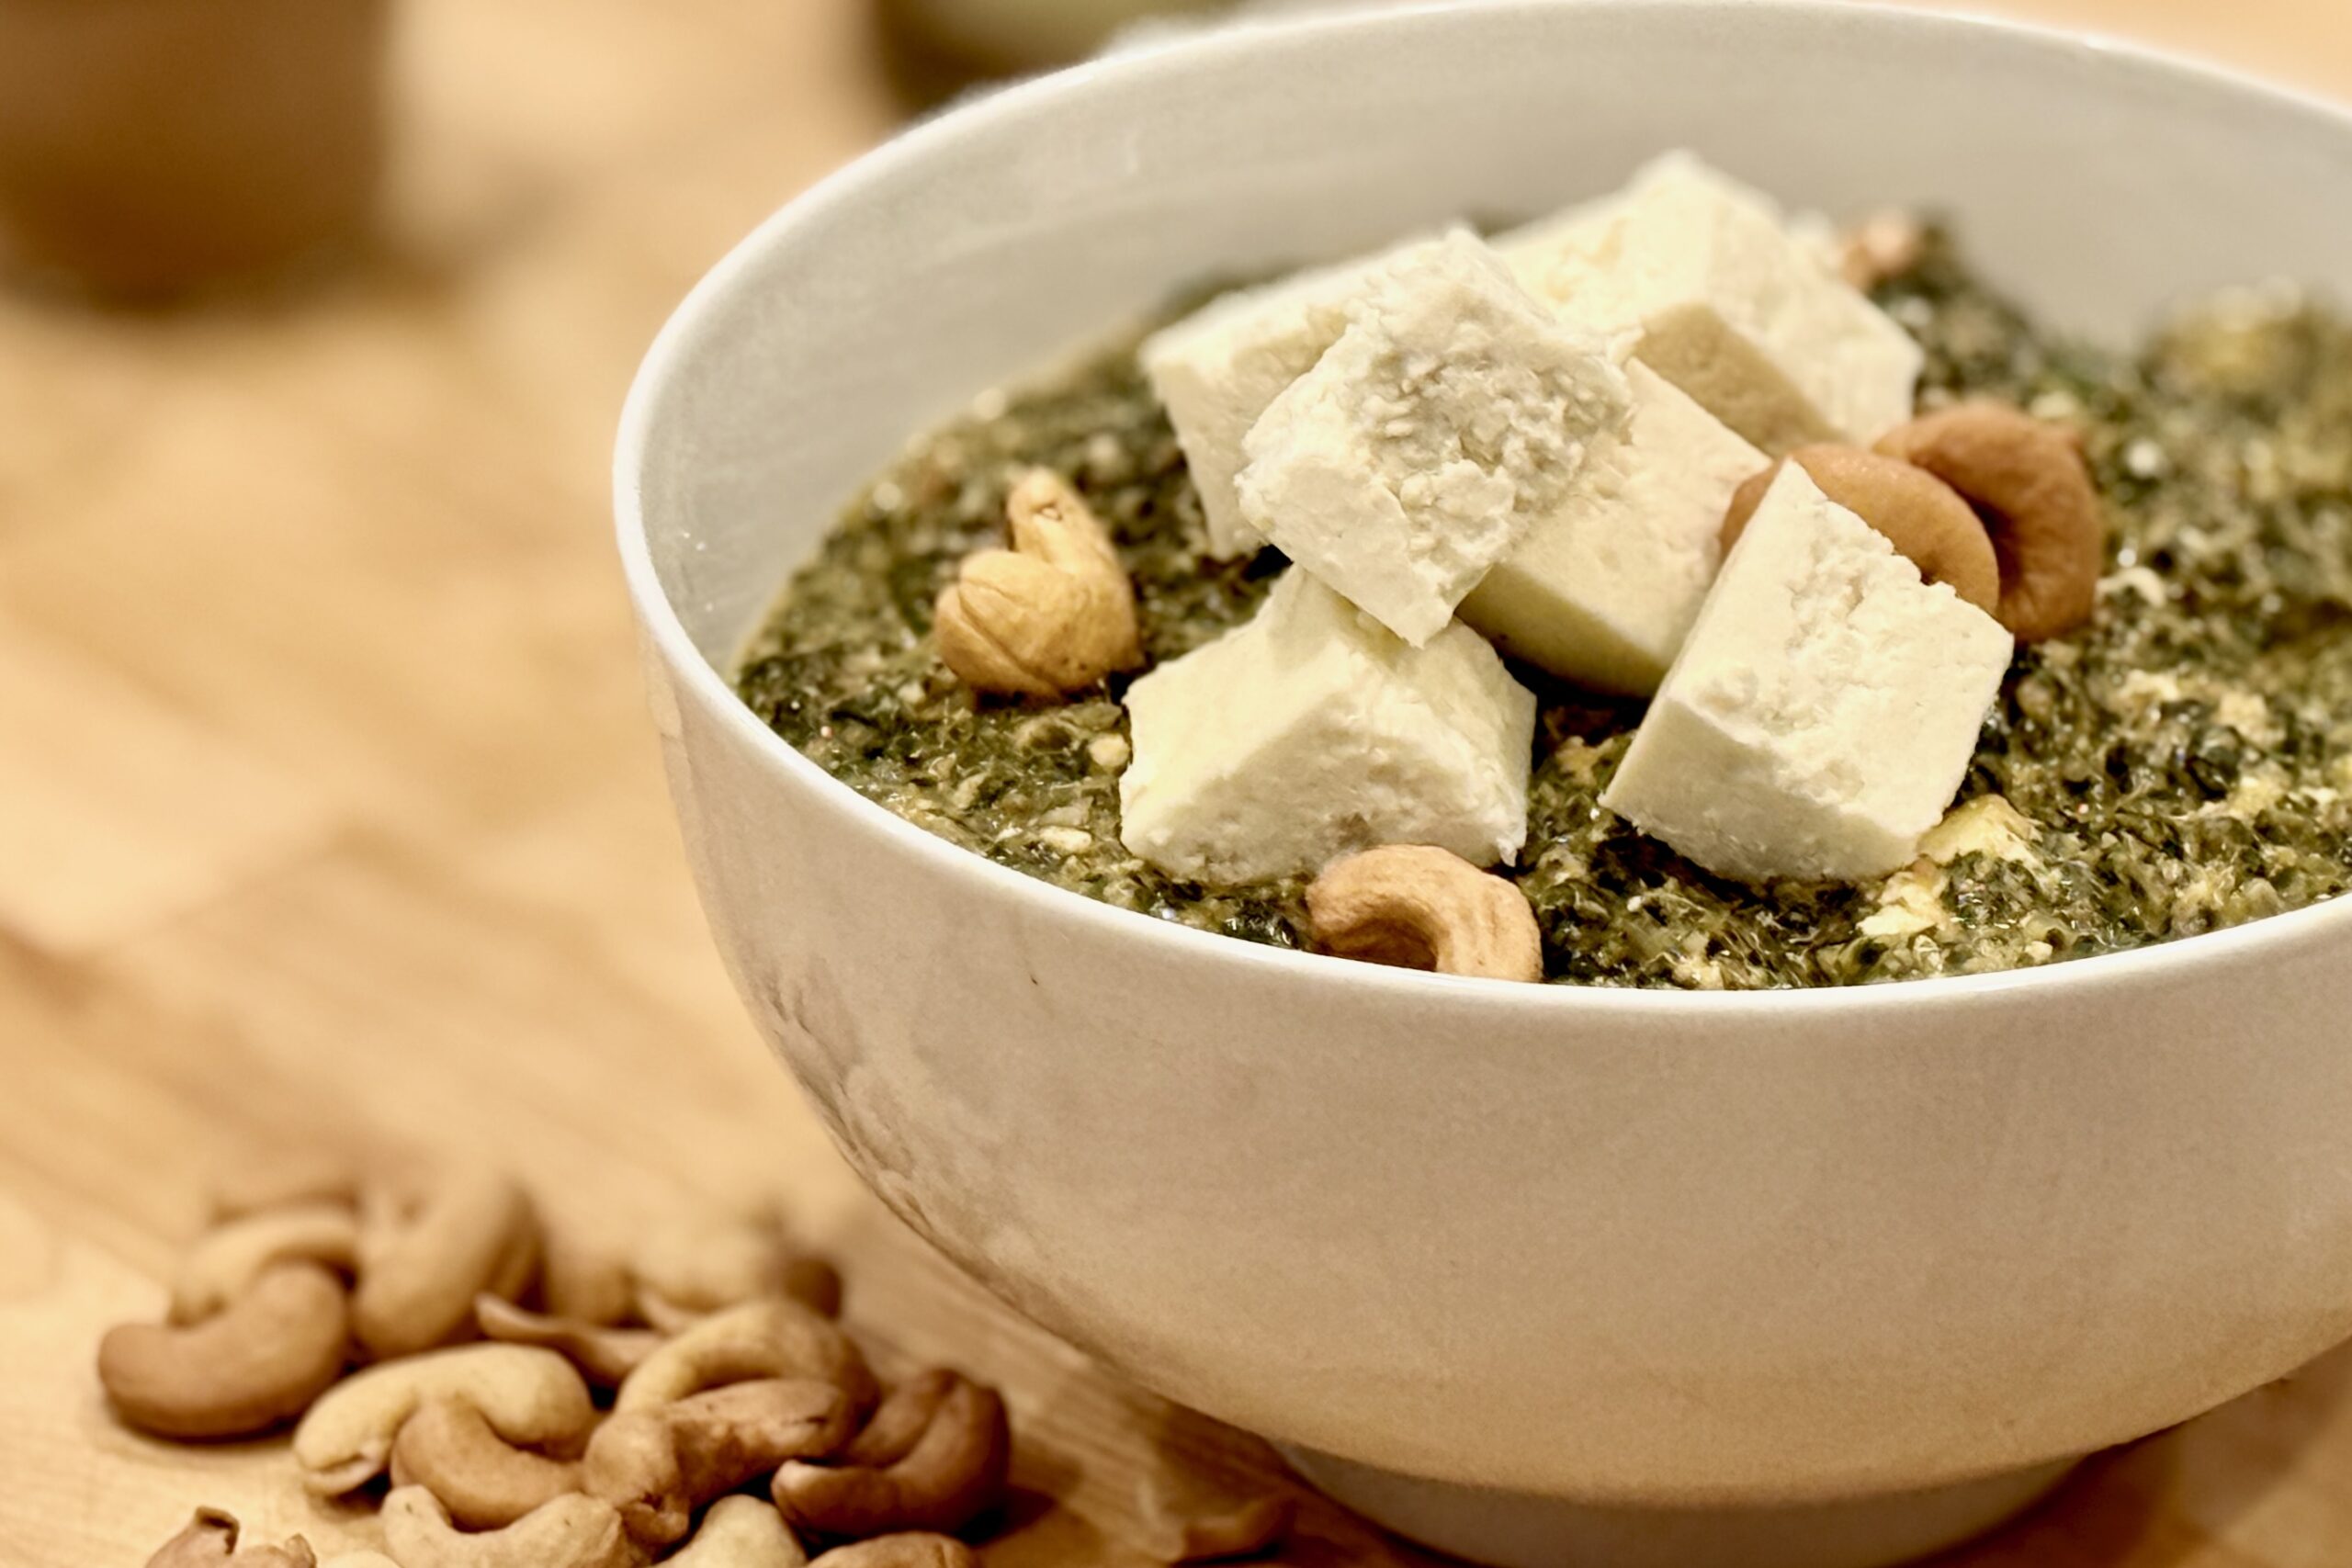
    • ½ cup roasted cashews, divided (blend half for creaminess, keep half chopped for texture)
    • ½ cup water
    • ½ cup plain whole-milk yogurt
    • ½ cup whole milk
    • ½ tsp garam masala (added at the end)
    • 1–2 tsp dried fenugreek leaves (kasoori methi), crumbled
    • 2 tbsp heavy cream (to finish)
    • 3 tbsp chopped fresh cilantro
    • 2 tsp salt (to taste)
    • ½ tsp pepper (to taste)
    • Additional Protein (Optional)

    • 1 lb boneless, skinless chicken thighs or breasts; lamb shoulder or leg; or beef chuck (can replace or complement paneer)

    Directions

    Prepare the Spinach

    Bring a large pot of salted water to a boil. Add fresh spinach and cook until just wilted, about 30 seconds. Drain, rinse with cold water, and squeeze out excess moisture. Roughly chop and set aside. Squeeze thawed frozen spinach to remove excess water and combine with the fresh spinach.

    Build the Base

    In a large skillet or saucepan, melt butter over medium heat. Add cumin seeds and toast for about 30 seconds until fragrant. Add onion and cook until softened and golden, 6–8 minutes. Stir in garlic, ginger, chile, coriander, paprika, turmeric, cardamom, and cinnamon; cook 30–60 seconds until aromatic.

    Add tomatoes and cook, stirring occasionally, until most of the moisture evaporates and the mixture thickens slightly, about 5–7 minutes. Stir in spinach, half of the blended cashews, and ½ cup water. Simmer uncovered 5–10 minutes, until spinach is tender and cohesive. Remove from heat.

    Blend and Enrich

    Using an immersion blender, purée the mixture directly in the pan until mostly smooth, leaving some texture. Stir in yogurt and milk. Return to low heat and simmer gently 5–10 minutes until thickened and creamy, without boiling. Adjust consistency with a splash of milk or water if needed.

    Stir in remaining chopped cashews, garam masala, fenugreek leaves, cilantro, and heavy cream. Season to taste with salt and pepper.

    Prepare the Paneer

    Cut chilled paneer into bite-sized cubes. Pan-fry in a little butter or oil until golden, if desired. Reserve a few pieces for garnish. Gently fold remaining paneer into the sauce and warm through, about 2–3 minutes.

    Optional Additional Protein

    For added variety, substitute or combine paneer with cooked chicken, lamb, or beef. Follow these guidelines:

    • Chicken: Sear 1 lb boneless thighs or breasts in oil until golden and cooked through (165°F). Optionally marinate in yogurt, lemon juice, garlic, ginger, and garam masala for 30+ minutes beforehand.
    • Beef: Brown 1 lb stewing beef (chuck) in oil, then simmer in water or broth until tender, 1–1½ hours.
    • Lamb: Sear 1 lb shoulder or leg cubes in oil, then braise 1½–2 hours in broth with garlic and ginger until fork-tender. Stir a little braising liquid into the sauce for extra flavor.

    Serve

    Serve hot with basmati rice or naan. Garnish with reserved paneer, cashews, cilantro, and a drizzle of cream, if desired.


    Notes

    Preparation

    • Use all fresh or all frozen spinach if preferred; total weight should be 1½–2 lbs.
    • Do not boil after adding yogurt or milk to prevent curdling.
    • Paneer can be pan-fried or used directly; frying adds a richer texture and flavor.

    Serving Suggestions

    • Serve with basmati rice, naan, or chapati for a complete meal.
    • Pair with homemade paneer for the freshest flavor and best texture.
    • For a full Indian dinner, accompany with cucumber raita or mango chutney.

    Variations

    • Add ¼ cup heavy cream or coconut cream for a richer sauce.
    • For a vegan version, replace paneer with firm tofu and substitute coconut milk for dairy.

    Make-Ahead & Storage

    • Refrigerate leftovers up to 4 days in an airtight container.
    • Freeze up to 2 months; thaw overnight in the refrigerator before reheating.
    • Reheat gently over low heat, adding a splash of milk or water to restore consistency.
  • Saté Sapi — Beef Satay

    Saté Sapi — Beef Satay

    Saté Sapi Dengan Saus Kacang – Dutch-Indonesian Beef Satay with Peanut Sauce: The most memorable part of my first Christmas in the Netherlands was the evening we spent with a generous Indonesian family in Dordrecht. They invited us to share a rijsttafel—my very first taste of a true Indonesian feast. When we arrived, the table was covered with what seemed like dozens of colorful dishes, their fragrant aromas filling the home. Among them, one dish stood out: saté sapi (beef satay). Served with acar ketimun (sweet-and-sour cucumbers) and richly spiced peanut sauce, the skewers of marinated beef were grilled over charcoal and lightly glazed with ketjap manis. Just thinking about it brings back vivid memories of the smoky aroma and layered flavors. This recipe is my way of returning to that Christmas dinner, and to the warmth of friends who welcomed me—a newcomer in what then felt like a strange land—as one of their own.


    Ingredients

    • 2–4 lbs beef (sirloin, tri-tip, flank, or ribeye), sliced into strips about ¼-inch thick and 2–3 inches long
    • Velveting:

    • 2 cups water
    • 1 tsp baking soda
    • ¼ cup soy sauce
    • Marinade:

    • ¼ cup ketjap manis
    • 1 tbsp vegetable oil
    • 1 tbsp shallot, finely grated (or onion)
    • 1 tsp fresh ginger, grated
    • 1 tbsp brown sugar
    • ¼ tsp ground coriander
    • 1 clove garlic, minced (or ¼ tsp garlic powder)
    • 2 tsp lime juice
    • 2 tbsp coconut milk
    • ⅛ tsp white pepper
    • Peanut Sauce:

    • 1 cup smooth peanut butter
    • 2 cloves garlic, minced
    • 2 tbsp oil (peanut or vegetable)
    • ¼ cup ketjap manis
    • 2 tbsp lime juice
    • 2 tbsp brown sugar
    • ½ tsp hot red curry powder
    • 1–2 tsp sambal oelek (to taste)
    • 1 can (14 oz) coconut milk
    • ½ tsp ground coriander (optional, ties to marinade)
    • ¼ tsp aji-no-moto (optional)
    • 2 tsp tamarind paste (optional, for tang)
    • warm water, as needed to thin
    • For Serving:

    • wooden skewers, soaked at least 1 hour
    • acar ketimun (quick cucumber pickle) or fresh cucumber salad
    • steamed rice (or lontong / rice cakes)

    Directions

    Velvet the Beef

    Slice beef into thin strips. Combine water, baking soda, and soy sauce, then add beef and soak 1–2 hours in the refrigerator. Drain, rinse briefly under cold water, and pat dry.

    Marinate the Beef

    Whisk together all marinade ingredients. Add velveted beef, toss to coat thoroughly, cover, and marinate 3–12 hours in the refrigerator.

    Prepare the Peanut Sauce

    Heat oil in a saucepan over medium-low heat. Add garlic and sauté until fragrant but not browned.

    Stir in peanut butter, ketjap manis, lime juice, brown sugar, curry powder, sambal, and coriander. Mix until smooth.

    Gradually whisk in coconut milk until creamy. Reduce heat to low and warm gently for 2–3 minutes.

    Thin with warm water if needed. Adjust to taste with tamarind, sambal, or sugar. Keep warm or rewarm gently before serving.

    Grill the Satay

    Thread marinated beef strips onto soaked skewers. Grill over hot charcoal 2–3 minutes per side, or until lightly charred at the edges.

    In the final minute, baste lightly with a mixture of ketjap manis and oil for caramelization.

    Serve

    Arrange skewers on a platter. Serve with warm peanut sauce, cucumber pickle, and steamed rice or lontong.


    Notes

    Preparation

    • Velveting ensures tenderness while avoiding any baking-soda aftertaste when rinsed properly.
    • Use thin, even beef strips for consistent grilling and ideal caramelization.
    • A touch of tamarind in the sauce adds depth and a gentle sour note that complements ketjap manis.

    Serving Suggestions

    • Serve with acar ketimun for freshness and contrast.
    • Pair with steamed jasmine rice, lontong, or coconut rice.
    • Excellent with grilled vegetables or nasi goreng.

    Variations

    • Spicy Version: increase sambal in both marinade and sauce.
    • Sweeter Dutch Style: add an extra tablespoon ketjap manis during grilling.
    • Smokier Grill: add a small piece of lump charcoal beside the coals to intensify aroma.

    Make-Ahead & Storage

    • Marinated beef keeps up to 24 hours refrigerated.
    • Peanut sauce can be made 2–3 days ahead; rewarm gently to loosen.
    • Leftover skewers keep 2–3 days refrigerated and reheat well over medium heat.
  • Korean Pulled-Pork Tacos

    Korean Pulled-Pork Tacos

    Inspired by the flavors of Korean bulgogi and Mexican street tacos, this fusion dish brings together tender sous-vide pork shoulder marinated in a sweet-savory Korean-style sauce, then shredded, crisped, and served in warm tortillas with fresh toppings. The result is rich umami, bright acidity, and a touch of heat—echoing the street-food creativity that made Korean tacos famous. It’s also fast becoming one of our family’s most requested Sunday dinners, especially when served with cilantro lime rice made with a hint of coconut milk. Around our table, there’s still a friendly debate over which is better—corn tortillas for their texture, or soft flour tortillas that soak up every drop of sauce.


    Ingredients

    • 3 lb boneless pork shoulder, trimmed of excess fat and silver skin

    Marinade:

    • ⅓ cup sugar
    • 2 tsp ajinomoto (optional)
    • 4 tsp onion powder
    • 1 tsp black pepper
    • 2 tbsp garlic, finely chopped
    • 4 tsp sambal oelek
    • 3 tbsp sesame oil
    • ⅔ cup mirin
    • ½ cup soy sauce
    • 1–1½ tsp liquid smoke

    Finishing Brush:

    • ½ cup reserved marinade + ½ cup honey

    Creamy Drizzle:

    • ¼ cup reserved marinade base
    • 1 cup Greek yogurt
    • 2–3 tbsp fresh lime juice (adjust to taste)
    • 1 tsp gochujang or extra sambal (optional)
    • or substitute Cilantro Lime Crema

    Pickled Cucumber (and Optional Daikon):

    • 1 medium cucumber (or cucumber + daikon/radish), thinly sliced
    • 2 tbsp rice vinegar
    • 1 tsp sugar
    • ¼ tsp table salt
    • ½ tsp sesame oil

    Sriracha Slaw:

    • 2 cups shredded cabbage (green or mixed)
    • 1 cup shredded carrot
    • 2 tbsp lime juice
    • 1 tbsp sesame oil
    • 2–3 tbsp sriracha (to taste)
    • 2 tsp sugar (to taste)
    • ½ tsp ajinomoto (optional)
    • salt, to taste

    To Serve:

    • Corn or Flour tortillas (8–10, warmed)
    • Chopped fresh cilantro
    • Toasted sesame seeds
    • Diced raw onion
    • Lime wedges

    Directions

    Marinate the Pork

    Mix all marinade ingredients. Reserve ¾ cup of the mixture: ½ cup for the finishing brush, ¼ cup for the creamy drizzle. Add the remaining marinade to the pork in a sealed bag. Refrigerate 8–12 hours.

    Sous-Vide the Pork

    Heat sous-vide bath to 165°F (74°C). Cook sealed pork 18–24 hours. This produces a tender, shreddable texture.

    Make the Pickled Cucumber

    Combine cucumber with vinegar, sugar, salt, and sesame oil. Rest 10–15 minutes; drain lightly.

    Make the Sriracha Slaw

    Toss cabbage and carrot with lime juice, sesame oil, sriracha, and salt.

    Make the Creamy Drizzle

    Whisk ¼ cup reserved marinade with yogurt, lime juice, and optional gochujang or sambal.

    Shred and Crisp the Pork

    Remove pork and reserve cooking juices. Shred pork. Spread on sheet pan and brush with the finishing mixture. Broil until edges crisp. Drizzle ⅓–½ cup of the reserved cooking juices over pork to keep it moist.

    Assemble the Tacos

    Warm tortillas. Layer pork, pickled cucumber, and slaw. Top with the creamy drizzle (or Cilantro Lime Crema). Garnish with cilantro, sesame seeds, onion, and lime.


    Notes

    Preparation

    • Use evenly sized pork pieces for consistent sous-vide cooking.
    • Reserved cooking juices add essential moisture and depth.
    • Monitor broiling closely—honey burns fast.

    Serving Suggestions

    • Serve with cilantro-lime rice, sliced avocado, cabbage slaw, pickled onions, and sprinkled with sesame seeds.
    • Substitute cilantro-lime crema for the creamy drizzle, or as another flavorful addition—the combination of both sauces is delicious.
    • A squeeze of fresh lime brightens the flavors.

    Variations

    • Swap pork shoulder for boneless beef short ribs.
    • Use corn tortillas for a lighter street-taco style.
    • Increase sambal or gochujang for extra heat.

    Make-Ahead & Storage

    • Sous-vide pork can be made 1 day ahead; chill in ice bath before refrigerating.
    • Store shredded pork with 2–3 tbsp cooking juices; refrigerate 3–4 days or freeze 2–3 months.
    • Briefly re-broil to restore crisp edges before serving.
  • Babi Panggang — Indonesian Roasted Pork

    Babi Panggang — Indonesian Roasted Pork

    Working in the office in the city of Bussum in The Netherlands, we’d often order take-out from our favorite Chinese-Indonesian restaurant, Tong Fong, in the neighboring city of Hilversum. One stand-out item was their delicious Babi Panggang, which was always a part of our order. I later learned that Babi Panggang is the most ordered main dish at Indonesian restaurants throughout the Netherlands. This is my attempt to recreate the vibrant flavors and textures of this delicious dish.


    Ingredients

    • 2 lb pork shoulder or belly
    • Marinade

    • ¼ cup ketjap manis
    • 2 tbsp hoisin sauce
    • 2 tbsp rice cooking wine
    • 1 tbsp brown sugar
    • 1 tbsp fresh ginger, grated
    • 1 tbsp fish sauce
    • ½ tbsp sambal oelek
    • ½ tbsp sambal badjak
    • ½ tsp toasted sesame oil (optional)
    • ¼ tsp Chinese five spice (optional)
    • 2 cloves garlic, minced
    • Juice and zest of 1 lime
    • Sweet & Sour Red Sauce

    • 1 tbsp vegetable oil
    • 1 small onion, finely chopped
    • 2–3 cloves garlic, minced
    • 2 tsp grated ginger
    • ½ tsp sambal oelek
    • 3 tbsp tomato paste
    • ¼ tsp chicken powder
    • ¼ cup sweet chili sauce
    • 3 tbsp ketchup
    • 2 tbsp lime juice
    • 2 tbsp seasoned rice vinegar
    • 1 tbsp tamarind paste
    • 1 tbsp ketjap manis
    • 1 tsp fish sauce
    • ¾ cup chicken stock or water
    • ¼ cup brown sugar (adjust to taste)
    • 1 tbsp cornstarch mixed with 1 tbsp water

    Directions

    Marinate the Pork

    Combine all marinade ingredients, stirring until the sugar has completely dissolved. Pour into a resealable container or vacuum-seal bag. Add the pork, coating thoroughly. Seal and marinate in the refrigerator for 4–12 hours.

    Sweet & Sour Red Sauce

    Heat oil in a saucepan over medium heat. Sauté onion until lightly browned; add garlic, ginger, and sambal, and cook until fragrant. Add tomato paste and chicken powder; cook 1 minute to develop sweetness.

    Stir in sweet chili sauce, ketchup, lime juice, vinegar, tamarind, ketjap manis, fish sauce, stock or water, and brown sugar. Simmer 10 minutes to allow flavors to meld. Add the cornstarch slurry and simmer until glossy and thickened. Blend with an immersion blender and adjust thickness with additional stock, if needed.

    Preparation #1: Sous Vide

    Preheat sous vide bath to 170°F / 77°C for pork shoulder (130°F / 55°C for pork loin or tenderloin; 150°F / 65°C for pork belly). Submerge vacuum-sealed pork and marinade in the water bath and heat for 12–24 hours (2–8 hours for pork loin or tenderloin).

    Remove from the bag and pat dry. Brush with oil and finish under a broiler set to high for 4–5 minutes to crisp the top. Brush with red sauce during broiling and allow it to develop a few bits of char.

    Slice and serve over rice with a generous amount of sauce. Serve with acar ketimun (pickled vegetables), cucumber salad, fried cabbage, and/or blanched green beans tossed with garlic and sesame oil.

    Preparation #2: Oven

    Preheat oven to 350°F / 177°C. Place pork on a rack in a baking tray. Reserve marinade and boil in a saucepan for 5 minutes. Roast pork for 30–40 minutes per pound, or until internal temperature reaches 190°F / 88°C, basting with the boiled marinade halfway through.

    Rest pork for 20 minutes. Pat dry, brush with oil, and finish under a broiler set to high for 4–5 minutes to crisp the top. Optionally, baste with the red sauce while broiling and allow it to develop slight char.

    Slice and serve over rice with a generous amount of sauce. Serve with acar ketimun, cucumber salad, fried cabbage, and/or blanched green beans tossed with garlic and sesame oil.

    Preparation #3: Pellet Grill

    Preheat pellet grill to 250°F / 120°C. Smoke until internal temperature reaches 187°F / 86°C, basting halfway through. Rest pork for 30 minutes.

    Pat dry, brush with oil, and finish under a broiler set to high for 4–5 minutes to crisp the top. Optionally, baste with the red sauce while broiling and allow it to develop light char.

    Slice and serve over rice with a generous amount of sauce. Serve with acar ketimun, cucumber salad, fried cabbage, and/or blanched green beans tossed with garlic and sesame oil.


    Notes

    Preparation

    • Fattier cuts such as pork shoulder or belly are preferred, but pork loin or tenderloin (especially when using the sous vide method, with times and temperatures adjusted accordingly) can also be used. Take care not to overcook leaner cuts.
    • Preparation #1, Sous Vide, is the preferred method for the most tender and flavorful result.

    Serving Suggestions

    • Serve sliced Babi Panggang over rice with plenty of red sauce spooned on top.
    • Pair with acar ketimun, fried cabbage, cucumber salad, or blanched green beans with garlic and sesame oil.
  • Sweet Potato Gnocchi

    Sweet Potato Gnocchi

    After our family took a cooking class together—where we learned to make and shape classic gnocchi—we gathered again on a Sunday evening and had a light-bulb moment: what if we made gnocchi with roasted sweet potatoes? Roasting the sweet potatoes deepens their flavor and keeps the dumplings light yet richly savory. Finished in a nutty browned butter and crisp sage leaves, each pillowy bite evokes cozy autumn warmth—without drifting into dessert territory.


    Ingredients

    • Gnocchi:

    • 2 lb (900 g) orange-flesh sweet potatoes (about 2 large)
    • 1 large egg yolk
    • ¾–1 cup (90–120 g) all-purpose flour, plus more for dusting (start with ¾ cup)
    • ½ tsp table salt
    • ¼ tsp white pepper (or black pepper)
    • pinch nutmeg (optional; up to ⅛ tsp)
    • 2–3 tbsp finely grated parmesan (optional; adds savory depth)
    • semolina or additional flour, for dusting the tray
    • To Serve:

    • 1 batch Browned Butter & Sage Sauce
    • finely grated parmesan, for finishing (optional)

    Directions

    Roast the Sweet Potatoes

    Roast sweet potatoes at 400ºF (205ºC) until completely tender, 45–60 minutes. Split open and let steam escape for 10–15 minutes to reduce moisture. Scoop out the flesh.

    Rice and Cool

    Pass warm sweet potato flesh through a ricer (or mash very thoroughly). Measure 2 packed cups (450–500 g). Spread briefly on a sheet pan to steam off residual moisture, then cool until just warm.

    Make the Dough

    In a bowl, combine sweet potato, egg yolk, salt, pepper, optional nutmeg, and parmesan. Sprinkle ¾ cup (90 g) flour over the top. Fold gently with a bench scraper or spatula until a soft dough forms. It should be supple and just slightly tacky. If sticky, add flour 1 tbsp at a time.

    Test for Texture

    Bring a small pot of well-salted water to a boil. Roll and boil a small test nugget. If it falls apart or tastes mushy, knead in 1 tbsp flour and test again. Avoid overworking the dough.

    Shape the Gnocchi

    Lightly flour the counter and divide dough into four pieces. Roll each into a ¾-inch (2 cm) rope and cut into ¾-inch (2 cm) pieces. Optionally roll on a gnocchi board or fork. Transfer pieces to a semolina- or flour-dusted sheet pan.

    Boil

    Bring a large pot of well-salted water to a boil. Cook gnocchi in batches. They will sink, then float. Cook 30–60 seconds after floating, then lift gently with a spider directly into a warm bowl.

    Serve

    Toss gently with Browned Butter & Sage Sauce, loosening with a splash of cooking water as needed. Finish with parmesan and serve immediately.


    Notes

    Preparation

    • Roasting reduces moisture and prevents dense or gummy dough.
    • Flour amounts vary based on moisture. Add just enough to make dough manageable.
    • A potato ricer ensures the lightest texture; avoid food processors, which make puree gluey.
    • Nutmeg is optional. Keep to a tiny pinch for a savory balance.
    • Parmesan in the dough deepens savoriness and firms texture slightly.

    Serving Suggestions

    • Classic pairing: Browned Butter & Sage Sauce.
    • Also works with simple garlic–olive oil or a light gorgonzola cream.
    • Top with toasted breadcrumbs for added texture.

    Variations

    • Add 1–2 tbsp minced fresh herbs (sage, thyme, chives) to the dough.
    • Use purple sweet potatoes for a more earthy, colorful version; flour amount may vary.
    • Add ¼ cup ricotta for softer, pillowy gnocchi (increase flour slightly).

    Make-Ahead & Storage

    • Freeze uncooked gnocchi on a floured tray, then store in freezer bags up to 2 months. Boil from frozen; add 1–2 minutes to cook time.
    • Refrigerate cooked gnocchi lightly coated in oil up to 2 days. Rewarm gently in sauce.
    • Refrigerate raw dough tightly wrapped up to 24 hours; dust with a little flour if it hydrates.