Bags of Spices

Favorite Recipes

Mains

Hearty, flavorful main dishes — meats, poultry, seafood, vegetarian favorites, and global comfort food served at the center of the table.

  • Beer  Battered Halibut

    Beer Battered Halibut

    Each year I attended the same trade show in London. While I love the city, I didn’t love traveling without my wife—especially this trip because it always fell during her birthday week. The year we decided she’d come along was eventful, to say the least. But before we get to London, some backstory.

    Pregnancy was not something that came easy for us. A lot of very fun attempts, but at least to that point, no resulting pregnancies. Before we left I shared a dream where while in London she’d told me she was pregnant. We laughed as we continued to prepare for the trip.

    Wile I worked the show, my beautiful bride explored the city. On her birthday, we met up after my work day to celebrate with a delicious dinner followed by the theatre to see ‘Les Misérables’—an unforgettable night!

    Back at the hotel, she disappeared into the bathroom. Moments later I heard her voice, “I think we’re pregnant.” I laughed—until she rounded the corner with a pregnancy test, the two pink lines unmistakable. That London trip became our first family journey with our two sons. Later, five and seven years after the whirlwind of welcoming twins, we were blessed with two beautiful daughters, completing our little family.

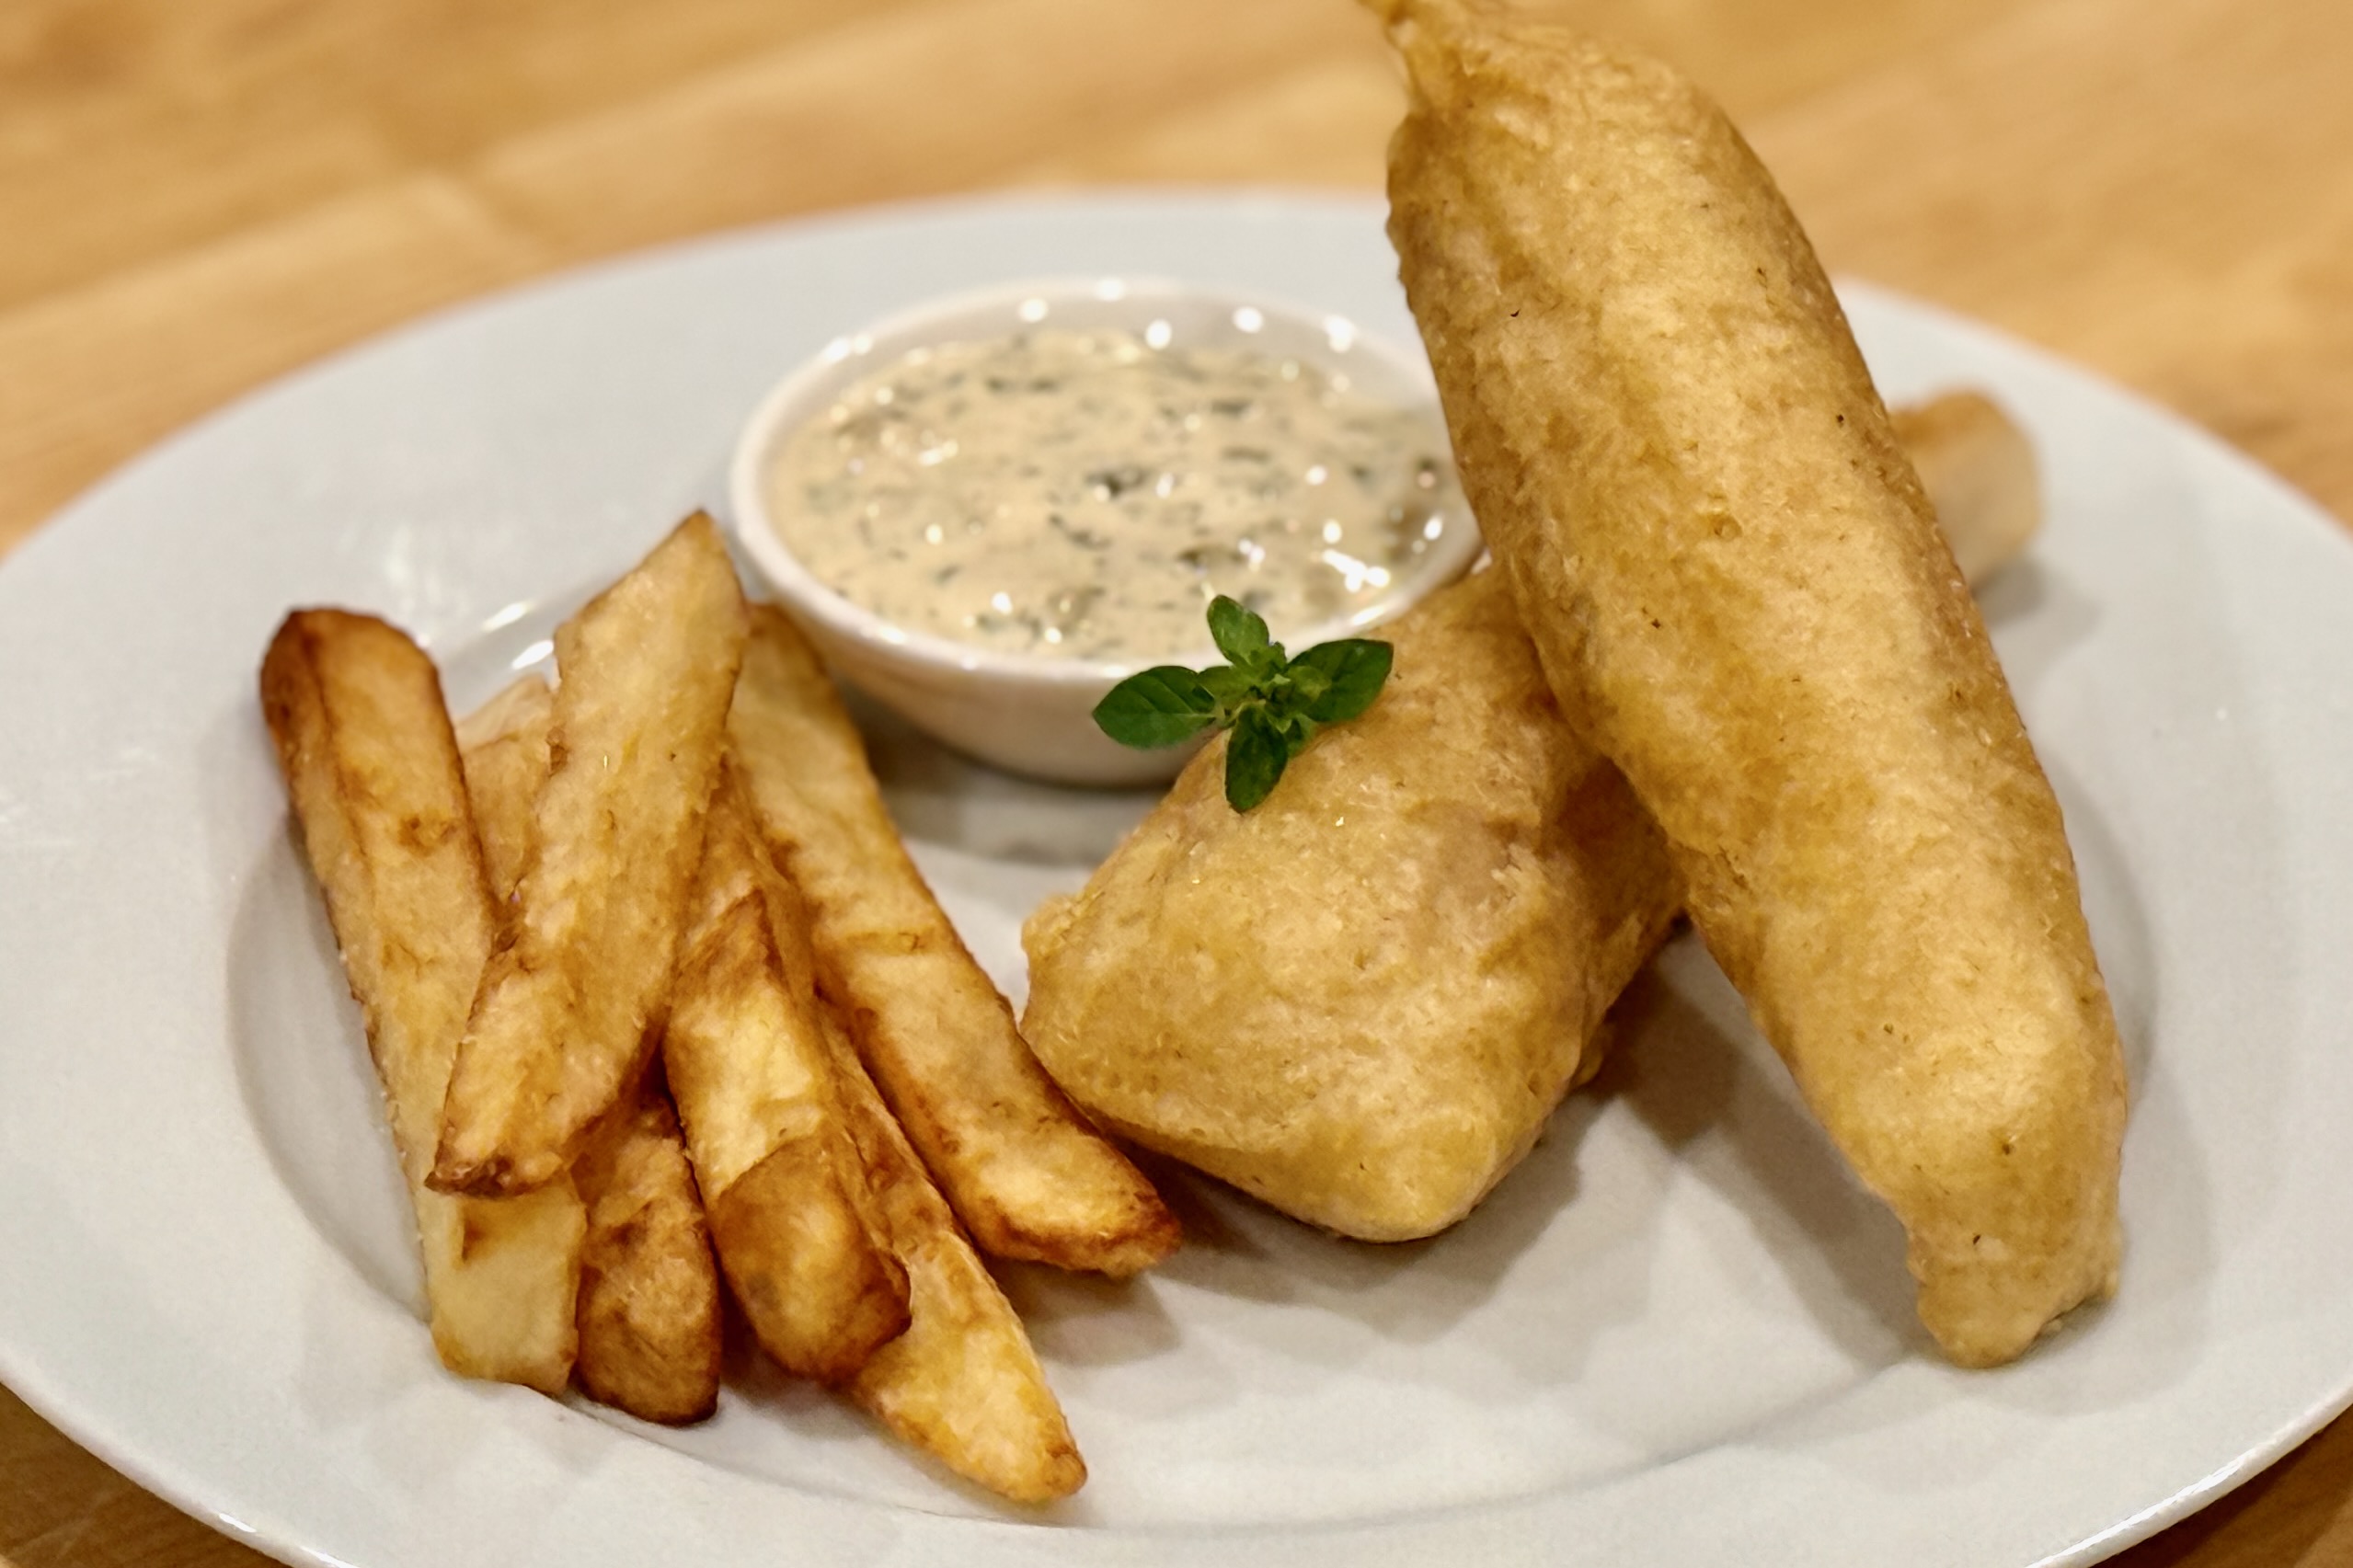
    As a remembrance of our London getaway, and our life-changing news, I created this recipe; my not-so-authentic version of fish and chips.


    Ingredients

    • 4–6 halibut filet portions
    • 1½ cups (185g) all-purpose flour, plus extra for coating filets
    • 1¼ cups (160g) corn starch
    • 2 tsp baking powder
    • ½ tsp table salt
    • ½ tsp white pepper (optional)
    • 1 can (16 oz / 475 ml) light beer
    • Optional Batter Add-Ins:

      • garlic powder
      • onion powder
      • paprika
      • shoarma spice blend
      • Old Bay

    Directions

    Prepare the Fish:

    Preheat 2″ to 3″ of neutral oil in a skillet or deep fryer to 350º–375ºF. Coat cold halibut filets on all sides with flour; place on a wire rack set over a baking sheet and refrigerate.

    Make the Batter:

    In a large bowl, whisk together flour, corn starch, baking powder, salt, and white pepper. Whisk in enough ice-cold beer to reach the consistency of a thin pancake batter. Refrigerate the batter for 10 minutes to rest and chill.

    Fry the Halibut:

    Dip each filet into the chilled batter and allow excess to drip off. Fry for 1–2 minutes per side, or until crispy and deep golden brown.

    Transfer to a wire rack and immediately sprinkle lightly with salt. Allow the oil temperature to return to 350º–375ºF before frying the next batch.

    Serve hot with Belgian frites, tartar sauce, and/or malt vinegar.


    Notes

    Preparation

    • Keeping the fish cold is essential—cold fillets meeting hot oil creates the highest-crisp batter.
    • Use ice-cold beer. Colder batter expands more rapidly when fried, creating a lighter, airier crust.
    • Halibut works beautifully, but cod, haddock, or rockfish are excellent alternatives.
    • To prevent sticking, make sure your oil is at temp before adding the first piece.

    Serving Suggestions

    • Serve with tartar sauce, malt vinegar, or a squeeze of fresh lemon.
    • Belgian-style frites or hand-cut fries complement the crispy halibut perfectly.
    • A quick cabbage slaw with lemon and dill keeps the plate light and balanced.

    Variations

    • Add ½ tsp paprika or smoked paprika for a deeper color and warmth.
    • Shoarma spice or Old Bay give a fun twist while keeping the classic texture.
    • Substitute half the beer with sparkling water for an extra-light batter.
    • For heat, add a pinch of cayenne or chili powder.

    Make-Ahead & Storage

    Fish and chips are best eaten immediately, but here are some tips:

    • If needed, keep fried pieces warm on a wire rack in a 225ºF oven for up to 20 minutes.
    • Leftovers may be reheated in an air fryer at 375ºF for 4–6 minutes to restore crispness.
    • Batter can be mixed dry (without beer) up to 2 days ahead; just whisk in cold beer before frying.
  • Poutine

    Poutine

    Poutine is the ultimate Canadian comfort classic—crispy hot fries, soft squeaky cheese curds, and rich gravy melting everything into one irresistible bite. It’s simple, hearty, and perfect for nights when you want something warm and satisfying without overthinking the prep.


    Ingredients

    • Southern gravy
    • Belgian frites, or oven fried fries
    • white cheddar cheese curds

    Directions

    Assemble the Poutine

    Plate hot fries and sprinkle generously with cheese curds. Cover with hot gravy and serve immediately.


    Notes

    Preparation

    • For best texture, use hot, freshly cooked fries so the curds soften slightly but don’t fully melt.
    • If your cheese curds are refrigerated, let them sit at room temperature for 15–20 minutes before assembling for maximum “squeak.”
    • Warm gravy thoroughly just before serving so it coats evenly and heats the curds.

    Serving Suggestions

    • Add shredded rotisserie chicken, pulled pork, or leftover brisket for a heartier variation.
    • Top with chopped green onions or a sprinkle of smoked paprika for extra flavor depth.
    • Serve alongside burgers, grilled meats, or as a standalone comfort meal.

    Variations

    • Use mushroom gravy instead of brown gravy for a vegetarian option.
    • Try peppercorn gravy for a bolder, steakhouse-style version.
    • Make it “fully loaded” with bacon, caramelized onions, or jalapeños.

    Make-Ahead & Storage

    • Fries are best freshly cooked; avoid storing once assembled as they become soggy.
    • Gravy can be made up to 3 days ahead and reheated gently before serving.
    • Cheese curds keep well refrigerated for 1–2 weeks; bring to room temperature before using.
  • Aguachile Rojo de Camaron

    Aguachile Rojo de Camaron

    Our family’s take on northern Mexican aguachile rojo: quick-blanched shrimp finished in fresh lime, a vivid red base of toasted dried chiles and Camaronazo, and a crisp bed of cucumber, red onion, cilantro, and just-ripe avocado. Bright, spicy, and ice-cold—made to serve immediately with tostadas, salsa negra, and wedges of lime.


    Ingredients

      Shrimp & Lime Cure

    • 2 lb large raw shrimp, peeled, deveined, halved lengthwise
    • 1 cup fresh lime juice (just enough to cover shrimp)
    • 2 tsp table salt, divided (to season curing liquid and sauce)
    • Vegetables & Herbs

    • 1 red onion, very thinly sliced
    • 3 cucumbers, thin half-moons
    • 3 avocados, diced (add just before serving)
    • ½ bunch cilantro, chopped, plus leaves for garnish
    • radishes, thinly sliced (garnish, optional)
    • lime wedges, for serving
    • Red Base

    • 24–28 oz Camaronazo spicy tomato cocktail with shrimp
    • 4 dried chiles de árbol
    • 2 dried pequín chiles
    • 1 dried guajillo chile
    • 1 clove garlic
    • ¼ tsp chicken bouillon powder (Knorr-style), or to taste
    • Optional Balancers

    • ½ tsp sugar (to soften bitterness from toasted chiles)
    • 1–2 tbsp soy sauce or Maggi seasoning (depth; Sinaloan style)
    • 2–3 tbsp cold water (only if base is too thick)

    Directions

    Blanch and Cure the Shrimp

    Bring a pot of well-salted water to a gentle boil. Add shrimp and blanch 10–15 seconds—just until edges blush pink—then immediately transfer to an ice bath to stop cooking. Drain well and pat dry.

    Place shrimp in a shallow bowl and pour in just enough fresh lime juice to cover. Refrigerate 20–25 minutes, stirring once halfway, until opaque and slightly firm. Avoid over-marinating.

    Soak the Onion

    Soak sliced red onion in ice water for 10 minutes to mellow sharpness and keep a crisp bite; drain thoroughly.

    Toast & Hydrate the Chiles

    Toast árbol, pequín, and guajillo chiles in a dry skillet over medium heat until fragrant, ~30 seconds per side. Remove stems and most seeds.

    Soak guajillo in hot water 10 minutes to soften; reserve a spoonful of soaking liquid.

    Blend the Red Base

    Blend about ¼ of the Camaronazo with toasted chiles, garlic, 1 tsp of the salt, chicken bouillon, and a splash of guajillo soaking liquid until completely smooth and vivid red.

    Add remaining Camaronazo and optional soy sauce or Maggi; pulse to combine. If using, add sugar to round bitterness.

    If the base is too thick, add 2–3 tbsp cold water. If it tastes too sweet, brighten with more lime. Taste and adjust salt at the end.

    Combine the Vegetables

    In a large chilled bowl, mix cucumber, drained onion, and chopped cilantro. Pour in the red base and stir to coat evenly.

    Finish with Shrimp & Avocado

    Add the cured shrimp along with their lime marinade; fold gently to combine so the broth stays bright and balanced.

    Add avocado just before serving and fold lightly to keep the cubes intact.

    Serve

    Serve immediately in chilled bowls or on tostadas. Garnish with cilantro leaves, sliced radish, and lime wedges; drizzle with salsa negra or salsa macha if desired.


    Notes

    Preparation

    • Blanching locks in a crisp, restaurant-quality texture; the short lime cure finishes the “cook” without turning mushy.
    • Toast all dried chiles briefly to deepen flavor and color; soak guajillo for a smoother blend.
    • Onion soak: 10 minutes in ice water keeps texture while taming harshness.
    • If the base is too thick, add 2–3 tbsp cold water; if sweetness dominates, add a squeeze of lime; always taste and adjust salt at the end.
    • Add avocado only at the end to prevent bruising and mushiness.

    Serving Suggestions

    • Serve with crisp tostadas (not just chips) for structure and crunch.
    • Add thinly sliced radish and extra cilantro leaves for color and freshness.
    • Offer salsa negra or salsa macha for a glossy, smoky-spicy drizzle.
    • Pass extra lime wedges at the table for last-second brightness.
    https://thehugginsfamily.com/wp-content/uploads/2025/08/AguachileRojo.jpeg

    Variations

    • Soy sauce or Maggi (1–2 tbsp) adds savory depth common in Sinaloan versions—use to taste.
    • A pinch of sugar (½ tsp) can smooth bitterness from well-toasted chiles.
    • For extra heat, add another árbol or a small amount of the chile seeds; for milder heat, reduce árbol/pequín.

    Make-Ahead & Storage

    • The red chile base can be blended up to 1 day ahead; keep refrigerated and whisk before using.
    • Blanch shrimp and chill the onion/cucumber ahead, but cure shrimp in lime and add avocado just before serving.
    • Best served immediately once assembled; leftovers lose texture quickly—consume the same day.
  • Chicken Fajitas

    Chicken Fajitas

    Juicy, smoky chicken tossed with sizzling peppers and onions—these restaurant-style fajitas bring the flavor and drama of a classic Mexican grill to your table. Balanced citrus marinade, caramelized edges, and a final squeeze of lime create a bright, sizzling finish.


    Ingredients

    • 1½ lbs skinless, boneless chicken thighs and/or breasts (1 part thighs and 1 part breasts recommended)
    • Marinade

    • 3 tbsp canola oil
    • 2 tbsp lime juice
    • 1 tbsp orange juice
    • 1 tbsp soy sauce
    • 1 tbsp water
    • 2 garlic cloves, minced
    • ½ tsp chipotle chile powder
    • 1 tsp ancho chile powder
    • 1½ tsp ground cumin
    • ¼ tsp ground coriander
    • ¹⁄₁₆ tsp ground cinnamon
    • 1 tsp smoked paprika
    • 1 tsp dried Mexican oregano
    • 1 tsp kosher salt
    • ½ tsp black pepper
    • 1 tsp brown sugar (optional, helps caramelization)
    • ½ tsp liquid smoke (optional, if not cooking over charcoal)
    • Vegetables

    • 1 red bell pepper, sliced
    • 1 green bell pepper, sliced
    • 1 yellow bell pepper, sliced
    • 1 large white onion, sliced
    • 1–2 tbsp oil
    • Pinch of kosher salt
    • Squeeze of lime juice
    • To Serve

    • Warm flour tortillas
    • Pico de gallo
    • Guacamole or avocado slices
    • Crema or sour cream
    • Shredded cheese (cheddar, Monterey Jack, or Oaxaca)
    • Refried beans
    • Mexican rice
    • Fresh lime wedges
    • Fresh cilantro, chopped
    • Cotija cheese, crumbled (optional for garnish)

    Directions

    Marinate the Chicken

    Combine marinade ingredients in a bowl or resealable container. Add chicken and coat thoroughly, reserving 1–2 tbsp of the marinade for use later with the vegetables.

    Cover and refrigerate for 4–12 hours, turning occasionally.

    Prepare the Serving Skillet

    Preheat oven to 450–500°F (230–260°C). Place a large cast-iron fajita platter or skillet in the oven to heat for at least 15 minutes before serving.

    Cook the Chicken

    Heat a grill or cast-iron skillet over high heat. Cook chicken until nicely charred on the outside and reaches 160–165°F internally.

    Transfer to a plate, tent loosely with foil, and rest 5 minutes. Slice into thin strips across the grain.

    Caramelize and Combine

    Return the hot skillet to the stove (or use the same grill pan). Add sliced chicken and about 1 tbsp of the reserved marinade. Toss over high heat for 30–45 seconds to lightly caramelize and glaze the edges. Remove from heat and keep warm.

    Cook the Vegetables

    In a separate large skillet (or grill pan), heat 1–2 tbsp oil over high heat. Add sliced peppers and onions. Cook until blistered and tender-crisp, stirring occasionally, about 4–5 minutes.

    Add a pinch of salt and a squeeze of lime juice at the end of cooking for brightness and balance.

    Assemble and Serve

    Combine the vegetables with the sliced chicken. Carefully remove the preheated cast-iron skillet from the oven and transfer the chicken and peppers into it.

    Add a final squeeze of fresh lime juice—the skillet will sizzle and steam. Serve immediately on a heat-safe surface with warmed tortillas and all accompaniments.

    Garnish

    Sprinkle with fresh chopped cilantro and a light dusting of cotija cheese just before serving.


    Notes

    Preparation

    • The balanced 3:3 oil-to-citrus ratio prevents over-acidification and improves browning.
    • Adding 1 tbsp water ensures even coating and full marinade coverage.
    • Optional liquid smoke adds authentic char aroma when not using a charcoal grill.
    • A brief toss of sliced chicken in reserved marinade creates a restaurant-style glossy finish.
    • Seasoning vegetables with salt and lime at the end enhances flavor and color.
    • The sizzling lime finish releases steam and aroma when the hot skillet hits the table.

    Serving Suggestions

    • Serve with warm tortillas, Mexican rice, and refried beans.
    • Offer pico de gallo, guacamole, crema, or cheese for build-your-own fajitas.
    • Top with extra cilantro, cotija, and a squeeze of lime just before serving.

    Make-Ahead & Storage

    • Marinate chicken up to 12 hours in advance for maximum flavor.
    • Cooked chicken and vegetables can be refrigerated for up to 3 days.
    • Reheat gently in a skillet or oven before serving; add a squeeze of lime to refresh flavor.