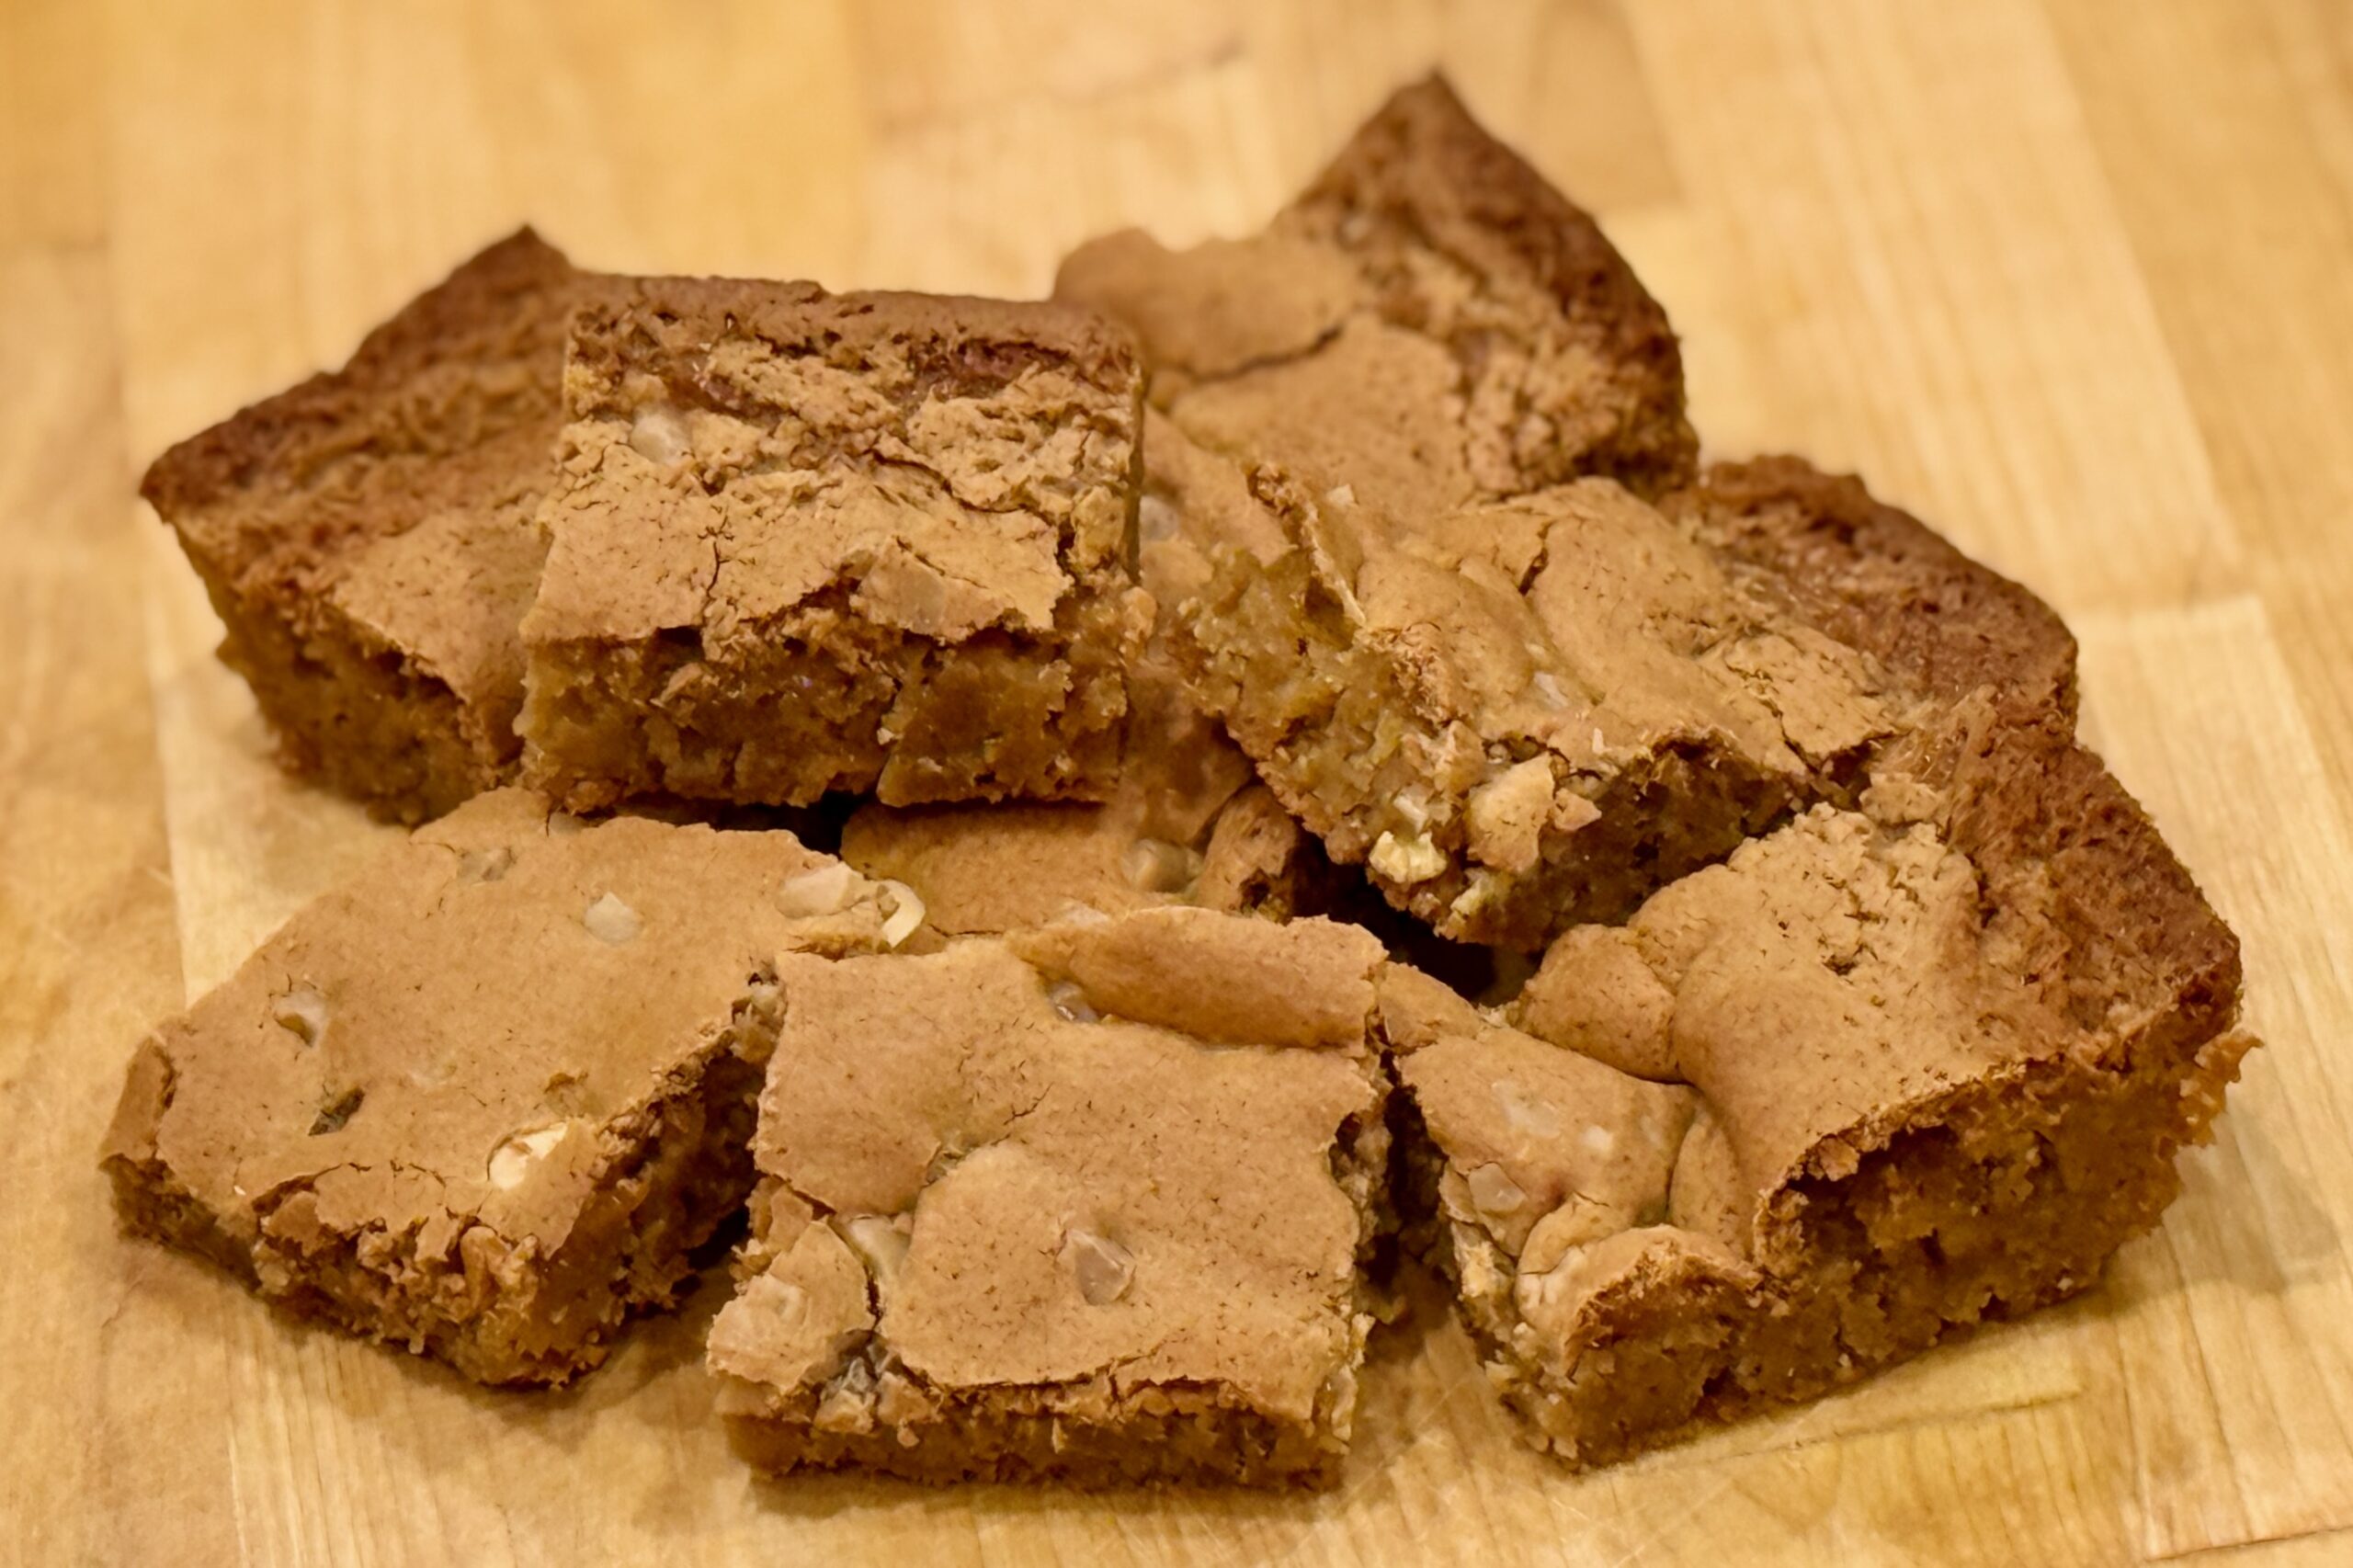
Bags of Spices

Favorite Recipes

Method

Browse recipes by cooking method — ideal when you’re planning around equipment, time, weather, or technique.

  • Rendang

    Rendang

    Often mistaken for curry, this traditional Sumatran dish is celebrated throughout Indonesia for its incredible depth of flavor. Slowly simmered in coconut milk and fragrant spices, it’s served on very special occasions. In a 2011 CNN poll, rendang was voted the world’s most delicious dish.


    Ingredients

    • 1 whole chicken, cut into small to medium-size pieces (or 2 lb boneless chicken thighs or breast chunks)

    Beef or Pork Variation

    • 2 lb beef chuck or pork shoulder, cut into 1½-inch cubes
    • (Increase coconut milk to 1½ cans and simmer longer—about 90 minutes or until dark and caramelized.)

    Sauce

    • 1 can (13.5 oz) good-quality full-fat coconut milk
    • ½ cup water or unsalted chicken stock
    • 2 tbsp fresh lemongrass, finely chopped (tender inner portion only)
    • 1 onion, peeled and quartered
    • 4 cloves garlic
    • 1 thumb-size piece galangal (or ginger)
    • 1–2 red chillies or 1 tbsp sambal oelek
    • ¾ tbsp tamarind paste
    • 1 tbsp brown sugar
    • 2 tsp dark soy sauce
    • 2 tbsp fish sauce (use 3 tbsp for beef or pork)
    • ½ tsp turmeric
    • 1 heaping tbsp ground coriander
    • 1 tbsp ground cumin
    • 1 small cinnamon stick (or 1½ tsp ground cinnamon)
    • ¼ tsp ground nutmeg
    • ¼ tsp ground cloves
    • 2 whole star anise
    • 2–3 kaffir lime leaves (optional but recommended)

    Garnish (Optional)

    • Fresh cilantro leaves
    • Dry shredded coconut or toasted coconut (kerisik)

    Directions

    Make the Spice Paste

    Place all sauce ingredients except the star anise and kaffir lime leaves in a food processor (or crush with a mortar and pestle) and blend into a thick, smooth paste.

    Taste the blended paste before cooking. It should be slightly under-seasoned—saltiness will intensify as the sauce reduces. Add a touch of sugar if too sour, or more chili if you prefer extra heat. If using sambal oelek, reduce fish sauce slightly and adjust at the end.

    Bloom the Paste

    Transfer the paste to a wok or large, deep-sided pan and cook over medium heat for 3–5 minutes, stirring constantly, until fragrant and slightly darker in color.

    Simmer and Reduce

    Add the chicken (or beef/pork), the star anise, and kaffir lime leaves. Stir to coat the meat evenly.

    Bring to a gentle boil over medium-high heat, then reduce to a low simmer. Do not cover—the sauce should reduce gradually. Stir occasionally to prevent sticking.

    For chicken: simmer 45–60 minutes until the sauce thickens and the meat is tender. For beef or pork: simmer about 90 minutes, stirring occasionally, until the sauce darkens and the oil separates (you’ll see pools of oil bubbling at the surface), and the meat is deeply caramelized.

    Finish and Serve

    If the sauce reduces too quickly or becomes overly thick, add a splash of water or coconut milk as needed. Adjust salt near the end of cooking if necessary.

    Serve hot, garnished with shredded or toasted coconut and fresh cilantro. Pairs beautifully with jasmine or glutinous rice.


    Notes

    Preparation

    • Using full-fat coconut milk helps prevent curdling and creates the signature silky texture.
    • The added water or stock allows longer reduction time without oversalting.
    • If using sambal oelek instead of fresh chilies, reduce fish sauce slightly and adjust at the end.
    • For a drier, traditional beef rendang, continue simmering until nearly all liquid has evaporated and the sauce clings darkly to the meat.
    • For extra depth, optionally stir in 1–2 tbsp toasted coconut (kerisik) near the end of cooking.
    • Taste and adjust seasoning only at the end—salt intensifies as the sauce reduces.

    Serving Suggestions

    • Serve with jasmine rice or glutinous rice to soak up the rich sauce.
    • Finish with fresh cilantro and a sprinkle of shredded or toasted coconut (kerisik), if desired.

    Variations

    • Beef or Pork: Use 2 lb beef chuck or pork shoulder (1½-inch cubes). Increase coconut milk to 1½ cans and simmer about 90 minutes or until dark and caramelized.

    Make-Ahead & Storage

    • Rendang improves in flavor overnight; refrigerate up to 3 days.
    • Reheat gently with a splash of water or coconut milk to loosen the sauce.
    • Freeze up to 2 months; thaw in the refrigerator before reheating.
  • Greek Lemon Potatoes

    Greek Lemon Potatoes

    These Greek Lemon Potatoes are built around the classic taverna method: potatoes gently braised in lemony broth until creamy inside, then roasted uncovered so the liquid reduces and the edges turn deeply golden and crisp. Yukon Golds hold their shape while soaking up bright lemon, oregano, and garlic, and a small finish of butter rounds the acidity without dulling it. The result is a side dish that’s bold, savory, and unmistakably Greek—equally at home next to roast chicken, lamb, or a simple grilled protein.


    Ingredients

    • 2½ lbs Yukon Gold potatoes
    • ⅓ cup olive oil
    • ¼ cup fresh lemon juice
    • Zest of 1 lemon
    • 2 tsp dried oregano
    • Pinch dried thyme
    • 1 tbsp garlic, minced (see note for whole garlic option)
    • ½ tbsp table salt, divided
    • ½ tsp black pepper
    • 1¼ cups chicken broth
    • 1–2 tbsp unsalted butter
    • 1–2 tsp fresh parsley, finely chopped

    Directions

    Prepare the Potatoes

    Wash the potatoes and slice into thick wedges (skin on or peeled). Place in a large bowl of cold water and soak for at least 30 minutes to remove excess surface starch. Drain well and pat thoroughly dry.

    Prepare the Seasoned Oil

    In a small saucepan, gently warm the olive oil over low heat. Add the oregano, thyme, and garlic and cook just until fragrant, 30–60 seconds, taking care not to brown the garlic. Remove from heat.

    Stir in the lemon juice, ¾ of the salt, and the black pepper.

    Roast – Phase One (Braise & Steam)

    Preheat the oven to 400°F (200°C).

    Arrange the potatoes in a single layer in a 9×13-inch baking dish. Pour the seasoned oil mixture evenly over the potatoes and toss gently to coat.

    Carefully pour the chicken broth into the sides of the baking dish, avoiding pouring directly over the potatoes. The potatoes should be partially submerged, with their tops exposed.

    Cover loosely with foil and roast for 30 minutes.

    Roast – Phase Two (Reduce & Crisp)

    Remove the foil. Dot the butter between the potatoes, allowing it to melt into the broth as it reduces.

    Continue roasting uncovered until most of the liquid has reduced and the bottoms of the potatoes are deeply golden, about 30–35 minutes. Toss once only after the potatoes release cleanly from the pan.

    Return to the oven and roast an additional 20–30 minutes, until the potatoes are golden, crisp-edged, and fork-tender. Broil briefly if desired for extra color.

    Finish

    Transfer the potatoes to a serving dish and spoon over any remaining pan juices. Sprinkle with lemon zest and parsley. Taste and adjust with the remaining salt if needed. Serve immediately.


    Notes

    Preparation

    • Soaking the potatoes removes excess surface starch, helping the wedges roast with crisper edges instead of turning gummy.
    • Blooming the oregano and garlic in warm oil softens oregano’s bitterness and prevents raw garlic harshness, resulting in a rounder, more integrated flavor.
    • Avoid pouring broth directly over the potatoes. Keeping the tops dry allows them to roast while the bottoms gently braise.
    • Salt is added in stages: most goes in early to season the interior, with a final adjustment once the liquid has reduced and flavors have concentrated.

    Serving Suggestions

    • Serve alongside roast chicken, lamb, or grilled meats.
    • Pairs well with a simple cucumber–tomato salad or tzatziki to balance the richness and lemony depth.
    • Best served hot from the oven, when the edges are crisp and the centers are creamy.

    Variations

    • Whole Garlic Option: Whole garlic cloves (lightly smashed) may be used in place of minced garlic. As they roast, the cloves soften and sweeten, lending a gentler, more rounded garlic flavor without the sharper bite of minced garlic.

    Make-Ahead & Storage

    • These potatoes are best served fresh, but leftovers keep well.
    • Refrigerate in an airtight container for up to 3 days.
    • Reheat uncovered in a hot oven (400°F / 200°C) to restore crisp edges. Avoid microwaving, which softens the exterior.
  • Italian-American Meat Sauce

    Italian-American Meat Sauce

    This Meat Sauce is a classic Italian-American style simmered sauce built for depth and balance: well-browned meat, layered tomato flavor, dried herbs, and just enough savory backbone to make it craveable without tipping into heaviness. Blooming the tomato paste adds richness and sweetness, while a short covered simmer softens acidity before finishing uncovered to concentrate flavor. It’s a sauce that’s excellent fresh, but even better the next day—exactly what a great red sauce should be.


    Ingredients

    • 2 tbsp olive oil
    • 1 cup (8 oz) onion, chopped
    • 5 cloves garlic, minced
    • 1 lb ground chuck beef (or ½ lb ground chuck and ½ lb uncased Italian sausage)
    • 1 can (28 oz) crushed tomatoes
    • 1 can (15 oz) tomato sauce
    • 1 can (6 oz) tomato paste
    • 1 cup chicken broth
    • ¼–½ cup dry white or dry red wine (optional)
    • 1 tbsp fish sauce
    • 2 tsp dried basil
    • 2 tsp dried parsley
    • 1 tsp dried oregano
    • ½ tsp dried ground fennel
    • ¼ tsp dried thyme leaves
    • 2 whole cloves, crushed
    • 2 bay leaves
    • ½ tsp freshly ground black pepper (to taste)
    • 1 tsp table salt

    Directions

    Build the Sauce

    In a Dutch oven over medium heat, heat the olive oil until shimmering. Add the onion and sauté until translucent and tender, about 5–7 minutes. Add the garlic and cook for 1–2 minutes more, just until fragrant.

    Add the ground meat and cook, breaking it up with a spoon, until well browned and any excess moisture has cooked off.

    Stir in the tomato paste and cook for 1–2 minutes, allowing it to bloom and darken slightly to deepen sweetness and round acidity.

    Stir in the crushed tomatoes, tomato sauce, chicken broth, wine (if using), and fish sauce. Add the dried herbs, fennel, thyme, crushed cloves, bay leaves, pepper, and salt. Bring the sauce to a gentle simmer.

    Simmer

    Reduce heat to low and simmer covered for 30 minutes to soften acidity and allow the flavors to meld.

    Uncover and continue simmering for 15 minutes, allowing excess moisture to evaporate and the sauce to thicken. Remove and discard the bay leaves and crushed cloves before serving.

    Finish the Pasta

    Boil pasta as directed until al dente. Drain, reserving some of the pasta cooking water.

    Place enough warmed meat sauce in a serving bowl to lightly coat the pasta. Stir in a small splash of the reserved pasta water to loosen the sauce, then add the pasta and toss gently to coat. Serve topped with additional meat sauce and freshly grated Romano and/or Parmesan cheese.


    Notes

    Preparation

    • Anchovy Option: The fish sauce may be replaced with 4–6 anchovy fillets, finely minced. Add them with the garlic so they dissolve into the oil and meat as the sauce cooks.

    Make-Ahead & Storage

    This sauce improves with time and is best when made a day ahead and reheated.

    • Refrigerate in airtight containers for up to 3 days.
    • Freeze for up to 3 months.
    • Reheat gently on the stovetop over low heat, adding a splash of water or broth as needed to loosen the sauce.
  • Murgh Makhani — Indian Butter Chicken

    Murgh Makhani — Indian Butter Chicken

    Butter Chicken (Murgh Makhani) is a rich, comforting classic—tender yogurt-marinated chicken folded into a velvety tomato-cream sauce fragrant with ginger, fenugreek, and warm garam masala. It’s the kind of dish that fills the kitchen with incredible aromas and brings everyone running to the table, perfect for family nights when you want something deeply satisfying without being complicated.


    Ingredients

      Sauce

    • 4 tbsp butter, divided (chilled, cut into 4 pieces)
    • 1 large onion, chopped fine
    • 5 garlic cloves, minced
    • 4 tsp grated fresh ginger
    • 1 serrano chile, stemmed, seeded, and minced (optional, to taste)
    • 1 tbsp garam masala
    • 1 tsp ground coriander
    • ½ tsp ground cumin
    • ½ tsp turmeric
    • ½–1 tsp Kashmiri chili powder (or mild paprika for color)
    • ½ tsp black pepper
    • 1 cup crushed or puréed tomatoes (San Marzano–style preferred)
    • 1 cup water (or as needed)
    • 1 tbsp honey or jaggery (or 1 tbsp sugar)
    • 1 tsp table salt (plus more to taste)
    • 1 cup heavy cream
    • 1 tsp dried fenugreek leaves (kasuri methi), lightly crushed
    • Chicken

    • 2 lbs boneless, skinless chicken thighs, trimmed
    • ½ cup plain Greek yogurt
    • 1 tbsp lemon juice
    • 1 tsp garam masala
    • ½ tsp turmeric
    • 1 tsp table salt
    • 3 tbsp chopped fresh cilantro, divided
    • Garnish

    • Additional chopped fresh cilantro
    • Optional drizzle of cream

    Directions

    Marinate the Chicken

    In a medium bowl, mix yogurt, lemon juice, garam masala, turmeric, and salt. Add chicken thighs and coat well. Cover and refrigerate at least 30 minutes or up to overnight.

    Make the Sauce Base

    In a large saucepan, melt 2 tbsp butter over medium heat. Add onion, garlic, ginger, and serrano (if using). Cook, stirring often, until onions are deep golden brown, about 10–12 minutes.

    Add garam masala, coriander, cumin, turmeric, Kashmiri chili powder, and black pepper. Stir constantly for 1–2 minutes until fragrant.

    Stir in tomatoes and 1 cup water, scraping up browned bits. Add honey and salt. Simmer 10 minutes, then stir in cream.

    Off heat, blend with an immersion blender until smooth. Return to low heat and simmer gently for 5 minutes.

    Add more water as needed if sauce becomes too thick.

    Cook the Chicken

    Adjust oven rack 6 inches from the broiler. Line a baking sheet with foil and place a wire rack on top. Arrange marinated chicken on the rack.

    Broil until lightly charred and chicken registers 175°F, 16–20 minutes, flipping halfway. Let rest 5 minutes, then cut into ¾-inch chunks.

    Alternatively, grill or pan-sear if preferred.

    Finish the Sauce

    Add chicken to the sauce. Stir in kasuri methi and 2 tbsp chopped cilantro. Remove from heat and whisk in remaining 2 tbsp chilled butter until glossy.

    Adjust seasoning with salt or honey as needed.

    Serve

    Transfer to a serving dish. Drizzle with cream if desired and sprinkle with more cilantro. Serve with basmati rice and/or Naan.


    Notes

    Preparation

    • For the deepest flavor, marinate chicken overnight, but reduce lemon juice to 1 tsp to prevent the meat from becoming mushy.
    • Broiling creates a slight char that mimics tandoori-style cooking at home.
    • Kashmiri chili powder adds color and mild heat; paprika works as a substitute if you prefer less spice.
    • Fenugreek (kasuri methi) is essential to the classic restaurant-style flavor—don’t skip it if you can find it.

    Serving Suggestions

    • Serve with basmati rice, Naan, roti, or even roasted potatoes.
    • A side of cucumber raita helps balance the richness.
    • Goes beautifully with Mango Lassi for contrast.

    Variations

    • For a lighter version, replace half the cream with whole milk.
    • For extra heat, add an additional serrano or a pinch of cayenne.
    • For a smokier finish, add ½ tsp smoked paprika or a tiny dash of liquid smoke.
    • Make it vegetarian by using paneer or roasted cauliflower instead of chicken.

    Make-Ahead & Storage

    • The sauce can be made up to 3 days ahead. Reheat gently and whisk in fresh butter before serving.
    • Leftovers keep 3–4 days refrigerated.
    • Freezes well for up to 2 months; thaw overnight and reheat gently to avoid splitting.
  • Chicken Tikka Masala

    Chicken Tikka Masala

    Chicken Tikka Masala is one of those comforting, crowd-pleasing dishes where tender marinated chicken meets a rich, warmly spiced tomato-cream sauce. This version balances classic aromatics, gentle heat, and layered spice blooming for a deeply flavorful, restaurant-quality finish perfect for serving with basmati rice or warm naan.


    Ingredients

      Chicken Tikka

    • 2 lb boneless, skinless chicken thighs, trimmed
    • 1 tbsp lemon juice
    • 1 tsp table salt
    • 1 cup plain whole-milk yogurt
    • 2 tbsp vegetable oil
    • 2 cloves garlic, minced
    • 1 tbsp grated fresh ginger
    • 1 tsp ground cumin
    • 1 tsp ground coriander
    • 1 tsp paprika (or Kashmiri chili powder, for color)
    • ½ tsp cayenne pepper (to taste)
    • ½ tsp ground turmeric
    • ½ tsp garam masala
    • Masala Sauce

    • 3 tbsp vegetable oil (or ghee)
    • 1 tsp ground cumin
    • 1 tsp ground coriander
    • 1 tsp paprika (or Kashmiri chili powder, for color)
    • 1 tsp garam masala
    • ½ tsp ground cinnamon
    • 1 medium onion, finely diced
    • 3 cloves garlic, minced
    • 1 tbsp grated fresh ginger
    • 1 serrano chile, minced (optional)
    • 1 tbsp tomato paste
    • 1 can (28 oz) fire-roasted crushed tomatoes
    • ¼ cup raw cashews, blended
    • 2 tsp sugar (to taste)
    • 1 tsp table salt (plus more to taste)
    • ⅔ cup heavy cream
    • 1 tsp dried kasuri methi leaves, crumbled
    • 2 tbsp butter (optional, for richness)
    • ¼ cup fresh cilantro, chopped (plus more for garnish)

    Directions

    Prepare the Chicken Tikka

    Toss chicken with lemon juice and salt; let rest for 20 minutes.

    Whisk yogurt, oil, garlic, ginger, cumin, coriander, paprika, cayenne, turmeric, and garam masala in a large bowl. Add chicken and coat thoroughly. Cover and refrigerate at least 1 hour, up to 8 hours.

    Heat oven broiler. Arrange chicken on a wire rack set over a foil-lined baking sheet. Broil 10–15 minutes, flipping halfway, until lightly charred and chicken reaches 165°F. Rest 5 minutes.

    Cut chicken into 1-inch chunks.

    Make the Masala Sauce

    Heat oil or ghee in a Dutch oven over medium heat until shimmering. Add cumin, coriander, paprika, garam masala, and cinnamon. Bloom spices for 30–45 seconds, stirring constantly.

    Add onion and cook 8–10 minutes until golden brown. Stir in garlic, ginger, serrano chile, and tomato paste; cook 1–2 minutes until fragrant.

    Stir in crushed tomatoes, blended cashews, sugar, and salt. Simmer 15 minutes, stirring occasionally, until slightly thickened.

    Add cream and butter (if using), then crumble in kasuri methi. Simmer 2–3 minutes more to meld flavors.

    Adjust seasoning with additional salt or sugar as needed.

    Finish

    Stir the broiled chicken pieces into the sauce just to coat. Warm through gently.

    Garnish with cilantro and an optional swirl of cream. Serve with basmati rice or Naan.


    Notes

    Preparation

    • Blooming the spices in oil at the beginning deepens their aroma and gives the sauce its signature restaurant-style richness.
    • For extra char flavor, grill the chicken instead of broiling; aim for light blistering on the edges.
    • Cashews provide natural thickening and creaminess; you may substitute 2–3 tbsp cashew butter if preferred.
    • Salt levels vary by brand of tomatoes—taste and adjust after simmering.
    • Altitude Adjustment (~4,750 ft): Increase simmer time by 3–5 minutes to concentrate flavors; sauce may reduce slightly slower at elevation.

    Serving Suggestions

    • Serve with steamed basmati rice, jeera rice, Naan, or paratha.
    • A side of cucumber raita or kachumber salad adds cooling freshness.
    • For a richer presentation, drizzle extra cream and add a few cilantro sprigs just before serving.

    Variations

    • Spicier: Add an extra serrano or increase cayenne to 1 tsp.
    • Smoky: Add ½ tsp smoked paprika or finish with a pinch of dried fenugreek for deeper aroma.
    • Dairy-Free: Swap cream for full-fat coconut milk and omit the butter.

    Make-Ahead & Storage

    • Marinated chicken keeps 12–18 hours in the refrigerator.
    • Masala sauce improves overnight; flavors deepen as it rests.
    • Store leftovers in an airtight container 3–4 days in the refrigerator.
    • Freezes well for 2–3 months; thaw overnight and rewarm gently to avoid cream separation.
  • Spanakopita Triangles

    Spanakopita Triangles

    These spanakopita triangles are crisp, buttery, and filled with a savory blend of spinach, feta, and fresh herbs. Dill leads the flavor, supported by parsley and a subtle hint of mint, creating a filling that’s bright, aromatic, and unmistakably Mediterranean. Baked until golden and shatteringly crisp, they’re perfect as an appetizer, mezze platter addition, or make-ahead snack.


    Ingredients

    • 1 tbsp olive oil (or butter)
    • ½ onion, finely diced
    • 1 tsp garlic, finely chopped
    • 2 tbsp fresh dill, finely chopped (or 2 tsp dried dill)
    • 1 tbsp fresh parsley, finely chopped (or 1 tsp dried parsley)
    • ¼ tsp dried mint
    • ¾–1 tsp shoarma spice mix (optional)
    • 1 package (12–16 oz) frozen spinach, thawed and very well squeezed dry, or equivalent fresh spinach, cooked down and drained
    • 1 egg, lightly beaten
    • ½ cup crumbled feta
    • salt & freshly ground black pepper, to taste
    • frozen phyllo dough, thawed
    • butter, melted

    Directions

    Prepare the Filling

    Preheat oven to 375ºF. Line two half-sheet pans with parchment. Heat a skillet over medium heat and add olive oil (or butter). Add onion and cook until softened but not browned.

    Stir in garlic, dill, parsley, mint, and shoarma spice mix (if using) and cook just until fragrant.

    Use a clean tea towel to squeeze as much liquid as possible from the spinach; coarsely chop if needed. Add spinach to the skillet and heat through. Remove from heat and let cool slightly, then stir in egg and feta. Season with salt and pepper to taste.

    Assemble the Triangles

    While the phyllo is still wrapped, use a sharp knife to cut it into 3 equal sections (about 3″ wide strips). Work with one section at a time, keeping the remaining dough covered with plastic or a lightly damp towel to prevent drying.

    Place one strip of phyllo on the work surface and brush lightly with melted butter. Top with a second strip and brush again. Place about ½ tbsp of filling near the bottom corner. Fold the corner over the filling to form a triangle, then continue folding in a flag pattern up the strip, maintaining the triangle shape. Transfer to the prepared baking sheet.

    Bake

    Repeat with remaining phyllo and filling, spacing triangles slightly apart. Bake for 18–22 minutes, until crisp and golden brown.


    Notes

    Preparation

    • Spinach must be squeezed very dry to prevent soggy filling and torn phyllo.

    Variations

    • Shoarma Spice Mix: This is a non-traditional addition. Classic Greek spanakopita relies on fresh herbs rather than warm spice blends. Used sparingly here, it adds subtle warmth and depth; omit it for a fully traditional Greek flavor.

    Make-Ahead & Storage

    • Unbaked triangles may be frozen solid and baked from frozen, adding 3–5 minutes to the bake time.
  • Spaghetti & Meatballs

    Spaghetti & Meatballs

    This Spaghetti & Meatballs is built the way a great red-sauce Sunday dinner should be: deeply savory, richly tomatoey, and unapologetically comforting. The meatballs are intentionally tender and juicy—thanks to a buttermilk panade and a little gelatin—then roasted for browning before finishing in the sauce so everything tastes like it belongs together. It’s a big-batch, make-ahead-friendly classic that feels special on a weeknight and even better the next day.


    Ingredients

    Meatballs

    • 6 oz bread crumbs
    • 1½ cups buttermilk
    • 1 pkg (+/- ½ tbsp) powdered gelatin, bloomed in ¼ cup water
    • 3 eggs, slightly beaten
    • 1+ tbsp garlic, minced
    • ⅓ cup (packed) fresh parsley leaves, finely chopped
    • ½ tbsp table salt
    • ½ tsp pepper
    • 3 oz Parmesan cheese, grated
    • 6 oz prosciutto, finely chopped
    • 2 lbs ground beef
    • 1 lb ground pork

    Sauce

    • 2 tbsp olive oil
    • 1 cup (8-oz) onion, chopped
    • 5 cloves garlic, minced
    • 1 can (28-oz) crushed tomatoes
    • 1 can (15-oz) tomato sauce
    • 1 can (6-oz) tomato paste
    • 1½ cups chicken broth
    • ½ cup dry white wine (optional)
    • 1 tbsp fish sauce
    • 2 tsp dried basil
    • 2 tsp dried parsley
    • 1 tsp dried oregano
    • ½ tsp dried ground fennel
    • ¼ tsp dried thyme leaves
    • 2 whole cloves, crushed
    • 2 bay leaves
    • ½ tsp fresh ground pepper
    • 1 tsp table salt
    • 1–2 lbs dry spaghetti

    Directions

    Prepare the Oven and Pans

    Preheat oven to 450ºF with cooking racks mid-top and mid-bottom of oven.

    Place foil and wire racks in 2 half sheet pans; spray racks with cooking spray.

    Make the Meatballs

    Combine bread crumbs and buttermilk and stir to completely combine. Soak bread crumbs to fully hydrate, about 10 minutes, then mash into a paste.

    Bloom gelatin in ¼ cup cold water for 8–10 minutes.

    Place bread crumb mixture into a mixing bowl. Mix in bloomed gelatin, followed by all remaining ingredients except beef and pork; mix well to combine.

    Place meats in a large mixing bowl; pour egg/bread crumb mixture over meat and mix gently by hand until thoroughly combined.

    Portion and form into individual balls, about 3-oz each (29–30 meatballs). If necessary, refrigerate to firm.

    Place meatballs on the greased racks and bake for about 30 minutes, rotating trays and tray locations after 20 minutes.

    Make the Sauce

    In a Dutch oven over medium heat, heat olive oil until shimmering; add onion and garlic and sauté until onion is translucent and tender.

    Stir in crushed tomatoes, tomato sauce, tomato paste, chicken broth, wine (optional), and fish sauce; add remaining herbs, spices, and seasonings.

    Bring to a simmer, then reduce heat to low and simmer covered for 15 minutes.

    Braise the Meatballs in the Sauce

    After removing cooked meatballs from oven, lower oven temperature to 300ºF.

    Add meatballs to sauce; cover with lid and place in oven for 1 hour.

    Remove and discard bay leaves before serving.

    Cook the Pasta and Serve

    Prepare spaghetti as directed; drain, retaining some of the pasta water in a separate bowl.

    Add pasta back to the cooking pot along with a small amount of pasta water and about ¼ cup sauce; toss until pasta is coated.

    Serve pasta topped with meatballs, additional sauce, and grated Parmesan.


    Notes

    Preparation

    • Fish sauce can be replaced by 4–6 anchovy filets, finely minced.

    Serving Suggestions

    • Optional finish: garnish bowls with a light chiffonade of fresh basil and/or a sprinkle of fresh parsley for extra brightness.

    Variations

    • Parmesan can be swapped for a mixture of Parmesan and Romano cheeses.

    Make-Ahead & Storage

    • Can be made a day in advance and reheated.
    • Add ¾ cup water over mixture and reheat covered at 325ºF.
  • Ginger Caramel Chicken

    Ginger Caramel Chicken

    This Ginger Caramel Chicken leans into a Southeast Asian flavor logic that makes caramel chicken so addictive: sugar cooked down into a glossy glaze, fish sauce for deep savory backbone, rice vinegar for balance, and ginger + garlic for warmth and aroma. Palm sugar brings a rounded, toasty caramel note, while a final hit of fresh ginger, sesame oil, and lime keeps the finish bright and lively instead of heavy. It’s sweet-salty, sticky, and intensely flavorful—perfect over rice with plenty of cilantro and lime wedges on the side.


    Ingredients

      Chicken

    • 1½ lb boneless, skinless chicken thighs, trimmed (left whole)
    • 1½ lb boneless, skinless chicken breasts, cut into large pieces
    • 1–2 tbsp vegetable oil, as needed
    • ½ tsp table salt (lightly season the chicken)
    • Caramel Sauce

    • ½ cup brown sugar (preferably dark brown sugar)
    • ⅓ cup palm sugar, finely chopped or grated
    • ⅓ cup fish sauce
    • ⅓ cup rice vinegar
    • ½ cup chicken stock
    • 2 tbsp fresh ginger, finely grated
    • 5 cloves garlic, crushed
    • To Finish

    • 1–2 jalapeños, thinly sliced (to taste)
    • 1 bunch green onions, sliced
    • ½ cup roasted peanuts, coarsely chopped
    • 1 tbsp fresh ginger, finely grated (added at the end)
    • 1 tsp toasted sesame oil
    • Juice of ½ lime (plus more to taste)
    • Fresh cilantro leaves, for garnish
    • Lime wedges, for serving

    Directions

    Prepare the Sauce

    In a bowl, combine brown sugar, palm sugar, fish sauce, rice vinegar, chicken stock, 2 tbsp grated ginger, and garlic. Stir well (some palm sugar may not fully dissolve yet).

    Brown the Chicken

    Pat the chicken dry and season lightly with ½ tsp table salt. Heat a large, wide sauté pan or skillet over medium-high heat. Add 1 tbsp vegetable oil.

    Working in batches, brown the thighs first (good color on both sides), then transfer to a plate. Brown the chicken breast pieces briefly until lightly golden, then transfer to a separate plate. Do not overcrowd the pan.

    Build the Caramel

    Carefully pour the sauce into the hot pan. Bring to a boil, scraping up any browned bits. Boil over high heat until the sauce reduces to a glossy, syrupy consistency—similar to maple syrup and able to coat the back of a spoon.

    Glaze and Simmer

    Return the chicken thighs to the pan and turn to coat in the caramel. Cook 2–3 minutes.

    Add the chicken breasts, reduce heat to medium, and simmer gently 6–8 minutes, turning occasionally, until the chicken is cooked through and evenly glazed.

    Finish

    Add jalapeños (to taste), green onions, peanuts, and the remaining 1 tbsp fresh ginger. Cook 1–2 minutes, just until fragrant.

    Remove from heat and stir in sesame oil and lime juice. Taste and adjust lime or heat as desired.

    Serve

    Serve over steamed jasmine rice. Garnish generously with cilantro and serve with lime wedges on the side.


    Notes

    Preparation

    • Palm sugar substitution: If you don’t have palm sugar, use ½ cup dark brown sugar + an additional ⅓ cup dark brown sugar (for a total of ⅚ cup dark brown sugar).
    • Pan choice: A wide skillet helps the sauce reduce quickly and glaze the chicken instead of braising it.

    Serving Suggestions

    • This dish pairs especially well with a crisp green salad dressed in our homemade ginger dressing, which helps cut the sweetness of the caramel glaze and refresh the palate. For a simple vegetable side, lightly blanched green beans—kept clean and restrained with just a touch of garlic and sesame oil—add freshness and texture without competing with the main flavors. Served together over jasmine rice, the plate feels balanced, bright, and complete.
    • Jasmine rice is ideal, but it’s also great over sticky rice or alongside a simple cucumber salad.
    • Serve with extra lime wedges so everyone can brighten their bowl to taste.

    Variations

    • More heat: Add a spoonful of chili oil or sambal at the end (to taste) for extra kick without changing the glaze texture.
    • Heat control: For milder heat, remove jalapeño seeds and ribs before slicing.

    Make-Ahead & Storage

    • Refrigerate leftovers in an airtight container for up to 4 days.
    • Reheat gently on the stovetop with a small splash of water or stock to loosen the glaze.
  • Garlic-Sesame Green Beans

    Garlic-Sesame Green Beans

    These Simple Garlic–Sesame Green Beans are designed to be a quiet, versatile side—clean, fresh, and adaptable to a wide range of Southeast Asian and Indonesian-inspired dishes. Blanched until just tender-crisp, then lightly warmed with garlic and finished with a restrained touch of sesame oil, they provide contrast and balance without competing with bold mains like babi panggang, caramelized meats, or richly sauced stir-fries.


    Ingredients

    • 1 lb green beans, trimmed
    • 1 tsp kosher salt (for blanching water)
    • 1 tsp neutral oil
    • 1 small clove garlic, finely minced (optional)
    • ¼–½ tsp toasted sesame oil (to taste)
    • Pinch of table salt, to finish

    Directions

    Blanch the Green Beans

    Bring a large pot of water to a boil and season generously with kosher salt. Add the green beans and cook until just tender-crisp, about 2–3 minutes.

    Drain immediately and spread on a tray or plate to cool slightly. (Ice shocking is optional but not necessary if the beans will be used right away.)

    Warm and Season

    Heat a wide skillet over medium heat and add the neutral oil. If using garlic, add it and cook briefly just until fragrant—do not brown.

    Add the blanched green beans and toss to warm through, about 1–2 minutes. Remove from heat and drizzle lightly with sesame oil. Toss once more and season with a small pinch of table salt if needed.

    Serve

    Serve warm or at room temperature as a simple vegetable side.


    Notes

    Preparation

    • Keep the sesame oil restrained—it should add aroma, not dominate the dish.
    • Garlic is optional and can be omitted for an even cleaner, more neutral side.

    Serving Suggestions

    • Pairs well with Indonesian and Southeast Asian dishes such as babi panggang, ginger caramel chicken, grilled meats, and rice-based meals.
    • Works especially well alongside rich or sweet-salty mains, helping to refresh the palate.

    Variations

    • No sesame: Omit the sesame oil entirely for a fully neutral vegetable side.
    • Indonesian-leaning: Finish with a few drops of neutral oil infused with garlic or shallot instead of sesame oil.

    Make-Ahead & Storage

    • Blanch the green beans up to 24 hours ahead and refrigerate; finish just before serving.
    • Leftovers keep well for up to 3 days and can be enjoyed cold or gently reheated.
  • Ramen

    Ramen

    This modular ramen guide gives you several broth options, multiple tare (seasoning sauces), and a flexible set of toppings so you can build your ideal bowl—light and clear, rich and creamy, or deeply savory with miso or soy. To prepare a delicious bowl of ramen, choose one of the three broths and combine it with one of the four tare (flavoring sauces). Finish your bowl with items from the Prepare to Serve section or with your own favorite toppings.


    Ingredients

    Chicken Broth

    • 1 rotisserie chicken carcass, most skin and meat removed
    • ½ onion, quartered
    • ½ tbsp garlic, minced
    • 1 oz ginger, thinly sliced
    • 2 green onions, quartered
    • ½ cup sake
    • 3 qt cold water
    • 3 packets (¼ oz each) gelatin, bloomed on ½ cup cold water

    Chicken & Dashi Broth

    • 1 recipe mizudashi
    • 1 recipe chicken broth (above)

    Chicken & Pork Broth

    • 1 recipe chicken broth or chicken & dashi broth
    • 1–1½ tbsp (or 3–4 cubes) pork bouillon
    • 1 tbsp lard
    • ½ tsp xanthan gum

    Shio Tare

    • ¼ cup dashi
    • 2 tbsp sake
    • 1 tbsp mirin
    • 1 tbsp salt

    Shoyu Tare

    • ¼ cup dashi
    • ¼ cup soy sauce
    • 2 tbsp sake
    • 2 tbsp mirin

    Miso Tare

    • ½ onion, finely chopped
    • 1 clove garlic, minced
    • 1 tbsp ginger, finely minced
    • 1 green onion, white portion only
    • 2 tbsp smooth peanut butter
    • 1 tbsp sake
    • 2 tbsp mirin
    • 1 tsp rayu chili oil
    • ½ cup white miso paste

    Char Siu Tare

    Prepare to Serve

    • Traditional ramen noodles
    • Ajitsuke tamago (soft-boiled marinated egg)
    • Diced char siu
    • Sliced green onion
    • Bok choy
    • Nori sheets
    • Menma (fermented bamboo shoots)
    • Thinly sliced onion

    Directions

    Make the Chicken Broth

    Place the chicken carcass, onion, garlic, ginger, green onions, and sake into an Instant Pot. Add water to the maximum fill line. Using the sauté function, heat and simmer for about 30 minutes, skimming off any foam or impurities.

    Secure the lid and pressure cook on high for 45 minutes. Allow pressure to release naturally for at least 30 minutes.

    Strain broth through a lined fine-mesh strainer and discard solids. Adjust with water if the broth is overly strong. Stir in the bloomed gelatin until fully dissolved.

    Make the Chicken & Dashi Broth

    Combine 2 parts dashi with 3 parts chicken broth in a pot. Heat until small bubbles form but do not boil. Simmer gently for 10 minutes or up to 2 hours to intensify flavor, monitoring to prevent boiling or over-reduction.

    Make the Chicken & Pork Broth

    Dissolve pork bouillon into hot broth. Mix lard with xanthan gum until smooth and lump-free. Add to the broth and blend with an immersion blender until emulsified.

    Make Shio Tare

    Combine dashi, sake, mirin, and salt in a saucepan over low heat. Simmer until salt dissolves. Use 2–3 tbsp tare per 2 cups broth.

    Make Shoyu Tare

    Combine dashi, soy sauce, sake, and mirin in a saucepan over low heat. Simmer briefly. For deeper flavor, make 1 day ahead. Use 2–3 tbsp tare per 2 cups broth.

    Make Miso Tare

    Blend onion, garlic, ginger, green onion, peanut butter, sake, mirin, and rayu until creamy. Cook the mixture in a saucepan over low heat for about 3 minutes. Remove from heat, stir in miso, and blend until smooth. Use 2–3 tbsp tare per 2 cups broth and blend into broth with an immersion blender.

    Use Char Siu Tare

    Use 2–3 tbsp tare per 2 cups broth.

    Assemble the Ramen

    Cook ramen noodles according to package directions or your preferred texture.

    Combine your chosen broth with your chosen tare, starting with about 2 tbsp tare per 2 cups broth and adjusting to taste.

    Add noodles to bowls, ladle broth over the top, and finish with desired toppings.


    Notes

    Preparation

    • Adding bloomed gelatin to the chicken broth enhances body and gives a collagen-rich texture similar to tonkotsu.
    • Skimming foam during the initial simmer produces a clearer broth but may be skipped if cloudiness is acceptable.
    • The chicken & pork broth provides a simplified method to mimic tonkotsu without long boiling of pork bones.
    • Lard added to the pork broth contributes richness and a silky mouthfeel typical of pork-based ramen.
    • Xanthan gum helps emulsify fats into the broth for a smoother texture.

    Serving Suggestions

    • Customize toppings with mushrooms, corn, sautéed greens, chili crisp, or flavored oils.
    • Increase tare for a saltier, more intense bowl or reduce for a lighter profile.

    Variations

    • Use mushroom dashi for a vegetarian-friendly broth base.
    • Add a small amount of sesame paste to miso tare for a richer Hokkaido-style bowl.
    • Infuse the broth with garlic oil, chili oil, or schmaltz for additional complexity.

    Make-Ahead & Storage

    • Broths keep refrigerated for 4–5 days or frozen for up to 3 months.
    • Tare keeps refrigerated for 1–2 weeks; miso tare lasts longest due to its salt content.
    • Store toppings separately for best texture.
  • Ajitsuke Tamago — Marinated Ramen Eggs

    Ajitsuke Tamago — Marinated Ramen Eggs

    These marinated ramen eggs—ajitsuke tamago—bring that silky, jammy yolk and savory-sweet flavor you expect from a good bowl of ramen. A balanced shoyu-mirin marinade and a precise cook time create restaurant-quality results every time.


    Ingredients

      Eggs

    • 6 large eggs, room temperature
    • Marinade

    • ½ cup soy sauce or tamari
    • ½ cup water
    • ½ cup mirin
    • ¼ cup sake
    • 3 tbsp sugar (or ¼ cup for a sweeter flavor)
    • Optional Aromatics

      • 1 crushed garlic clove
      • 1 thin slice fresh ginger
      • 1 small piece kombu (1×2 in), added off-heat
      • 1 dried shiitake mushroom
      • ⅛ piece star anise

    Directions

    Make the Marinade

    In a saucepan over medium heat, combine soy sauce or tamari, mirin, sake, water, and sugar.

    Stir just until the sugar dissolves; do not boil.

    Remove from heat and add any optional aromatics.

    Cool quickly using an ice bath or refrigerate until fully chilled.

    Cook the Eggs

    Bring a pot of water to a rolling boil. Lower the eggs gently into the boiling water.

    Cook for 6 minutes 30 seconds for a softer, molten-jam yolk, or 7 minutes for a firmer, jammy yolk.

    Transfer immediately to an ice bath and chill completely.

    Peel carefully once cooled.

    Marinate

    Ensure the marinade is fully chilled.

    Place peeled eggs in the marinade and use a folded paper towel to keep them submerged.

    Refrigerate for 4–8 hours for ideal flavor, or up to 12 hours for a stronger cure.

    Serve

    Remove eggs from the marinade and rest at room temperature for 10–15 minutes before serving.

    Slice cleanly using a damp knife (wipe between cuts) or use plain dental floss for perfect halves.


    Notes

    Preparation

    • For the most consistent yolk texture, start with room-temperature eggs.
    • For a richer umami profile, kombu or dried shiitake are the most impactful optional aromatics.
    • Use a slotted spoon or spider skimmer to lower eggs into the water to prevent cracking.

    Serving Suggestions

    • Serve atop shoyu, shio, or Ramen.
    • Delicious with rice bowls, soba, or cold noodle dishes.
    • Can be served whole or halved depending on presentation preference.

    Variations

    • For sweeter eggs (common in tsukemen), use the full ¼ cup sugar.
    • Add a few drops of toasted sesame oil to the marinade for a nutty aroma.
    • For a soy-forward, darker exterior, increase soy sauce by 2–3 tbsp and reduce water accordingly.

    Make-Ahead & Storage

    • Marinated eggs keep well for 3–4 days in the refrigerator.
    • The flavor deepens with time; if storing longer, taste intermittently to avoid over-salting.
    • Store eggs fully submerged in marinade for best results.
  • Southern-Style Sausage Gravy

    Southern-Style Sausage Gravy

    Sausage gravy, a Southern staple, has been a Huggins family favorite for generations. No true Southern breakfast is complete without buttery biscuits smothered in creamy sausage gravy. The sage sausage pays homage to my grandma Lena — a true Southern lady who loved using sage in her cooking. I learned to make this gravy watching my mom prepare it time and time again in our family kitchen in Southern California. I may just be superstitious, but I swear the gravy tastes best when it’s made in my favorite cast iron pan!


    Ingredients

    • 1 lb sage breakfast sausage
    • ½ cup (1 stick) butter
    • ½ cup flour, lightly mounded
    • 4–6 cups whole milk, divided (start with 4 cups and add more to adjust thickness)
    • salt, to taste
    • freshly ground black pepper or white pepper, to taste

    Directions

    Cook the Sausage:

    In a large skillet or cast iron pan over medium heat, cook the sausage until browned and crumbled, breaking it into small pieces as it cooks. When fully cooked, push the sausage to one side of the pan, leaving the drippings in the skillet.

    Make the Roux:

    Add the butter to the sausage drippings and let it melt completely. Sprinkle the flour over the melted butter and drippings, stirring constantly to form a smooth paste. Cook the roux for 2–4 minutes, stirring continuously, until it turns a pale blond color and smells lightly nutty. Do not let it brown.

    Add the Milk:

    Reduce the heat to medium-low. Slowly pour in about 6 cups of the milk while whisking or stirring constantly, scraping along the bottom of the pan to prevent scorching (especially when using cast iron). Continue to cook and stir until the gravy thickens and begins to gently bubble.

    Finish and Season:

    Stir the cooked sausage back into the thickened gravy. If the gravy is thicker than you prefer, add additional milk ½ cup at a time, stirring well heating after each addition, until it reaches your desired consistency—smooth, creamy, and thick enough to coat the back of a spoon while still pouring easily.

    Season with salt to taste and a generous amount of freshly ground black pepper or white pepper. Traditional Southern-style gravy is fairly pepper-forward, so don’t be shy unless you prefer it milder.

    Serve:

    Serve hot over warm Buttermilk Biscuits. This gravy is also excellent with fried eggs, soft-scrambled eggs, or grated boiled eggs alongside your biscuits.


    Notes

    Preparation

    • Milk scorches easily, especially in cast iron. Once the milk is added, keep the heat at medium-low and stir frequently, scraping along the bottom of the pan.
    • A pale blond roux (2–4 minutes of cooking) helps remove any raw flour taste while keeping the gravy light in color and flavor.
    • The gravy will continue to thicken as it sits off heat. If it becomes too thick, gently rewarm and whisk in a little extra milk until it loosens to your preferred consistency.

    Serving Suggestions

    • Serve over hot buttermilk biscuits for a classic Southern breakfast.
    • Pair with fried eggs, soft-scrambled eggs, or grated boiled eggs for added protein and richness.
    • Try serving with hash browns, breakfast potatoes, or over toasted bread when biscuits aren’t available.

    Variations

    • Add a few drops of Worcestershire sauce to the gravy for deeper savoriness.
    • Stir in a dash of your favorite hot sauce (such as Crystal or Tabasco) for gentle heat that complements the sage and sausage.
    • If your sausage is not very sage-forward, add a tiny pinch of rubbed sage toward the end of cooking, tasting as you go to avoid overpowering the gravy.
    • Use white pepper instead of black pepper if you prefer a smoother look while keeping a robust, peppery flavor.

    Make-Ahead & Storage

    • Sausage gravy can be made up to 2 days in advance and cooled completely before refrigerating in an airtight container.
    • Reheat gently over low heat, adding a splash of milk as needed to loosen the gravy back to a smooth, creamy consistency.
    • For food safety, avoid leaving the gravy at room temperature for extended periods; promptly refrigerate leftovers.
  • North Woods Garlic Cheese Bread

    North Woods Garlic Cheese Bread

    This garlic cheese bread captures the rich, gooey, paprika-tinted flavor of the beloved North Woods Inn classic—warm, buttery, deeply savory, and loaded with cheddar. This version adds the option for an ultra-smooth melt while keeping the rustic cheese bits that make the original so iconic.


    Ingredients

    • ¾ lb cheddar cheese, grated (reserve ½ cup for pulsing in at the end)
    • 2 oz Romano cheese, grated
    • 8 oz butter, room temperature
    • 1 small clove garlic, grated (or ¾ tsp garlic powder)
    • 1 tsp Hungarian sweet paprika
    • ½ tsp Tabasco sauce
    • 2 tsp Worcestershire sauce
    • Optional: 1–2 tsp sodium citrate (for an extra-smooth, gooey melt)
    • salt, to taste
    • 2 loaves French or sourdough bread, sliced
    • Hungarian sweet paprika, for sprinkling after broiling

    Directions

    Prepare the Cheese Spread

    Combine all ingredients except ½ cup of the cheddar in a food processor. Blend until smooth, cohesive, and richly colored.

    Taste and adjust salt if needed—the mixture should be boldly savory.

    Add the reserved cheddar and pulse 2–3 times to leave small, visible cheese pieces suspended in the spread.

    Assemble & Broil

    Spread the cheese mixture generously onto sliced French or sourdough bread.

    Place under the broiler until the top is melted with darkened, blistered spots—this light caramelization is essential for authentic North Woods flavor.

    Remove from the broiler and lightly dust with Hungarian sweet paprika. Wrap in foil to keep warm until serving.


    Notes

    Preparation

    • French bread gives the most classic soft, gooey texture; sourdough creates a firmer, tangier base.
    • Sodium citrate is optional but helps the cheese melt into an ultra-smooth, cohesive layer without separating.
    • Taste the spread before adding salt—Romano and cheddar vary in saltiness.

    Serving Suggestions

    • Serve alongside steaks, ribs, or salad for a full North Woods–style meal.
    • Excellent as an appetizer when cut into strips or squares.

    Variations

    • Add a pinch of cayenne or smoked paprika for a spicy or smoky accent.
    • Use sharp white cheddar for a milder color and deeper tang.

    Make-Ahead & Storage

    • The cheese spread can be made up to 3 days ahead and refrigerated in an airtight container.
    • Bring to room temperature before spreading for smoothest application.
    • Bread is best enjoyed immediately after broiling.
  • Gnocchi

    Gnocchi

    Light, pillowy gnocchi made from baked potatoes for the best possible texture. Rooted in northern Italian tradition, this simple dish traveled across the Atlantic with generations of Italian immigrants and found a second home in Argentina. Our family’s version emphasizes gentle handling, minimal flour, and a buttery golden finish—echoing the gnocchi Jane enjoyed while living in the mountains of Argentina, where gracious families gathered around humble tables to share food, laughter, and the quiet joy of good company.


    Ingredients

    • 2 lbs (900 g) russet or Yukon Gold potatoes
    • ¾ tsp table salt
    • 1–1½ cups all-purpose flour (start with 1 cup; add only as needed)
    • 1 large egg, lightly beaten (see variation)

    Directions

    Bake the Potatoes

    Bake whole, unpeeled potatoes at 400°F (200°C) until tender, about 1 hour. Split immediately after baking to allow steam to escape—this prevents sogginess.

    Scoop out the flesh and rice or mash while still warm.

    Prepare the Dough

    Spread the riced potatoes out on a board or tray and allow to cool slightly until just warm to the touch. Sprinkle evenly with salt.

    Add about ¾ of the flour over the potatoes, then drizzle the beaten egg over the top. Using your hands or a bench scraper, gently fold and press the mixture together, adding only enough additional flour to form a soft dough.

    Turn out onto a lightly floured surface and gently knead for 15–20 seconds, just until smooth. The dough should feel soft and slightly tacky, but not sticky—avoid overworking.

    Shape the Gnocchi

    Roll dough into ¾-inch ropes. Cut into ¾–1 inch pieces using a bench scraper for cleaner cuts.

    Shape on a fork or gnocchi board if desired. Lightly dust formed gnocchi with semolina or flour to prevent sticking.

    Cook the Gnocchi

    Bring a large pot of salted water (as for pasta) to a boil. Cook gnocchi in 2–3 batches until they float, then cook 30 seconds longer. Remove gently with a strainer and keep warm.


    Notes

    Preparation

    • Russets make the lightest gnocchi; Yukon Golds give a slightly richer, denser texture.
    • Flour should equal roughly 20–30% of potato weight. Less flour yields lighter, more delicate gnocchi.
    • Chill dough for 10–15 minutes before shaping if it feels too soft.
    • Salt cooking water generously—about 1–2 tbsp per gallon.
    • Test one gnocchi before cooking the full batch. If it falls apart, gently knead in 1–2 tbsp more flour.
    • For best texture, avoid kneading more than 15–20 seconds.
    • Remember: once gnocchi float, cook for an additional 30 seconds.

    Serving Suggestions

    • Toss with Browned Butter Sage Sauce and finish with parmesan and a squeeze of lemon.
    • Sauté boiled gnocchi in butter until golden, then toss with a light cream sauce, browned mushrooms, spinach, and spicy Italian sausage.
    • Serve with Pomodoro, Pesto alla Genovese, or Gorgonzola Cream Sauce.

    Variations

    • Use 1 egg for pillowy, restaurant-style gnocchi. Add a second egg for a firmer, rustic dough.
    • Add a pinch of nutmeg and 1–2 tbsp ricotta for a richer dough (add flour as needed).
    • For a classic eggless northern Italian version, omit the egg and increase flour slightly to reach a soft, workable dough.

    Make-Ahead & Storage

    • Shaped gnocchi may be refrigerated on a lightly floured tray for up to 4 hours before cooking.
    • To freeze, arrange uncooked gnocchi in a single layer until solid, then transfer to a freezer bag. Cook directly from frozen—do not thaw.
    • Cooked gnocchi can be refrigerated for 2–3 days and pan-seared in butter just before serving.
  • Nacho Cheese Sauce

    Nacho Cheese Sauce

    This smooth and flavorful nacho cheese sauce blends cheddar, colby jack, green chiles, warm spices, and a touch of cream cheese for richness—perfect for dipping, drizzling, or spooning over anything that needs a bold, melty kick.


    Ingredients

    • 2 tbsp butter
    • ¼ tsp powdered annatto (optional)
    • ¼ tsp garlic powder
    • ¼ tsp onion powder
    • ¼ tsp ground cumin
    • ¼ tsp chipotle chile powder
    • 2 tbsp flour
    • 1½ cups milk
    • 1½ tsp sodium citrate (optional)
    • 4 oz cream cheese, cut into small chunks
    • 4 oz cheddar cheese, grated
    • 4 oz colby jack cheese, grated
    • ½ tsp table salt
    • ¼ tsp fish sauce (optional)
    • 2–4 oz diced green chiles

    Directions

    Make the Sauce

    Heat butter in a skillet over medium heat. When melted and bubbling, add annatto (if using) and bloom for 15 seconds.

    Add garlic powder, onion powder, cumin, and chipotle chile powder; whisk briefly to bloom the spices. Add flour to form a roux and cook until the mixture is bubbling and the raw flour scent dissipates.

    Dissolve sodium citrate in the milk, then whisk the milk mixture into the roux. Continue whisking until the mixture thickens and reaches a gentle boil.

    Whisk in the cream cheese until fully incorporated. Remove the skillet from heat.

    Add the cheddar and colby jack a handful at a time, whisking thoroughly between additions until smooth. Stir in salt, fish sauce (if using), and green chiles.


    Notes

    Preparation

    Powdered annatto gives a warm reddish color and mimics classic cheddar coloring. It is a natural antioxidant with additional health benefits.

    Sodium citrate enhances smooth meltability, adds gentle tanginess, and helps prevent the sauce from separating. Increasing to 1½ tsp improves stability, especially during reheating.

    Fish sauce adds subtle umami depth and rounds out the flavors but remains undetectable as a distinct ingredient.

    Serving Suggestions

    For extra heat, stir in a splash of your favorite hot sauce just before serving.

    Pickled jalapeños or 1–2 tsp jalapeño brine may be added for brightness and acidity.

    Variations

    Optional Add-Ins:

    • Diced pickled jalapeños
    • Jalapeño brine for acidity
    • Extra green chiles for mild heat

    These additions adjust heat and acidity without changing the core sauce flavor.

    Make-Ahead & Storage

    Store cooled sauce in an airtight container for up to 4 days.

    Reheat gently over low heat on the stovetop or in the microwave in 20–30 second bursts, stirring between intervals.

    If the sauce thickens during storage or reheating, whisk in 1–3 tbsp milk as needed to adjust consistency.

  • Ensalada Serrana — Peruvian Mountain Salad

    Ensalada Serrana — Peruvian Mountain Salad

    This bright, colorful, heavily-dressed salad from the Andean highlands of Peru brings together tender vegetables, a creamy oregano-lime dressing, and the sweet earthiness of beets—a refreshing side inspired by the rustic cooking of Central Peru. It’s simple, vibrant, and pairs beautifully with grilled meats or roasted chicken.


    Ingredients

      Dressing

    • ¾ cup mayonnaise
    • ¼ cup whole milk
    • juice of 1 lime
    • 1 tbsp prepared yellow mustard
    • 1 tsp garlic, minced
    • 1 tbsp dry Mexican or Peruvian oregano, crushed
    • ½ tsp black pepper, coarsely ground
    • ¼ tsp kosher salt (to taste)
    • ½–1 tsp ají amarillo paste (optional)
    • ¼ cup water
    • Salad

    • 4 oz fresh green beans, strings removed and halved
    • 2 small carrots, thinly sliced on a bias or julienned
    • 1 large beet, roasted until tender and sliced
    • 1 large tomato, cored, seeded, and sliced into strips
    • ½ cup frozen peas, defrosted
    • 2 oz lettuce, washed and spun dry
    • ½ cup dressing (from above)

    Directions

    Make the Dressing

    In a blender, combine all ingredients except the water; blend until smooth and creamy. Thin with water to reach your desired consistency. Adjust salt to taste. Dressing will thicken in the refrigerator; thin with additional water as needed.

    Prepare the Salad

    Blanch green beans for 4–5 minutes, or until crisp-tender; transfer immediately to a bowl of ice water. Blanch carrots until crisp-tender and add them to the same ice water bowl. Dry beans and carrots thoroughly. Combine beans, carrots, and remaining salad ingredients in a large bowl; toss gently with dressing.


    Notes

    Preparation

    For the optional ají amarillo paste, you can create a reasonable substitute by blending 1 roasted, peeled, and seeded yellow or orange bell pepper with ½ of a seeded habanero. This provides similar fruitiness and gentle heat.

    Beets can be roasted ahead of time and chilled until ready to assemble the salad.

    Serving Suggestions

    This salad pairs beautifully with roasted chicken, grilled steaks, anticuchos, or Peruvian-style rice dishes.

    Variations

    Try adding thinly sliced red onion, diced avocado, or boiled potatoes for a heartier version.

    Make-Ahead & Storage

    Store dressing separately from the vegetables to keep the salad crisp.

    • Dressing keeps 4–5 days refrigerated.
    • Prepared vegetables keep 2–3 days in an airtight container.
    • Toss just before serving for best texture.
  • Soft Gingerbread Men

    Soft Gingerbread Men

    Cookies are serious business around our house. Baking dozens of cookies in all varieties is part of our holiday tradition. The box of cookies in the photo held just a sampling of treats baked for our annual Christmas Eve party—and these soft gingerbread men are always a crowd pleaser.


    Ingredients

    • 1 cup packed brown sugar
    • ½ cup butter + ¼ cup shortening (or ¾ cup shortening for a more traditional texture)
    • ¼ cup molasses
    • 1 tbsp honey or dark corn syrup (optional, for extra softness)
    • 1 large egg
    • 2 tsp baking soda
    • 1 tsp ground cinnamon
    • 1 tsp ground ginger
    • 1½ tsp ground cloves
    • ¼ tsp table salt
    • 2¼ cups all-purpose flour

    Directions

    Make the Dough

    In a large bowl, beat together brown sugar, butter, shortening, molasses, honey (if using), and egg until smooth and creamy. Stir in baking soda, cinnamon, ginger, cloves, and salt. Gradually mix in flour until fully incorporated.

    Cover dough and chill for at least 3 hours or overnight, until firm enough to roll.

    Roll and Cut

    Preheat oven to 375°F (190°C). Roll chilled dough between sheets of parchment paper dusted with confectioners’ sugar (instead of flour) to about ¼-inch thickness. Cut into desired shapes using cookie cutters.

    Transfer cookies to a baking sheet lined with parchment paper or release foil.

    Bake

    Bake for 10–12 minutes, or until cookies are fragrant and edges are just set—they’ll continue to bake on the sheet after removal. Avoid overbaking to keep them soft.

    Cool cookies on the baking sheet for several minutes before transferring to a wire rack to cool completely.

    Optional Glaze

    For a glossy finish, whisk together 1 cup confectioners’ sugar, 1–2 tbsp milk, and ½ tsp vanilla or lemon juice. Brush lightly over warm cookies and allow to set.


    Notes

    Preparation

    • Rolling between parchment prevents sticking and eliminates the need for added flour, keeping cookies tender.
    • Adding honey or corn syrup creates a slightly chewier texture.
    • For an even softer cookie, slightly underbake and store while still a bit warm.

    Serving Suggestions

    • Decorate with royal icing, sanding sugar, or a drizzle of glaze.
    • Serve alongside hot cocoa, Anijsmelk, or Aunt Laurie’s Pumpkin Spice Steamer for a cozy holiday pairing.

    Make-Ahead & Storage

    • Dough can be chilled up to 3 days or frozen up to 1 month; thaw in the refrigerator before rolling.
    • Baked cookies keep for about 1 week in an airtight container at room temperature.
    • To retain softness, store with a slice of bread or a piece of apple in the container.
  • Anijsmelk — Dutch Star-Anise Steamer

    Anijsmelk — Dutch Star-Anise Steamer

    Anijsmelk, the classic star-anise–flavored steamer of the Netherlands, is one of my favorite Dutch treats—simple, soothing, and steeped in nostalgia. Traditionally made by stirring anise-flavored sugar cubes (Anijsblokjes) into warm milk, it’s a comforting drink to warm your soul on a cold winter’s night. This homemade version captures that flavor with whole star anise and a touch of sweetness.


    Ingredients

    • 1 qt milk
    • 5–10 whole star anise
    • ⅛ tsp ground anise seed (optional, for rounder flavor)
    • 1–4 tbsp sugar, to taste (about 1 tsp per cup)
    • Small knob of butter or splash of cream (optional, for richness)

    Directions

    Infuse the Milk

    In a medium saucepan, warm the milk with the star anise over medium-low heat until steaming but not boiling. Reduce heat to low and let steep gently for 5–10 minutes, tasting occasionally to check flavor strength.

    Finish the Drink

    When the milk reaches your desired anise intensity, remove from heat and discard the star anise pods. Stir in sugar to taste and, if desired, add a small knob of butter or splash of cream for extra richness. Whisk briefly to create a light froth.

    Serve

    Pour hot into a teacup or mug and enjoy immediately. Optionally dust with a pinch of ground anise or cinnamon. Serve alongside a small Dutch biscuit or slice of buttered bread for an authentic touch.


    Notes

    Preparation

    • For the most authentic flavor, use a mix of whole star anise and a small pinch of ground anise seed.
    • Warm gently—avoid boiling, which can cause the milk to curdle or the flavor to become harsh.
    • Steep covered to preserve the delicate aroma of the anise.

    Serving Suggestions

    • Traditionally enjoyed as a bedtime drink or on cold evenings.
    • Serve in a warm ceramic cup with a dusting of ground anise, cinnamon, or nutmeg.
    • Pair with speculaas cookies or buttered toast for a cozy Dutch treat.

    Variations

    • Substitute honey or vanilla sugar for a more nuanced sweetness.
    • Add a drop of almond or vanilla extract for a gentle twist.
    • For a creamier version, replace 1 cup of milk with light cream.
  • Pão de Queijo — Brazilian Cheese Rolls

    Pão de Queijo — Brazilian Cheese Rolls

    Crisp on the outside and chewy within, these Brazilian cheese rolls—known as Pão de Queijo—are irresistibly airy and full of cheesy flavor. Made from tapioca flour, they’re naturally gluten-free and come together quickly in a blender for an easy, crowd-pleasing treat.


    Ingredients

    • 1 egg
    • 1 cup milk
    • ½ cup vegetable oil
    • 1¾ cups tapioca flour
    • ½ cup parmesan, grated
    • ½ cup mozzarella, cheddar, or jack cheese, grated
    • ½ tsp table salt

    Directions

    Prepare the Batter

    Preheat oven to 350°F (175°C). Spray a 24-cup mini muffin tin with nonstick cooking spray.

    In a blender, combine egg, milk, and oil. Blend for 30 seconds, then add the remaining ingredients and blend for another 30 seconds until smooth.

    Bake

    Pour batter into the prepared muffin cups, filling each about ¾ full. Bake for 20–25 minutes, or until the cheese rolls are puffed and golden.

    Serve warm for the best texture. Makes about 35–40 cheese rolls.

    Store

    Allow cheese rolls to cool completely before storing. Place in an airtight container and refrigerate up to 3 days or freeze up to 1 month. Reheat in a 350°F oven for 5–10 minutes until warmed through.


    Notes

    Preparation

    • Avocado oil is preferred, but olive oil or any neutral vegetable oil works well.
    • Tapioca flour gives Pão de Queijo its signature chewy texture—do not substitute with wheat flour.

    Serving Suggestions

    • Serve as a snack, breakfast bread, or alongside soups and stews.
    • Enjoy warm with butter, cream cheese, or fruit preserves for a sweet-savory contrast.

    Variations

    • Add ½ tsp garlic powder or minced herbs for extra flavor.
    • Swap in pepper jack for a spicy version or gouda for a milder flavor.

    Make-Ahead & Storage

    • Refrigerate baked rolls up to 3 days in an airtight container.
    • Freeze baked or unbaked batter portions up to 1 month.
    • Reheat frozen rolls directly in a 350°F oven for 10–12 minutes until hot and crisp.
  • Fried Rice with Shrimp & Char Siu

    Fried Rice with Shrimp & Char Siu

    Fried rice has always held a place of honor in our family meals—a dish that somehow feels both humble and celebratory at once. This version, with smoky char siu pork, tender shrimp, and crisp-tender vegetables, brings bold flavor and perfect balance to the table. The rice stays dry and lightly toasted, the shrimp are just sweet enough, and every bite carries the deep, savory notes that only come from a hot wok. It’s the kind of meal that fills the house with warmth and pulls everyone to the table—laughing, reaching for seconds, and sharing stories long after the plates are empty. Simple in spirit, but rich in tradition, it’s one of those dishes that reminds us why we love gathering together for a family meal.


    Ingredients

      Sauce / Seasoning Mix

    • 3 tbsp water
    • 2 tbsp light soy sauce
    • 1 tbsp dark or mushroom soy sauce
    • 1 tbsp oyster sauce
    • 1½ tbsp Shaoxing wine (or michiu)
    • 1 tsp sugar
    • ½ tsp chicken bouillon powder
    • ½ tsp white pepper
    • ½ tsp MSG (optional, for depth)
    • Slurry: 1 tsp cornstarch + 1 tsp water (optional, for thicker coating)
    • ½ tsp toasted sesame oil (add off heat, at the end)
    • Vegetables & Aromatics

    • 2–3 tbsp high-heat neutral oil (vegetable, peanut, or canola)
    • 1 medium onion, diced
    • 2 jalapeños, seeded and finely diced
    • 1 red bell pepper, diced small
    • ½ cup carrots, diced or julienned, blanched & patted dry
    • ½ cup celery, finely diced, blanched & patted dry
    • ½ cup green beans, cut into 1-inch pieces, blanched & patted dry
    • 2 cloves garlic, minced
    • 1 tbsp fresh ginger, grated or minced
    • ⅔ cup green onions (scallions), sliced — white parts for cooking, green parts for garnish
    • Proteins

    • 16 oz shrimp, cleaned, deveined, and thoroughly dried
    • 16 oz Char Siu, diced small
    • 3 large eggs, beaten
    • Rice

    • ~5 cups day-old jasmine rice (about 40 oz cooked), chilled and separated
    • Fresh Garnishes

    • Chopped cilantro
    • Reserved green onion tops
    • Lime wedges or a light squeeze of fresh lime juice
    • Optional: pinch of chili flakes or splash of fish sauce

    Directions

    Prepare the Sauce

    In a small saucepan, combine water, both soy sauces, oyster sauce, Shaoxing wine, sugar, chicken bouillon, white pepper, and MSG (if using). Bring to a gentle simmer and reduce slightly to concentrate flavor. Add slurry only if a thicker coating is desired. Remove from heat, stir in sesame oil, and set aside.

    Blanch & Dry the Vegetables

    Blanch carrots, celery, and green beans briefly (carrots & celery ~1 min; green beans ~2–3 min). Drain well, spread on paper towels, and pat dry completely before stir-frying.

    Cook Proteins Separately

    Heat wok over high heat. Add 1 tbsp oil and sear shrimp until just pink and cooked through; remove and set aside. Add char siu to the hot wok and fry until lightly caramelized on the edges; remove and set aside.

    Scramble the Eggs

    Add a drizzle of oil, then pour in beaten eggs. Let them set slightly before breaking into bite-sized curds. Remove and set aside.

    Stir-Fry Aromatics & Vegetables

    Wipe the wok clean if needed, then add 1 tbsp oil. Add onion and jalapeños; stir-fry until softened. Add garlic and ginger, cooking just until fragrant. Add bell pepper, carrots, celery, and green beans. Stir-fry until crisp-tender and slightly dry. Add white parts of the scallions and toss briefly.

    Fry the Rice

    Add more oil if needed. Increase heat to high. Add chilled rice, breaking up clumps with a spatula. Spread across the wok and let it rest for 20–30 seconds between stirs to allow slight browning and remove moisture. The rice should fry, not steam.

    Combine & Sauce

    Push rice aside to clear the center. Pour in sauce directly onto the hot metal to reduce briefly before folding into rice until evenly coated. Add shrimp, char siu, and scrambled eggs; toss rapidly to combine. Cook another 1–2 minutes over high heat.

    Finish & Garnish

    Turn off heat. Add a light squeeze of lime juice, toss once more, and taste for seasoning. Garnish with cilantro, scallion greens, and optional chili flakes. Serve hot.

    Notes

    Preparation

    • Well-dried, day-old rice is key. If using freshly cooked rice, spread it on a tray and refrigerate uncovered for at least 2 hours to dry out.
    • Use minimal oil and ensure vegetables are dry before stir-frying to prevent steaming.
    • Only add enough sauce to lightly coat the rice — start with about ¾ of the mix and add more as needed.
    • For better heat control at home, cook in two smaller batches to avoid steaming and maintain wok heat.